This FAQ provides a comprehensive overview of how to configure your Reftab User Portal, including customization options for branding, portal behavior, loan settings, and automated email notifications related to reservations.
Table of Contents
Step 1: How to add Custom Branding to your User Portal
Step 2: Portal Settings Before Allowing Access
Step 3: Loan Settings Before Allowing Access
Step 4: Email Triggers related to Reservations
Step 5: Configure Access Roles for User Portal access
Step 1: How to add Custom Branding
Click on Settings on the top right, then on then “Request Portal” a.k.a. “User Portal”.

Step 1a: User Portal Settings
Once there you will notice all of your portal settings. The first four settings, as shown below, are the main options for Custom Branding your portal.
Step 1b: Custom Company Portal Name
Here, you can customize the name that appears on your User Portal.

Step 1c: Custom Portal logo
Here, you can upload your company logo to display on the User Portal. Click on the button “Upload Portal Image” to add your image.

Step 1d: Custom Portal Color
Customize your primary portal color by clicking the color picker and selecting a shade with your mouse or entering your desired RGB values.

Step 1e: Custom Domain
You can also set up your own custom domain so that “reftab.com” is no longer part of the URL.

Step 2: Portal Settings Before Allowing Access
Now let’s set up additional User Portal settings, including custom loan notes, visibility of empty categories, portal notices, and user loan preferences.
Step 2a: Custom Loan Notes Label
The “Custom Loan Notes Label” lets you rename the “Loan Notes” field in the User Portal. For example, you can prompt users to enter a class number or any info you need.

Example of customized loan notes:

Step 2b: Display Categories With No Available Assets
Display Categories With No Available Assets
We recommend turning this setting On. Even if assets are currently assigned, users can still see and book them for future use. If set to Off, categories with no available assets will be hidden until the items are checked back in.

Step 2c: Custom portal information / notice display
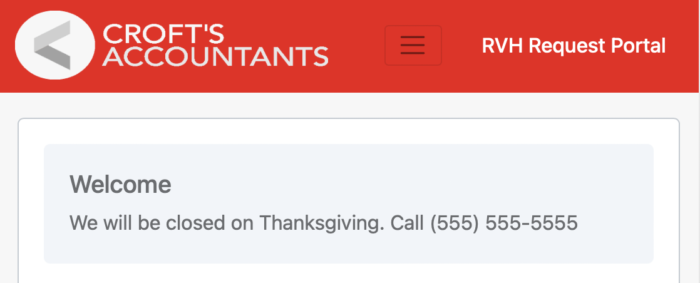
The “Custom Portal Information/Notice Display” option lets you show a message at the top of the portal. For example, you could display notices like “We will be closed on Thanksgiving. Call (555) 555-5555,” as shown below.

Example of the Welcome Message:
Step 2d: Portal Loan Setting
Another important setting on this page is “Portal Loan Setting.” If you want users to reserve items and have an admin manually check them out at pickup, set this option to “Reserve Only.”

Step 3: Loan Settings Before Allowing Access
Click on Settings on the top right, then on “Loan / Reservation Options“

Step 3a: Configure your Loan options for User Portal
The options below apply specifically to loans and reservations. They are not needed for the Portal, but are worth ensuring they match your policies. A value of “0” means unlimited.
Step 3b: Maximum Loans Amount
This value sets how many loans a user/loanee can have checked out at one time.

Step 3c: Maximum Reservation Amount
This value sets how many Reservations a user/loanee can have at one time.

Step 3d: Amount of Days into the Future Reservations can be Scheduled (in Days)
This value sets how many days in the future in which Reservations can be scheduled.

Step 3e: Maximum Overdue Loan Limit Amount
This value sets how many loans that are overdue that are allowed before new checkouts may occur.

Step 3f: Reservation Early Fulfillment (hours)
This value sets in hours that a Reservation can be fulfilled before its set start time.

Step 3h: Reservation Buffer Time (minutes)
This value sets in minutes a buffer time for new Reservations before the previous Reservation.

Step 4: Email Triggers related to Reservations
Click on Settings on the top right, then on “Email Settings / Logs” on the left.

Step 4a: Custom Email notifications & cc/bcc options.
Reftab lets you send custom email notifications based on specific conditions. In Email Settings / Logs, you can add CC or BCC recipients to notify additional admins or staff.

Step 4b: Examples of other emails to configure.
In the example above, Mike is CC’d on every Reservation Submission—useful if he needs to prepare the reserved items. Additional email notification options include:
- Loan Return
- Bulk Reservation Submission
- Overdue Loan / Accessory / License
- Reservation Reminder
For more information on Custom Emails you can check out our Email Configuration FAQ.
Step 5: Configure Access Roles for User Portal access
Found in Settings on the top Right, then Access Roles on the left, you will need to have a custom role with portal settings.
In order to see and use the user portal, the Loan Rights setting must be set either to:
“Portal Access with Loan Restrictions“, OR ” “Portal Access without Loan Restrictions“
Learn more by accessing our configure Access Roles FAQ.

Need Help?
If you have any questions please reach out to help@reftab.com and our Support Team will be more than happy to help!