Reftab includes a very powerful report builder. This query based reporting allows you to report on almost everything in your Reftab account. After running a report, you may export the results to an Excel file or to a CSV file.
In this guide, we will go over:
2. How to Export that Report to Excel
1. How to run a report
First and foremost, head to the Reports tab in your Reftab account. From here you have the option of creating a New Report or running a pre existing report. We are going to run an, “Assets on Loan” Report. To do this, our first argument will be Show Assets.

After choosing your first argument from the list above, (for this guide, Assets), you are able to add certain conditions.
In order to find all Assets on Loan, click “Add Condition” With a: [Loan] [status] [is] [out].
You can then click Run Report.

2. How to Export a Report to Excel
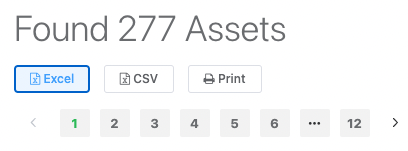
As a result of running your report you will be given a table with all of your Assets with the Loan Status of Out. In order to export this Report, simply click the corresponding button.
Next, you will be given the options of Excel, CSV, or Print.

Finally, click the Excel option.
You can then name your file and save it. Once saved, you are able to open this file directly in Excel.
Other types of Reftab Reports:
Reportable categories in Reftab include:
- Assets
- Kits
- Loans
- Reservations
- Locations
- Accessories
- Licenses
- Loanees
- Maintenance Reports
- Upcoming Maintenance
- Consumable Transactions
- Asset Changelogs
- Loan Verifications
Examples of Other Reports
- Display All Assets:
- Select Show: Assets
- Check desired boxes for fields to display
- Run Report – All assets across all locations and categories will display and include selected field data.
- Display All Current Loans:
- Select Show: Loans
- Click “Add Row”
- Select Where: Loan Status is Out
- Run Report – All current loaned items will display for each loanee and sub-account.
- Display Loan History for Individual Loanee:This report uses an example loanee, “John Smith” and will show current and historical loans.
- Select Show: Loans
- Click, “Add Row”
- Select Where: Loan, Loanee is John Smith
- Run Report – All past and current asset loan history of John Smith will display.
- Display Upcoming 30 Day Scheduled Maintenance:This report assumes you have assets with scheduled maintenance already configured.
- Select Show: Upcoming Maintenance
- Click, “Add Row”
- Select Where: Maintenance, Start, Greater Than, Now
- Click, “Add Row”
- Select Where: Maintenance Start, Less Than, Next Month
- Run Report – All assets that have scheduled maintenance within 30 days will appear.
- Display Loan History for Individual Asset:
- Select Show: Loans
- Click, “Add Row”
- Select Where: Asset, Asset Id is 1234
- Run Report – All past and current loan history for Asset ID: ‘1234’ will display.
- Display All Checked Out Assets Where Warranty Expires in the year 2025:This report assumes your assets have a field for, “Warranty Expires”
- Select Show: Assets
- Check box for ‘Warranty Expires’ field
- Click, “Add Row”
- Select Where: Asset, Warranty Expires, Greater Than (date), 12/31/2024
- Click, “Add Row”
- Select Where: Asset, Warranty Expires, Less Than (date), 1/1/2025
- Click, “Add Row”
- Select Where: Loan, Status, Is, Out
- Run Report – All currently checked out assets where the warranty expires in the year 2025 will appear.
- Display All Assets Where Warranty Expires “Next Month”:This report assumes your assets have a field for, “Warranty Expires”. This is a relative report and ideal to run as a scheduled job.
- Select Show: Assets
- Check box for ‘Warranty Expires’ field
- Click, “Add Row”
- Select Where: Asset, Warranty Expires, Greater Than, Now
- Click, “Add Row”
- Select Where: Asset, Warranty Expires, Less Than, Next Month
- Run Report – All assets where the warranty expires next month will appear.
As you can see, report designs can become complicated if you choose so. Reports can also be run on Locations, Accessories, Licenses and Kits