How to Integrate Lansweeper with Reftab
Lansweeper is one of the most widely used, auto-discovery tools for IT professionals. It is a data aggregation tool that can scan your network and discover connected devices.
By integrating Lansweeper into Reftab, you can automatically add discovered devices to your Reftab account to better help keep track of your assets. For example, Reftab can check equipment in and out to users and send ‘Custody Verification Requests‘.
One of the main functions of Reftab is to be able to track the lifecycle of all assets – not just networked assets. It’s a major time savor and security advantage to automatically populate Reftab with network discovered assets, so that you have a single pane of glass for all assets, at all locations, and know every device being used by users.
If you’re looking to disconnect Reftab from Lansweeper click here
Know Before You Start
Before enabling the Lansweeper integration, ensure your assets include a valid serial number.
To avoid duplicate asset creation and ensure accurate matching, assets must include:
- Serial Number
Assets missing a serial number may be skipped during synchronization.
Configuration Steps to add Reftab to Lansweeper
Step 1: You’ll want to make sure you have Lansweeper installed on your network and you’ll need admin access to Lansweeper and Reftab.
Step 2: Log into Reftab as an administrator and click “Settings” > “Integrations“. Find Lansweeper and click “Link Reftab“

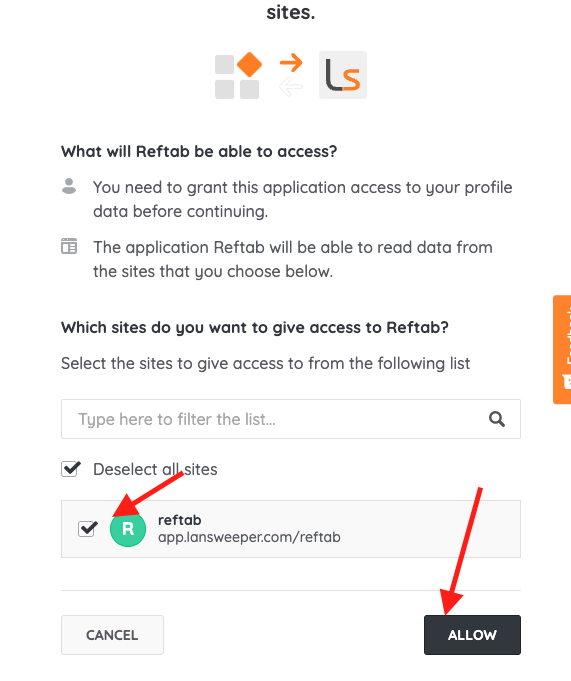
Step 3: Next, the authorization window will appear. Select the sites you want to sync from (or click “Select all Sites”) and click “Allow“:
Step 4: Next, the auth window will disappear. You should see then see “Linked” appear in green on the Lansweeper Integration in Reftab. Click “Configure“

Step 5: Next, you will need to map the Lansweeper “Asset Types” to “Reftab Categories”.

For example, in Reftab’s Lansweeper lab environment, under “All Assets” I can look at the type column. I see I have items listed as “Mobile”, “Streaming Dongle”, “Computer” , “Monitor”, etc.

Therefore, in our Reftab account, in the Lansweeper configuration settings, we want “Computer” to map to Laptops and “Monitor” to map to Monitors.

(Even though we have other category types mapped like, “Desktop”, our Lansweeper has nothing saved with the type of, “Desktop”. This means, nothing will be passed from Lansweeper to Reftab as a Desktop type and no assets will be created as Desktops.)
Step 6) Next you’ll need to map the “Sites” from Lansweeper, to “Reftab Locations”. The same logic applies here as it does with the category to site mapping. Your assets in Lansweeper will need to be saved to sites and then those specific sites will need to be mapped to a location in Reftab.
Step 7) Click “Save Lansweeper Settings” when done.
It’s useful to note that Reftab maps on the serial number of the device, so as long as the device has a serial number and it is mapped, no duplicates will be created.
Field Mappings
Step 7: Below is a list if data attributes used Lansweeper assets. You will need to add the fields you want synced so that the assets in Reftab display asset details. To add fields within Reftab, click “Asset Categories” and select your category and click “Add Field“. Then, drag and drop the field to the right-side column and click “Save Category”.
For example, if you want to map the field “Operating System”, enter “Operating System” into Field Name and select “Text” as Field Type. Click “Save Field” when done. Then, drag-and-drop the newly saved field to the category you wish to display it on.

The fields below are displayed as “Field Name” and “Field Type”
- Name -> text
- Category -> text
- Manufacturer -> text
- Model -> text
- Serial Number -> text
- Product Name -> text
- SKU -> text
- Serial -> text
- Purchase Date -> date
- Warranty Date -> date
- Location -> geolocation
- Building -> text
- Department – text
- Branch Office -> text
- Barcode -> text
- Operating System -> text
- OS Version -> text
- User Email -> text
- Antivirus Up To Date -> text
- Antivirus -> text
- Hard Drive Size -> text
- RAM -> text
- Resolution -> text
- Core Count -> text
- Processor -> text
- Mac Address -> text
- Last IP Address -> text
Save and Sync
Step 8: You should see a notice saying the Lansweeper settings were saved. Close the configuration window and click “Sync Now“.

Step 9: Once the sync completes, you should see a success notice and a date and time populate. Next, click on your location(s) in Reftab and you should see assets populated into the categories you’ve mapped in the steps above.
How to Disconnect Reftab from Lansweeper
Note, you can choose to simply disable the integration from the ‘configure’ screen. Otherwise, to fully disconnect, follow below steps:
- Log into Reftab as an administrator.
- Click “Settings” > “Integrations” > find the Lansweeper section and click “Configure”
- Scroll to bottom and click “Delete“

4. Next, Confirm Delete on the window that pops up.
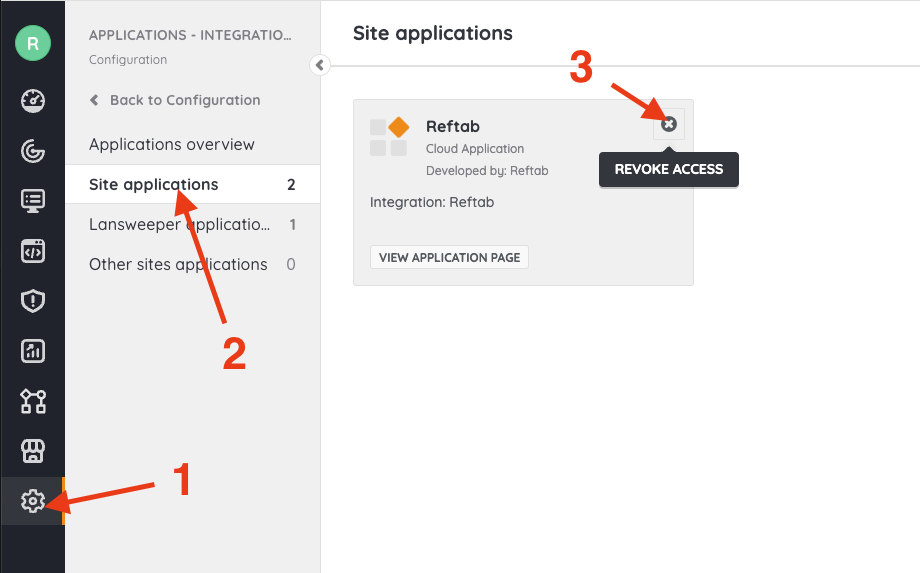
5. Next, Log into Lansweeper as an administrator
6. Click the “Gear” icon and click “Site Applications“. Find Reftab and click “X” to revoke access.
6. Next, click your profile icon in the bottom left corner. Click “Authorized Applications“. Find Reftab and click the checkbox. Click the “X” to Revoke Access.

Reftab is now fully disconnected from your Lansweeper environment.
Suggested Next Steps
How to Auto-Assign Asset Locations via Loanee Fields in Workflows
Utilize automated workflows to update asset locations based on dynamic custom loanee fields.
Need help? We're here for you
For any questions or assistance, feel free to reach out to us.
Your assets, simplified. Begin your journey with us!
50 assets free forever with unlimited inventory & software tracking. Includes email alerts, mobile apps, reports, custom asset tags and more.