How to Setup Email SMTP Settings with Office365 OAuth2 Authentication with Reftab
1. Log into https://portal.azure.com/ and navigate to Azure Active Directory.
2. On the left-side panel, click “App Registrations” > “Add“ > “App Registration“

3. Next, name the app “Reftab SMTP” and click “Register“

4. You will be automatically redirected to the new application settings page. (If not, click ‘overview’ on the left side panel). Under the “Essentials” section, copy and paste them into a note pad.
- Application (Client) ID

5. Next, on left side click “Certificates & Secrets“

6. Next, click “New Client Secret” and set a Description and set the Expiration date to 24 months.

7. At bottom, Click the “Add” button. A new client secret will be generated.
8. Copy the secret BEFORE refreshing the page. Once the page is refreshed, the secret cannot be copied any longer and will need to be entered manually (later).
9. Log into Reftab at: https://www.reftab.com/login as an administrator.
10. Click “Settings” > “Email Settings / Logs” > “Edit SMTP Settings“

11. Complete the required fields with the inputs below:
- Sender Email: Azure AD email address that will be used as sender in the emails. (Note: user must exist in your Azure environment.)
- Client Secret: The generated secret’s value in the Certificates & secrets section on the Azure application
- Application (Client) ID: This is the value previously copied from the Essentials section in the created Azure App.
- OAuth 2.0 Token Endpoint (v2) (MS URL Access Token): This can be retrieved by heading to Azure > App Registrations > Endpoints > OAuth 2.0 Token Endpoint (v2)

12. Click “Save SMTP Settings“
13. Next, back in Azure click “App Registrations” > “Reftab SMTP”. From the left menu, select “Authentication“
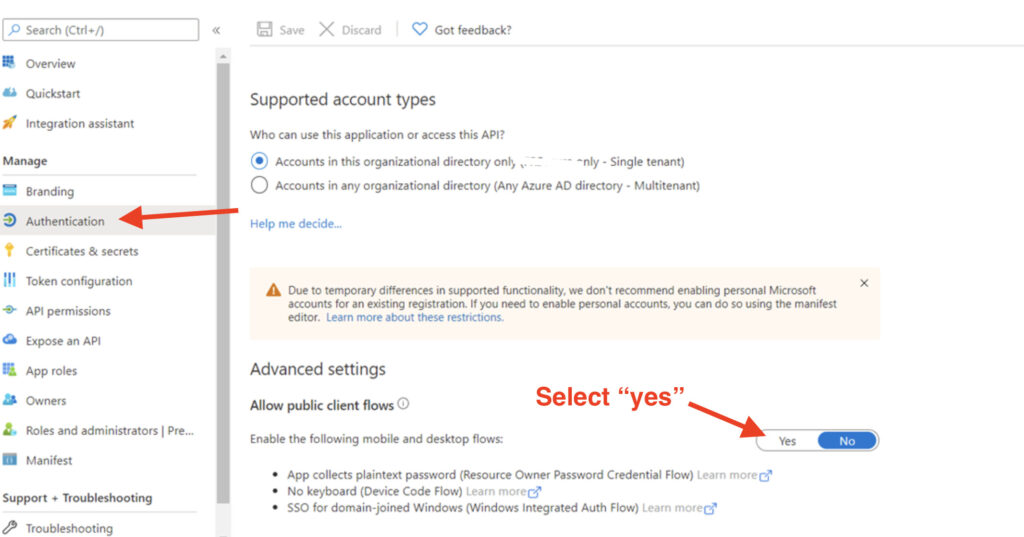
14. Click “Save” button to apply the changes.
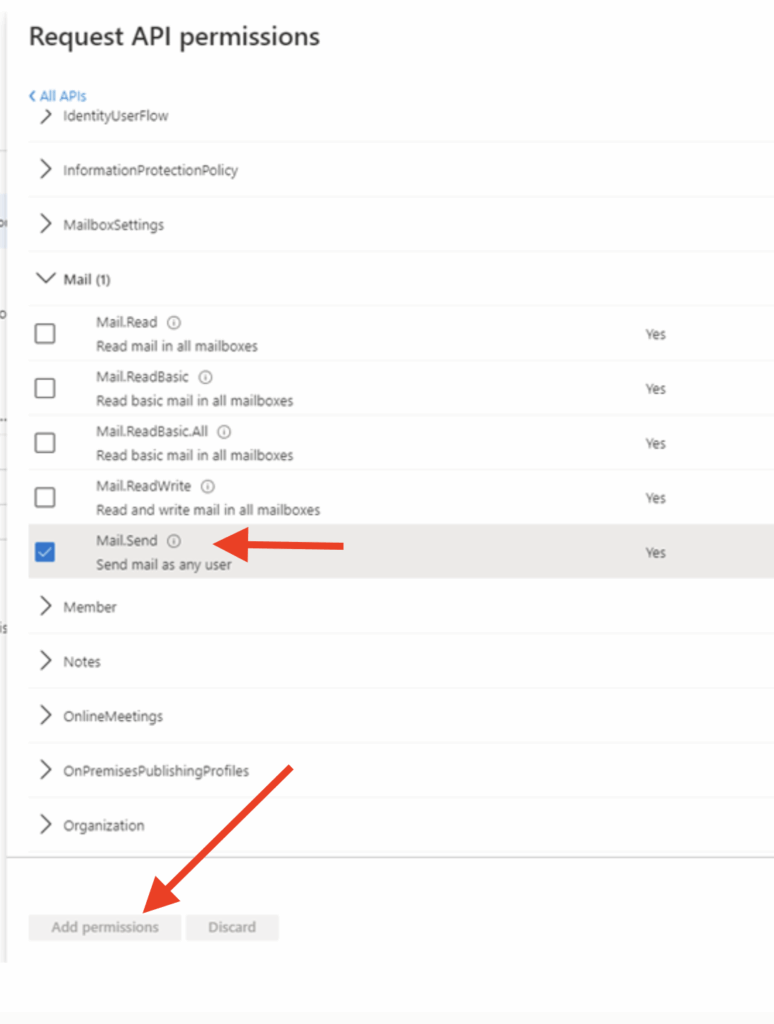
15. From the left menu, select API Permissions.

16. Click “Microsoft Graph“

17. Click “Application Permissions”

STOP: Please double check that you have set the permission type to “Application“
18. Next, Select “Mail.Send” in the “Mail” section.
19. Next Select “User.Read.All” in the “User” section.
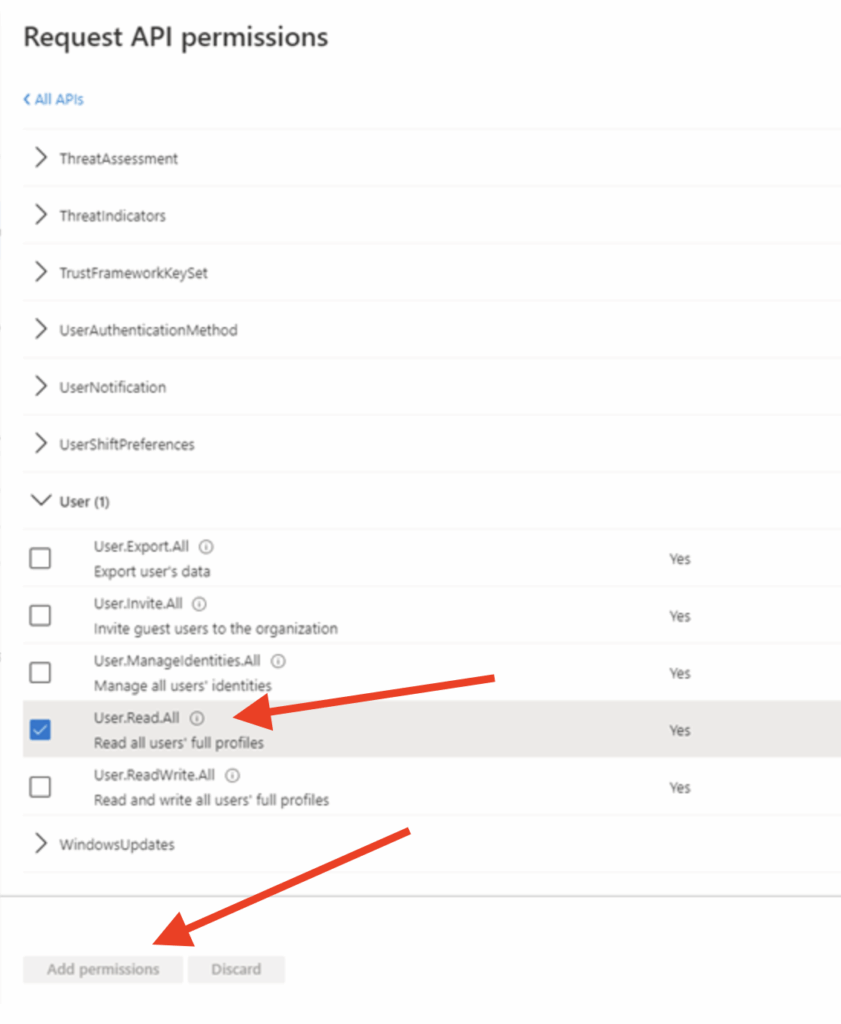
20. The result should look like the below. Please note, Click “Grant admin consent for <Reftab SMTP>“.
(At this step, please check that the “type” column is showing “Application” permissions)

STOP: Please double check that you have set the permission type to “Application“
21. Finally, go back to Reftab and click “Settings” > “Email Settings / Logs” > “Edit SMTP Settings” and click the button at bottom, “Send Test Email“.

NOTE: If you get the error “Could not get Azure Token”, please check that in step 11 above, you have pasted in the client secret value (and not the ID).
NOTE: If you get the error “Could not get Azure user id”, you will want to ensure the following:
- The user exists within Azure, and is not a distribution group.
- The aforementioned application permissions are granted admin consent to the app and are listed as application as opposed to delegated.
- Ensure you are utilizing the oauth token endpoint v2, not v1.
Check your email inbox for the test message. If you get the message, setup is complete. If there is an error, Reftab will output the error on the page and you can refer to this guide for any missed steps. Otherwise, email ‘help@reftab.com’ for further assistance or questions.
Please remember that once SMTP is enabled, emails sent from Reftab will be sent from your domain instead of info@reftab.com.
Your assets, simplified. Begin your journey with us!
50 assets free forever with unlimited inventory & software tracking. Includes email alerts, mobile apps, reports, custom asset tags and more.