How to Setup Kandji Integration with Reftab
Automatically sync devices from Kandji into Reftab. By doing so, you avoid having to manually enter assets into Reftab each time a new device is deployed. Also, our Kandji integration can automatically assign devices to users in Reftab. (Kandji is available to customers on the Business plan of Reftab, or to those on the free trail.)
For information on how Kandji updates existing assets, click here
Know Before You Start
Before enabling the Kandji integration, verify that your any existing assets that will be managed by Kandji include the required identification fields.
To ensure accurate matching and avoid duplicate assets, assets must include:
- Serial Number
- Kandji ID
These fields allow Reftab to reliably map Kandji devices to existing assets. Missing or non-unique values may result in devices being skipped during synchronization.
Step 1) Log into Kandji as an administrator and click “Settings” > “Access“

Step 2) Scroll to bottom and click “Add Token“

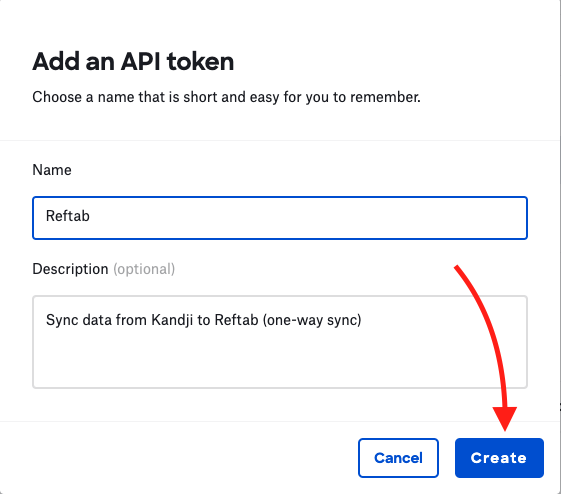
Step 3) Name the token “Reftab” and optionally provide a description and click “Create“.
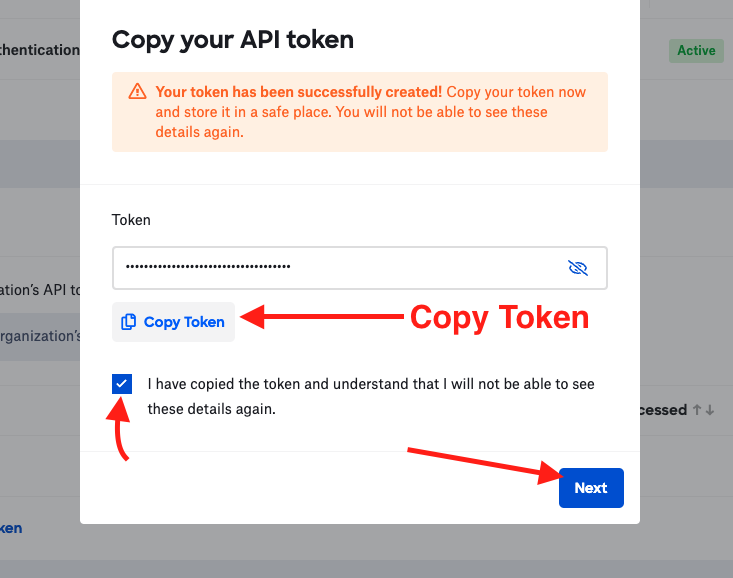
Step 4) Copy the token to a notepad. Note: This will the be ONLY time you will be able to access this token. Then, check the box and click “Next“
Step 5) Click, “Configure“

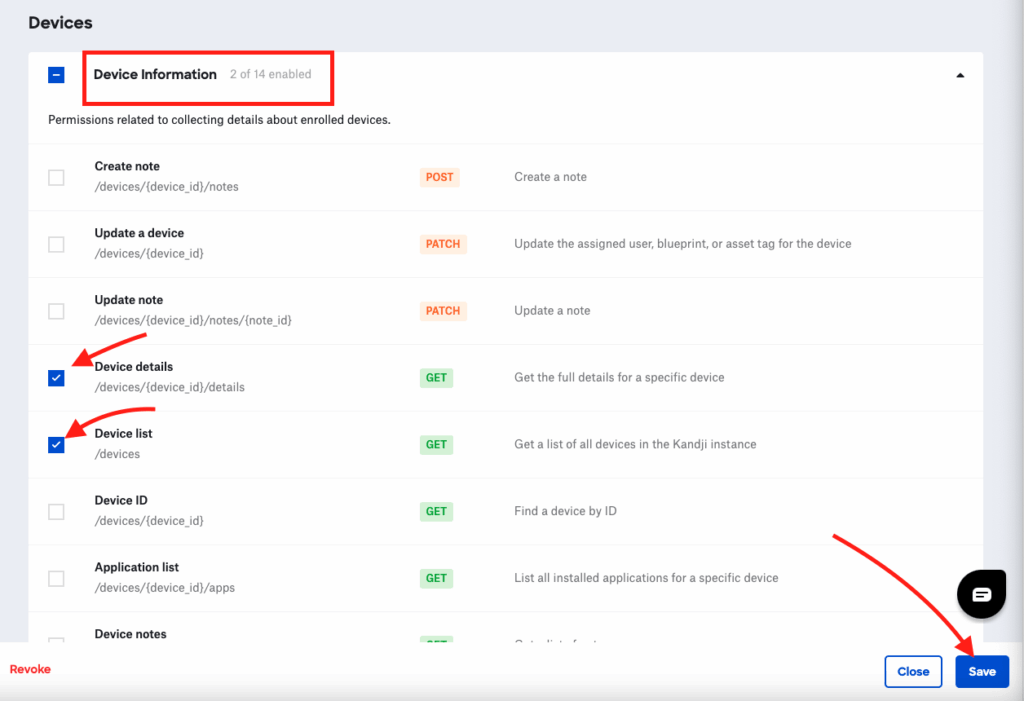
Step 6) Scroll down to “Devices” section and check two boxes:
- Device Details
- Device List
Click “Save” > “Close“
Step 7) Next, back in Kandji’s Settings > Access page, scroll down and copy the API token URL. Paste this to a notepad.

Step 8) Log into Reftab as an administrator and click “Settings” > “Integrations” > find Kandji and click “Configure“

Step 9) Paste in the API Token URL as the “Host”
Step 10) Paste in the API Token
Step 11) Select a Computer Category. Then select “show fields”. The fields that display are fields available to be mapped from Kandji. You must have at least a field for ‘kandjiid’ saved to your selected computer category.
If you do not have this field, (it will display in red if you do not have it) you will need to exit the Kandji configuration and click “Asset Categories” and add ‘kandjiid’ as a text field to whichever category you are using to save Kandji devices.
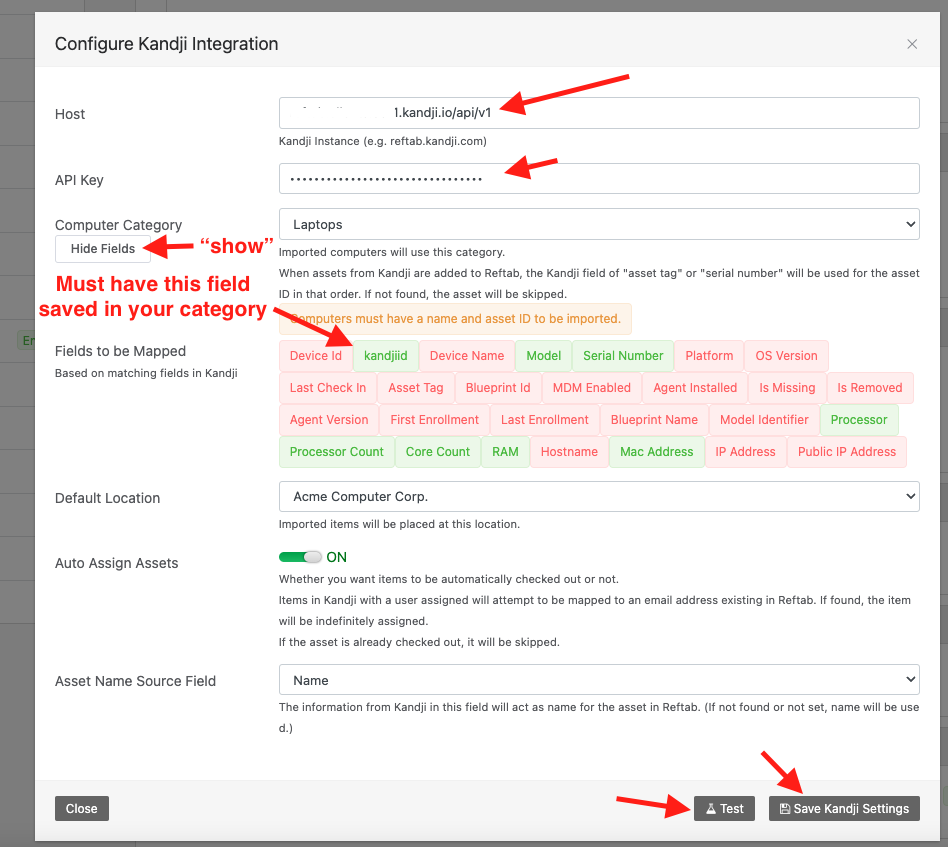
Step 12) Select a default location to save the Kandji devices into.
Step 13) Optionally, turn on “Auto Assign Assets”. If this is on, then the devices from Kandji will automatically be checked out to Reftab loanees. Next, select an Asset Name Source Field. The field selected will act as the name for the asset in Reftab.
Step 14) Click “Test” & if a success message appears, click “Save Kandji Settings“. If an error message appears, you should be able to troubleshoot from there based upon further information provided.
That’s it! Kandji is now connected to your Reftab account.
How Existing Assets are Updated in Reftab from Kandji Sync
1) When a sync starts, the integration looks for existing assets in Reftab with a matching KandjiID value (saved against an asset at the field level). If found, the asset is updated in Reftab.
2) If there is no found matching KandjiID field value on any asset in Reftab, the integration looks to see if there is an existing asset saved with a matching Asset Tag value saved as a Reftab asset ID. If found, the asset is updated in Reftab (and subsequently also updated with a KandjiID field value).
3) If both an existing kandjiID value is not found, nor is a asset_tag value found as an assetID, then the integration looks to see if there is a Serial Number value found saved to an existing asset as the asset ID, if found, the asset will be updated (and subsequently also updated with a KandjiID field value).
4) If none of the above are found in that order, a new asset is created in Reftab, and saved with a KandjiID.
In summary we match upon existence of “KandjiID” (saved to an asset field) -> “Asset Tag” (saved as an asset ID) -> “Serial Number“(saved as an asset ID),in that order, to determine if an asset from Kandji already exists in Reftab.
Important Notes
Default system emails for “check out” and “return” do not trigger by default when JAMF assigns or returns assets. If a user wants to use emails or any other actions, workflows can be used to achieve this purpose.
Suggested Next Steps
How to Auto-Assign Asset Locations via Loanee Fields in Workflows
Utilize automated workflows to update asset locations based on dynamic custom loanee fields.
Email “help@reftab.com” for any questions.
Your assets, simplified. Begin your journey with us!
50 assets free forever with unlimited inventory & software tracking. Includes email alerts, mobile apps, reports, custom asset tags and more.