Every asset in Reftab has a unique asset ID that is used to generate both barcodes and qr-codes. Download the Reftab mobile app to use the camera of your phone or tablet to scan these codes and immediately view your assets, kits or accessories.
In this guide, we’ll show you how to design and print barcode and qr-code labels so you can start tagging your assets easily. We’ll cover:
General Information
Printing Asset Tags in Bulk
Creating and Saving Custom Asset Tag Label Sizes and Designs
Using Label Printers and / or Avery Sheets for Asset Tags
Using Third-party Asset Tags or Existing Asset Tags with Reftab
General Information
For optimal usage with the Reftab mobile app, we highly recommend using QR codes instead of barcodes. QR codes offer several advantages:
- Faster Scanning: QR codes can be scanned more quickly and accurately than traditional barcodes.
- More Data: QR codes can store more information, allowing for enhanced asset tracking capabilities.
- Error Correction: QR codes have built-in error correction, which means they can still be read accurately even if they are partially damaged or obscured.
Ensuring Proper Scanning
To ensure that your QR codes are scanned properly:
- White Space: Make sure there is plenty of white space around the QR code. This white space, known as the “quiet zone,” is crucial for accurate scanning. A lack of sufficient white space can lead to scanning errors.
- Clear Printing: Ensure that the QR code is printed clearly and at a high resolution. Blurred or pixelated QR codes can be difficult for the scanner to read.
Below are visual examples of a good QR code tag and a bad barcode tag:

Observe the ample white space around the tag and the high resolution of the QR code itself. In contrast, notice the insufficient white space around the barcode, which could lead to scanning issues.
By following these guidelines, you can ensure that your asset tags are scanned efficiently and accurately, enhancing your asset management process.
Printing Asset Tags in Bulk
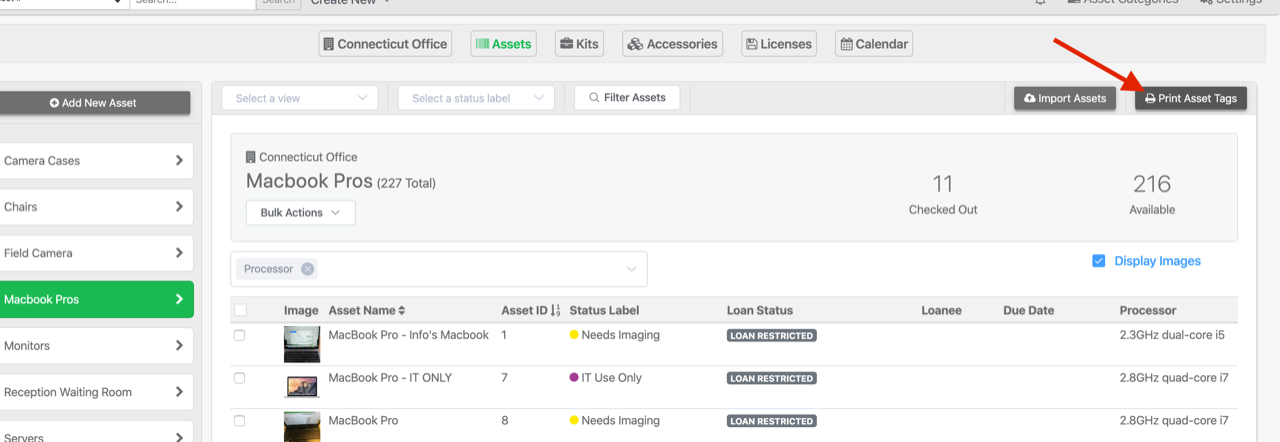
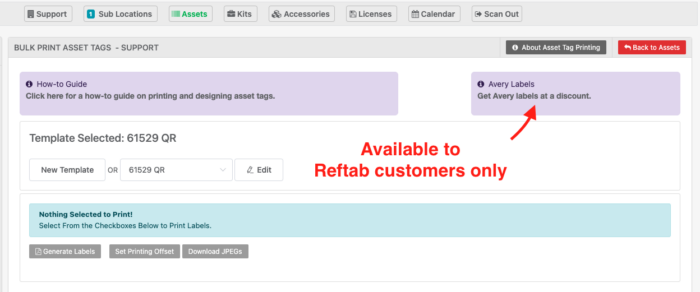
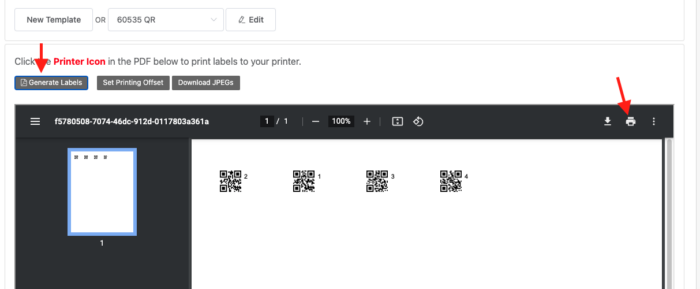
To print asset tags in bulk, select one of your asset categories and click “Print Asset Tags”
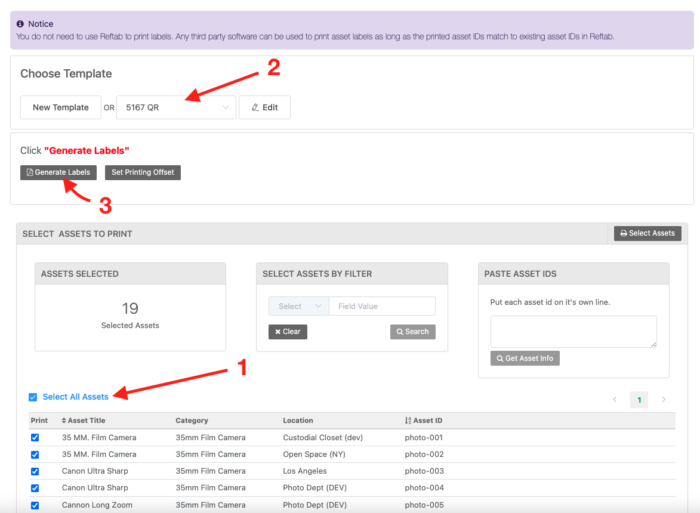
Next, use the check boxes to select the assets you’d like to print. Then, use the drop-down list to select from pre-made templates. Then, click “Generate Labels”.
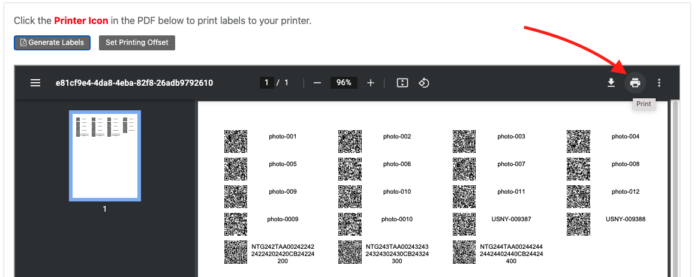
A PDF file will generate showing each label on screen. The PDF is sized to print to the Avery sheet or continuous roll you selected.
You can click the printer icon and select your printer to print the labels. Once printed, you can peel and stick the labels to your assets.
Creating and Saving Custom Asset Tag Label Sizes and Designs
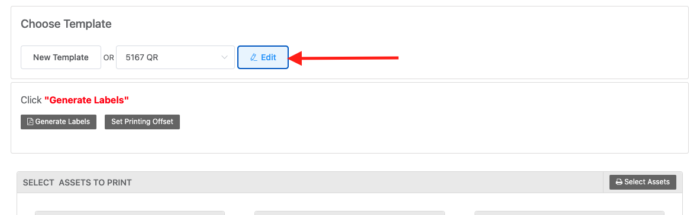
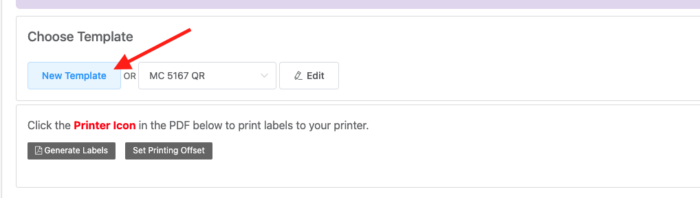
Reftab provides a few out-of-the-box labels and designs. You can easily customize these pre-made labels by clicking the “Edit” button:
From here, you can change to a barcode or qr-code, add text, images and even change the width and height of the label itself.

NOTE: The designer will always show a barcode even if you selected QR. However, when the PDF is generated, it will display your chosen code.
For example, to add the title of each asset, you can click “Add Text“, then use the drop-down list that appears to select ‘Title‘.
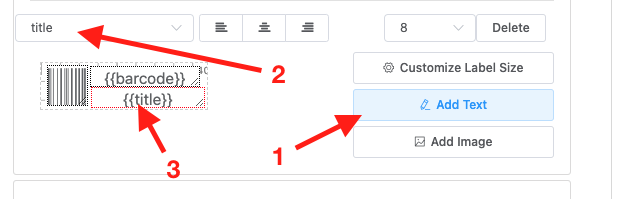
When done, click “Generate Labels” and you’ll see the PDF display the title of each asset on every label.
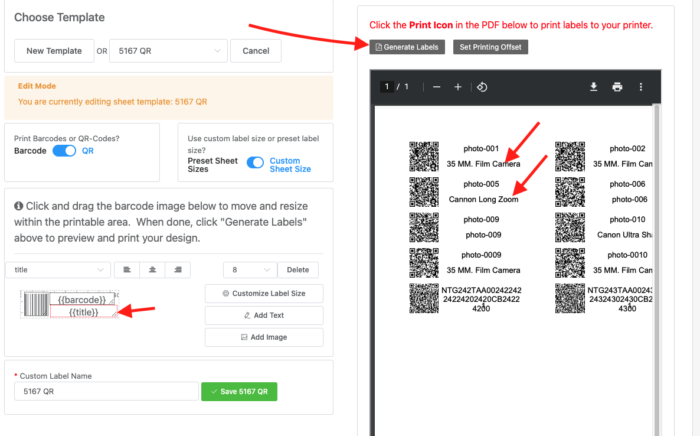
NOTE: The designer you see in the image above, (the dotted lines area), is the printable width / height of the label. This is not the full label size.
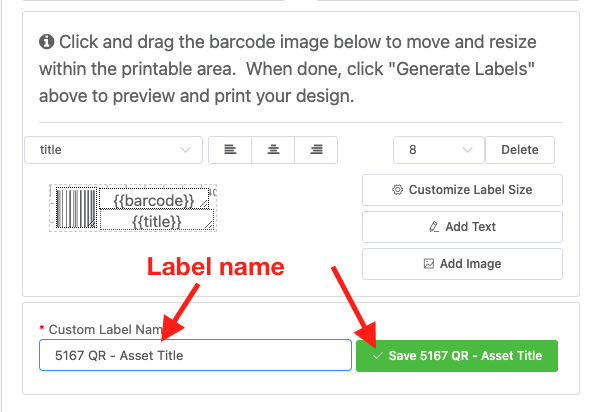
When you’ve completed designing your label, give the label a name and click “Save“
Printing Directly to Label Printers and / or Avery Sheets
By customizing your own label sheet, you can print to virtually any roll or label sheet such as an Avery sheet or to continuous label rolls used by Zebra, Brother, Dymo or other dedicated label printers. At this time, Reftab does not support printing for 2-Up labels.
Printing to Continuous Label Roll
NOTE: For best performance, install the printer drivers that came with your continuous roll printer. When you install printer drivers, you need to manually configure the size and type of loaded labels. That way, when printing from Reftab, the offset of the tag prints correctly in the space given.
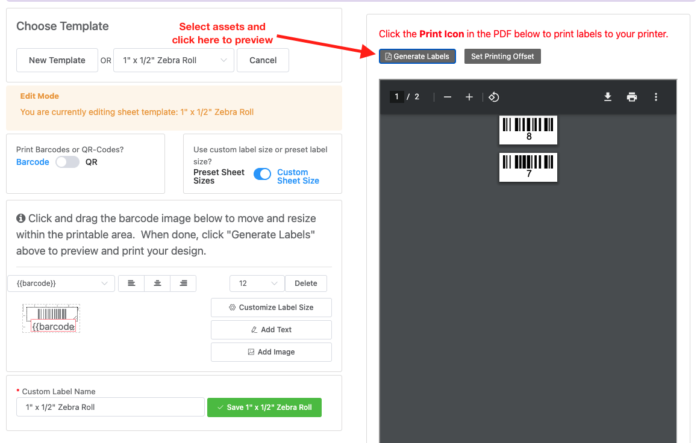
For example, if you had a Zebra desktop printer with a thermal label roll sized 1″ x 1/2″ you would design a new template in Reftab by clicking “New Template“.
Note that from here, you can select “Preset Sheet Sizes” and choose a preset sheet size for continuous label rolls. However, if you don’t see your size, continue to next step.
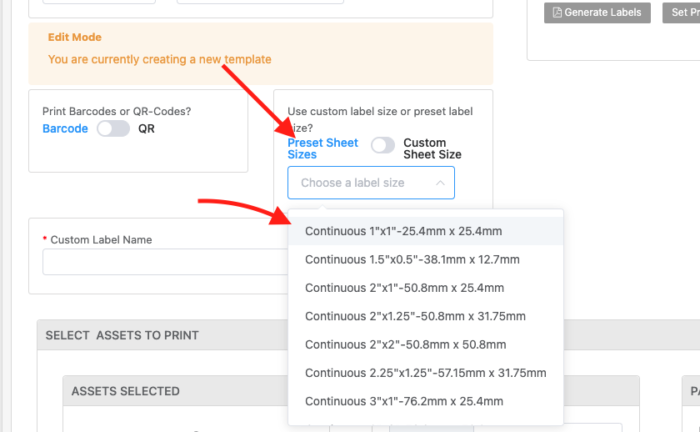
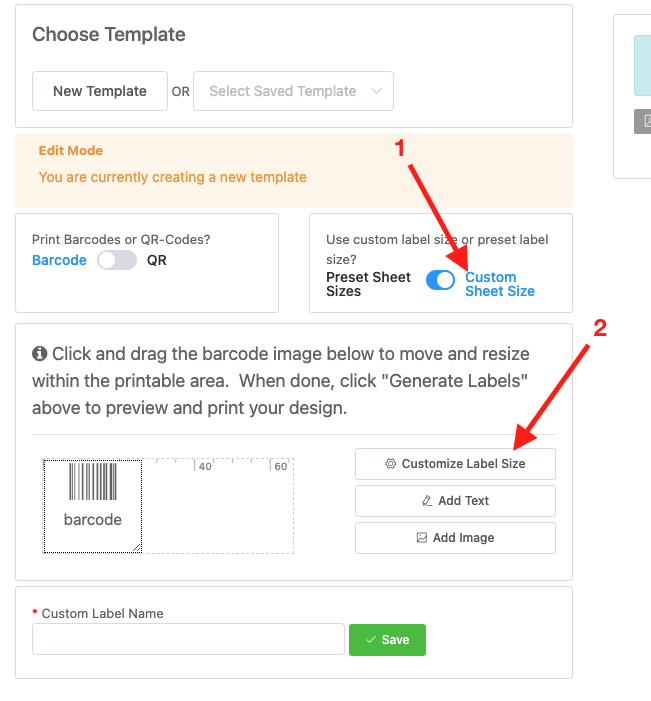
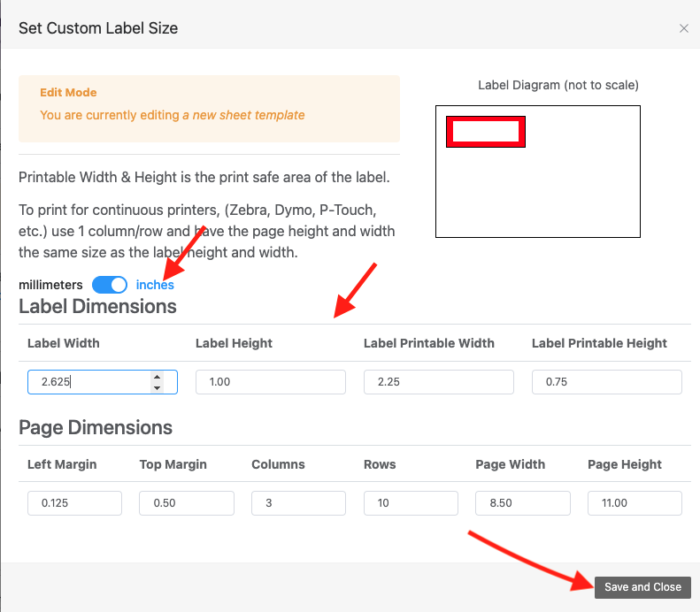
Next, choose barcode or qr-code and click “Custom Sheet” then click “Customize Label Size“
On the window that pops up, select “Inches” and set the label dimensions label width: 1 and label height: 0.5. The label printable width and label printable height can be the same measurements, or slightly smaller if necessary to establish a printable area.
The left margin is the space between the edge of the sheet and the label. The top margin is the space between each label. The columns and rows will both be “1“. Page Width and Page Height match to Label Width and Label Height.
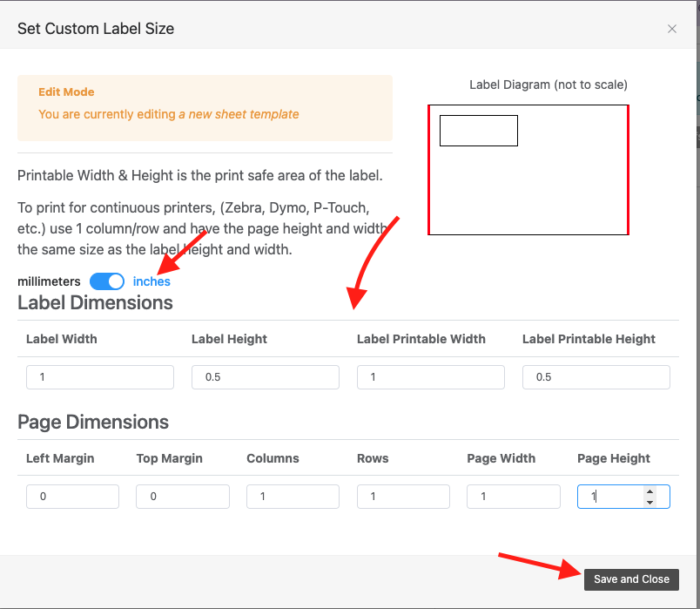
Click “Save and Close” when done.
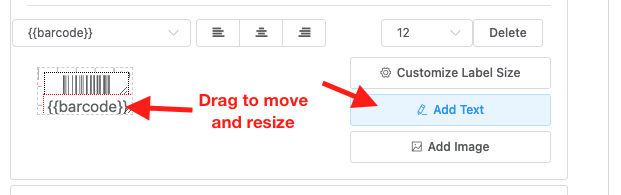
The page will display the designer sized to fit the set dimensions. You can drag to move and resize the barcode or qr-code, (the designer will always show a barcode even if you selected QR). You can add additional text and / or an image such as a logo.
For example, click “Add Text” to add the asset ID to display on the label. Asset ID will display on the designer as {{barcode}} which you can click and drag to move and resize.
Next, to view your label and design, select a few assets and click “Generate PDF“
Next, test the label by clicking the Print Icon inside the PDF. We suggest printing very few labels so that you can be sure your design works and is spaced correctly before printing more.
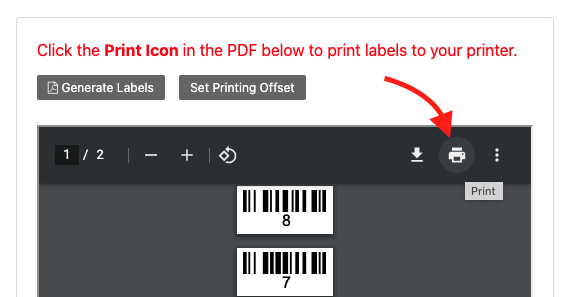
Make sure your label printer is connected to your computer, select it and print. If the labels fit, you can save your design and re-use it next time you need to print labels from Reftab.
NOTE: For best performance, install the printer drivers that came with your continuous roll printer. When you install printer drivers, you need to manually configure the size and type of loaded labels. That way, when printing from Reftab, the offset of the tag prints correctly in the space given.
Printing to Avery Template
Avery provides peel and stick labels that you can print from your laser jet printer. If you’re looking to purchase Avery labels at a discount, Reftab customers can click the link displayed here in your Reftab account:
Printing with Pre-made Avery Templates
Reftab provides a large amount of pre-made sheets for common Avery sizes. These are available by clicking “New Template” and can be viewed under the “Preset Sheet Sizes“
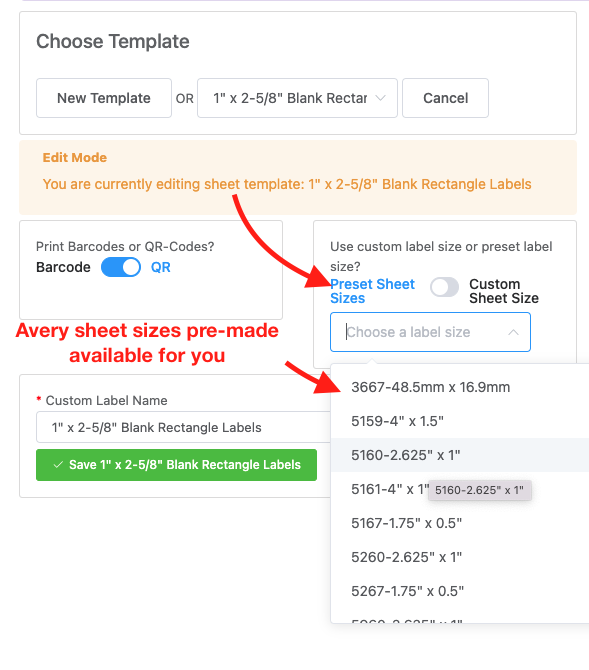
Simply select the sheet size that corresponds to your Avery sheet size, then generate the labels in Reftab. Then, input the sheet into your printer and print from the PDF that Reftab generates.
Design a Custom Template Size for Any Label
However, to completely design a custom asset tag label click “New Template“
Then, click “Custom Sheet Size” > “Customize Label Size“
NOTE: The example below is for Avery’s 1″ x 2-5/8″ Blank Rectangle Labels:
Next, select “Inches” and fill out the label and page dimensions. Note that for different Avery sizes, you may need to use a ruler to measure the label and page dimensions for accuracy.
NOTE: Use Inches for US, use Millimeters for most elsewhere.
Click “Save and Close” when done.
Add any text, logos, etc., and scroll down to select a few assets and click “Generate Labels“
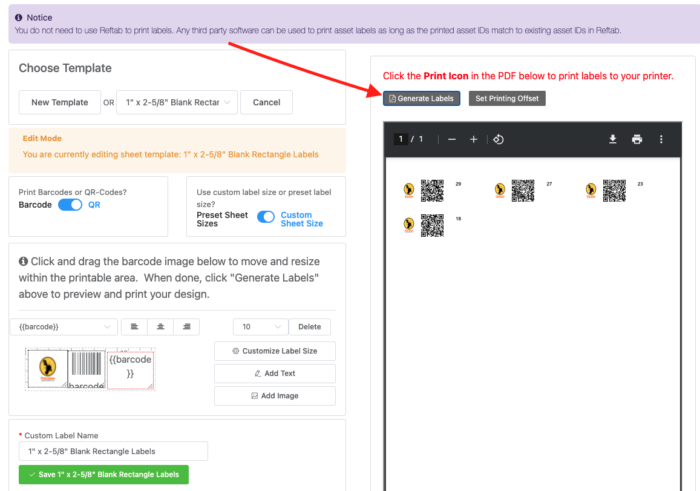
We suggest printing only a few labels to start in order to make sure your dimensions and designs fit correctly to the page.
Using third-party asset tags or existing asset tags with Reftab
You can order asset tags from any provider. As long as the barcode / qr-code is generated using the same asset id’s that are in your account, the Reftab app will be able to scan them.
All the Reftab app looks for, is the barcode number. So in other words, if you had an asset in Reftab saved with the ID of “ABC123“, if you found a barcode anywhere in the world generated with, “ABC123” the Reftab app would scan it and it assume it was your asset (Of course, you need to be logged into your account first).
Display PDF in Reftab:
If you see a notice saying the content blocked, you’ll need to adjust your Chrome browser’s settings
1. Open the Chrome settings menu and select Settings.
2. Select Site Settings under Privacy and Security.
3. Select Additional content settings.
4. Select PDF documents.
5. Set the toggle next to Download PDF files instead of automatically opening them in Chrome to off. Once this setting is disabled, you’ll be able to open and view PDFs in Chrome.
Reach out to help@reftab.com for any questions on this. We are always happy to help.