A Guide to Reftab’s Approval Flows and Procurement Tracking
Efficient procurement tracking is pivotal within any comprehensive asset management software platform, offering an array of invaluable benefits. With its robust capabilities, this feature not only enables seamless monitoring of purchases and acquisitions but also facilitates the consolidation of data inputs from diverse departments, all in one centralized repository. This unified approach ensures a holistic view of the entire procurement process, allowing for streamlined oversight and management of assets. By empowering different departments to input and track their data throughout the lifecycle, Reftab provides admins with a singular, comprehensive perspective, fostering improved transparency, accuracy, and efficiency in asset management.
In this guide, we’re going to build an approval flow that is one round of approval and requires the “IT Manager” to approve. The approval flow will be called, “IT Manager’s Approval”. We will run through an example of a user requesting a specific software license. But first, let’s explore the benefits of having approval flows within your organization.
In this guide, we’ll go over Reftab’s approval flows by:
- Creating an Approval Flow
- Triggering Approval Flows from Requests
- Capturing Additional Data During the Approval Process
- Approving/Denying a Request
- Creating New Assets From Requests
- Fulfilling a Request
Creating an Approval Flow
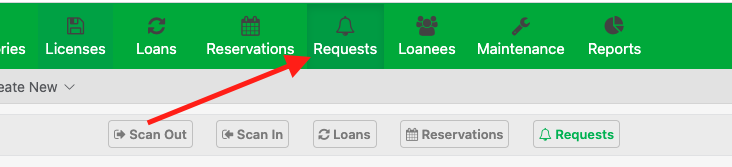
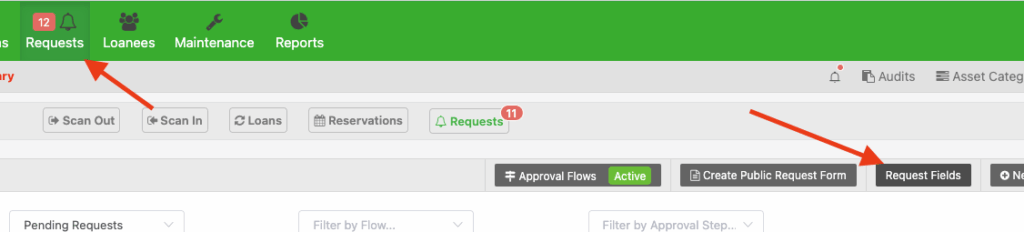
To get started, navigate to the “Requests” tab located in the green header. (Note, the Requests page is only available to users on the Business plan. Reach out to ‘help@reftab.com’ if you’d like to upgrade.)
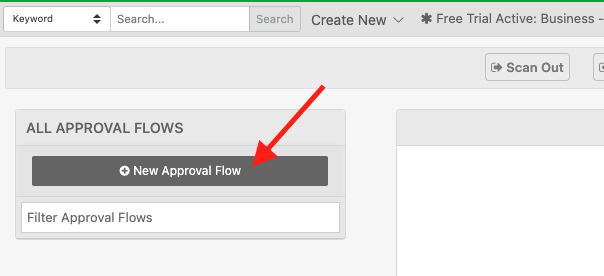
Click the, “Approvals Flows” button at the top of the page. If this is your first time, you’ll see a small icon indicated these flows are not set.

Click, “New Approval Flow” and we can begin building our first step.
The step builder will appear on the right.
Give the step a name such as, “IT Manager’s Approval”.
Under the “Approvers” section, select a user account who will approve this step, such as your IT Manager. (Note, this person must be listed as a user in Reftab. It is often recommended to setup a SCIM User Provisioning Integration for many aspects of the Reftab platform)

OPTIONAL NOTE: If you want supervisors or managers as approvers, you will need to configure a manager field in Reftab. Follow this guide first, then return: https://www.reftab.com/faq/how-to-reference-another-user-as-a-manager-or-supervisor-in-reftab-from-okta
(OPTIONAL)Toggle the option shown below to send this request directly to the requestor’s manager.

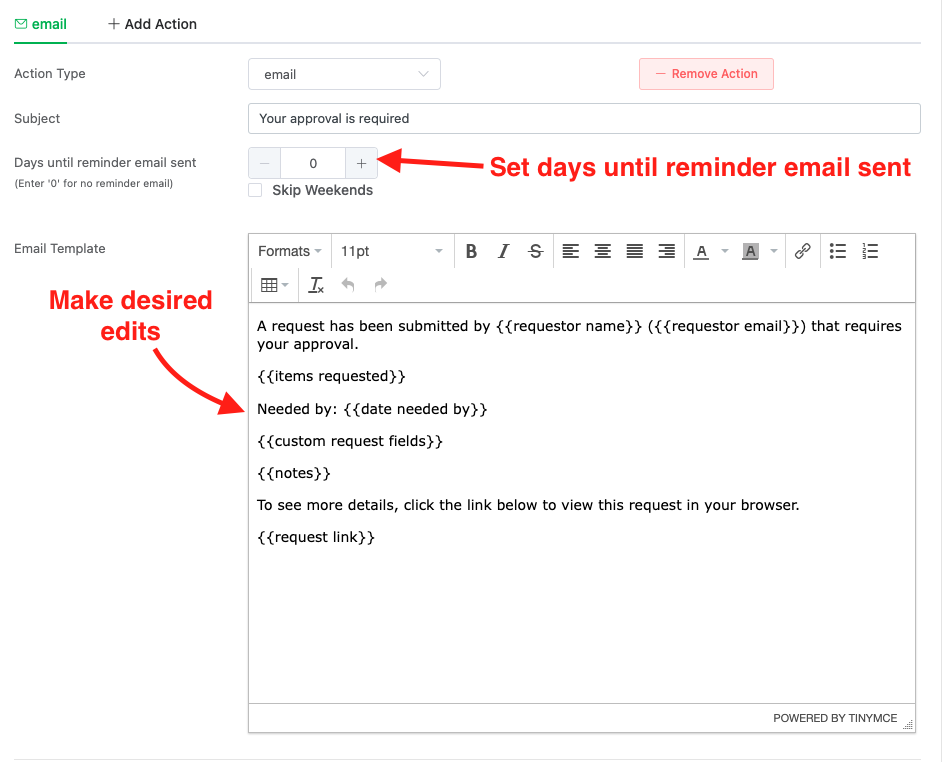
Next, click “Send Email“

Next, you can make any desired edits such as changing the subject of the email and setting an amount of days until a reminder email is sent:
Fields
Next, if you’d like the approver at this step to enter any data, (PO numbers, department codes, etc.) select any of the fields in the table (or create a new field if need be).

Additional Options
Next, under Additional Options you can:
- Adjust button text to something other than ‘approve’ or ‘reject’
- Allowing approvers to reject at this step – turning this off will remove the reject button from the approval form.
- Make it required that an approver e-sign when approving/rejecting this request.
- Enabling the ‘Check-out / Reserve at this step” allows you to check out or reserve assets once this step is reached. The final step should always include this option. (Selecting this on any step prior to the Final Step helps set up an “early exit” option on your flows.)

When done, click “Save Step“. It will look like the below with a ‘Fulfillment’ step automatically applied.

You now need to assign this approval flow to a request page so that this approval flow process can be triggered when someone issues a request.
Triggering Approval Flows from Requests
Login to Reftab as an administrator and click “Settings” > “Public Request Forms“

Click, “Create Public Request Form” (or if you already have a form click edit on your existing form.)

Next, you can fill out your form with a title, a description and set requestable items. On the “Approval Flows” section, select your approval flow and click, “Save Public Request Form” when done.
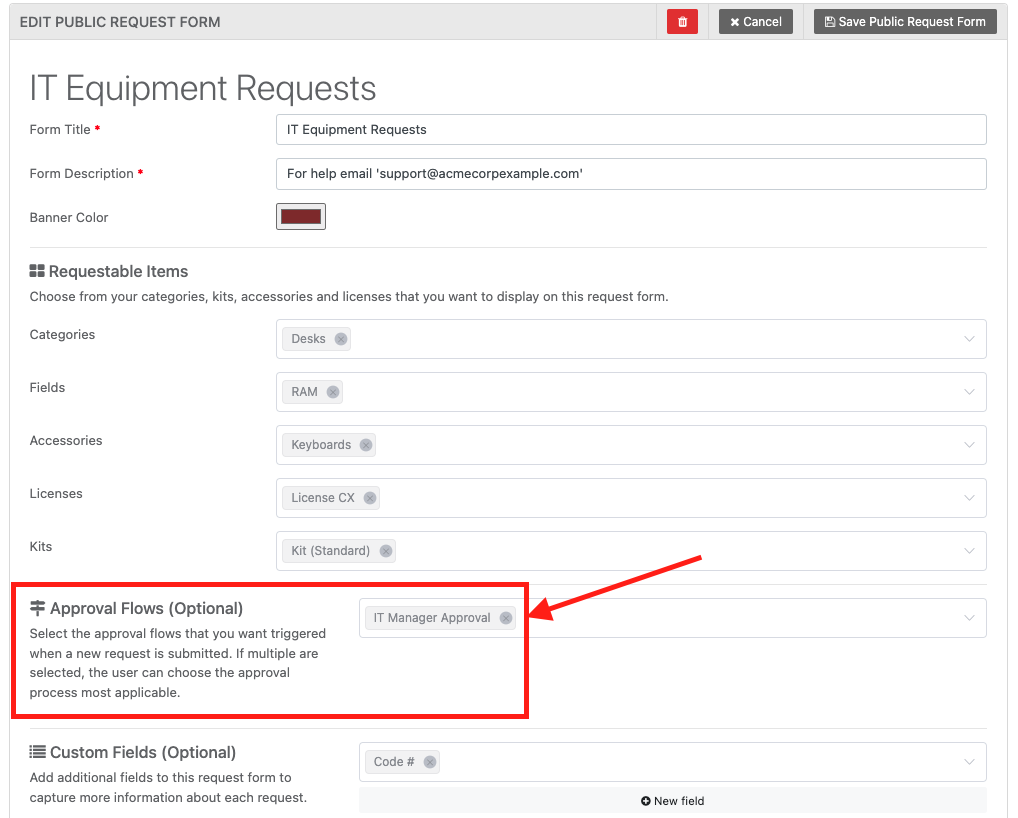
Note: Multiple flows can be assigned to a request form. If you decide to assign multiple flows, the user requesting equipment will have the option of choosing the flow that best fits the current request.
Once the form is saved, you’ll be presented with the unique URL. This is the URL you can share with your entire organization to submit equipment requests.
Click the URL and it will open in a browser tab to view your request form. Choose an item, fill out the form and click “Submit Request“

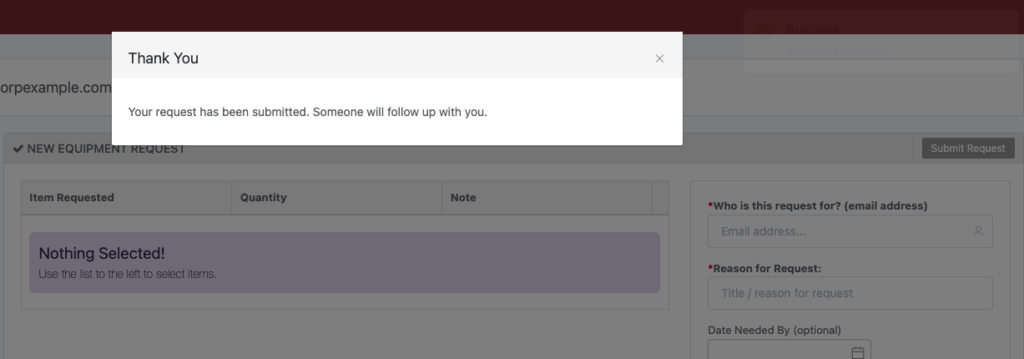
Back in Reftab, you will see the request as, “Pending IT Manager’s Approval”. At this point, the approver (IT Manager) has been sent an approval email.

Approving / Denying a Request
At this point, a request has been submitted and the approver has been emailed details of the request. Below is what the email looks like for the approver.
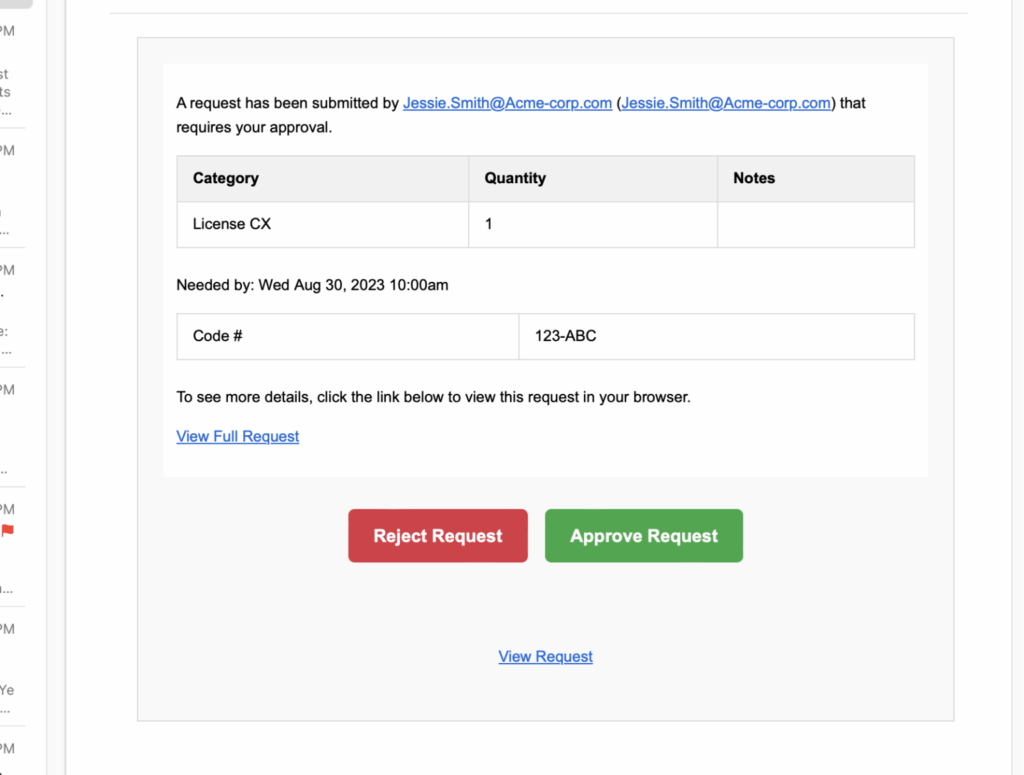
Notice how the approver can not only see the details of the request in the body of the email, but they can “Reject Request” or “Approve Request” right from within the body of the email as well. They don’t have to log into Reftab which means they can respond quickly and efficiently.
If the approver clicks “Approve Request” or “Reject Request” they’ll see a webpage open with this response:

The IT Manager approval step is now complete!
If you had further rounds of approval steps, the next round of approvers will be sent a similar email as seen above.
Capturing Additional Data During the Approval Process
When creating an approval step, you have the option of selecting fields for the data you want captured at any particular step. Make sure the checkbox is selected when editing your step. For this user guide example, we are capturing a “PO number”.

When the approver clicks the ‘Approve’ button in their email, a browser tab will open. The user will be able to enter the necessary details. They can click ‘Approve Request’.

The data can be visible and editable on any subsequent step as long as the step has the field checked on the edit step screen. If the step is not checked on any other step, the information will still be visible during fulfillment.
How to attach request field data to asset check outs / reservations
When fulfilling a request, data captured during the approval process can be transferred to the asset’s loan / reservation so that you can store and view this data throughout the Reftab platform. To do this, you must create identical loan fields as your request fields. This guide uses the example of capturing a PO number. However, you can capture any sort of information from approvers at your organization such as safety training information before using tools, department codes, student information such as majors and class information, etc.
First, view your request fields and identify the field(s) you want to transfer to equipment loans / reservations. Click “Requests” > “Request Fields“
For example, if you have a “PO number” field that you capture during the approval flow process:

You will need to create a custom loan field called, “PO number”:
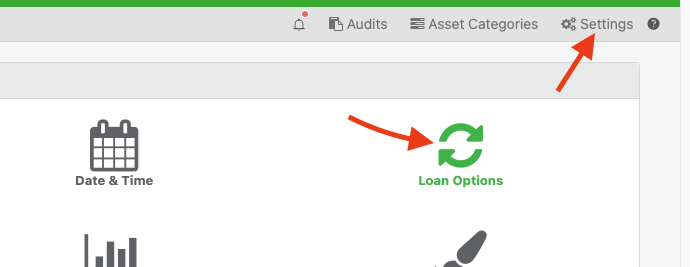
1. To create a custom loan field click, “Settings” > “Loan Options”
2. Click “Manage Custom Loan Fields“

3. Click “Add Field“
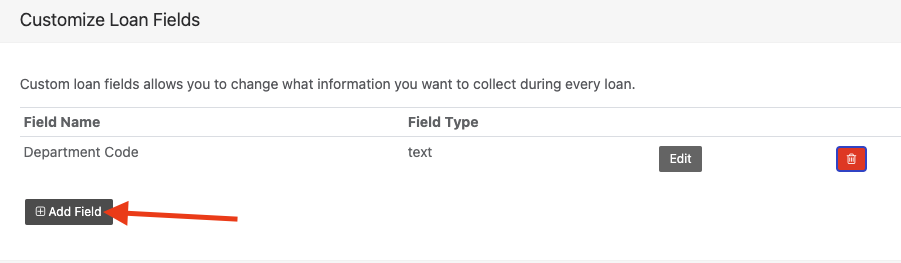
4. Add in your field name exactly the same as your request field. In this example, we’ll add “PO number” and click “Save Field“.

5. That’s it! Now when viewing requests you will see your field filled with the data captured from the approver:
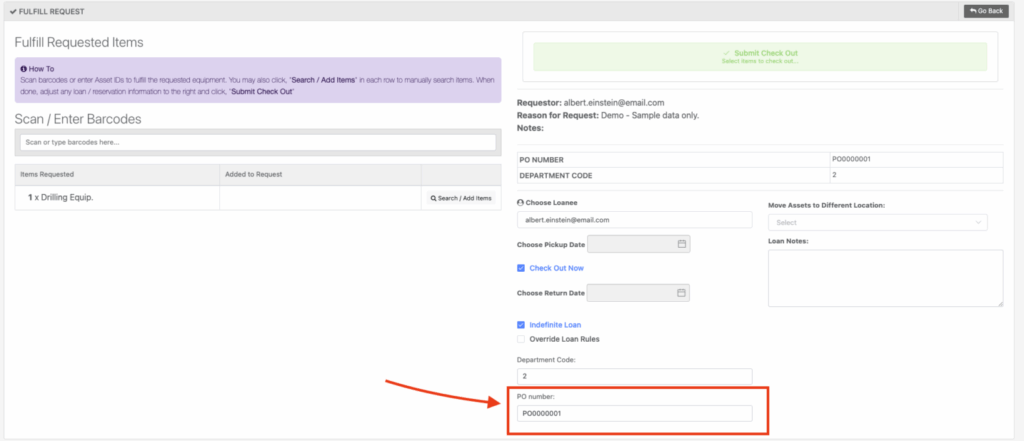
When viewing the asset, you will see the data:

Creating New Assets From Requests
When creating steps of an approval flow, you have the option to select the action of “Create Assets“.

This will allow you to map fields that you want to collect during the procurement process and use those values to create assets automatically in Reftab.
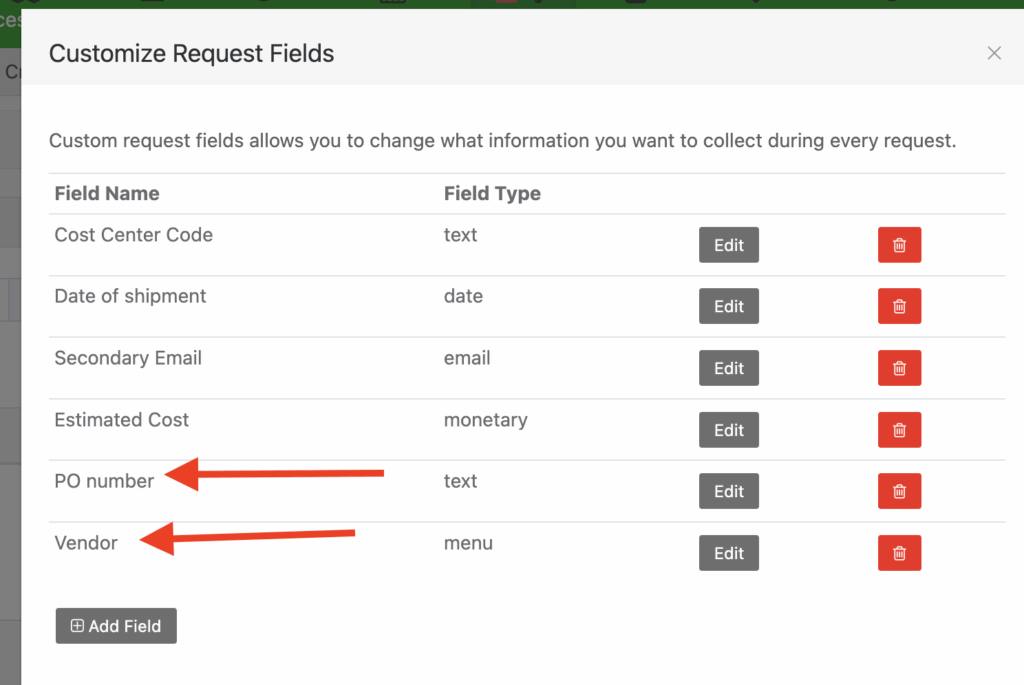
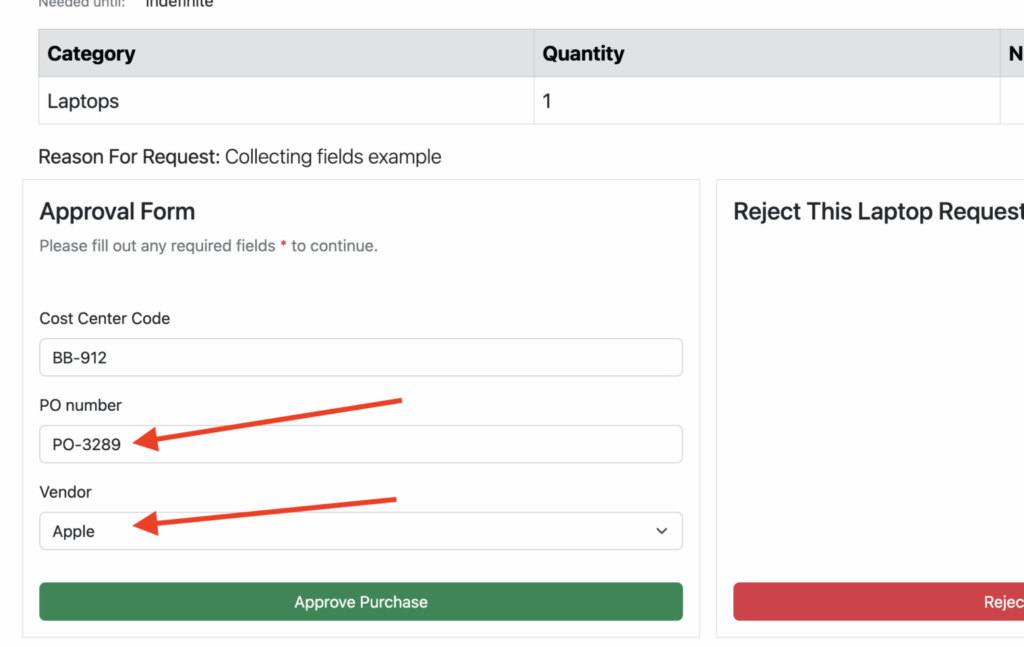
For example, let’s say you want to capture and store the PO number and the Vendor of your laptop purchases automatically to ultimately store that information on assets within Reftab.
To map those fields, make sure you have “PO number” and “Vendor” saved on your asset categories.

Also, have those same two fields saved as custom fields on your Request Forms and, selected on one of the steps of your approval flow. (By doing so, this allows approvers to add this data.)
Click “Requests” > “Request Fields” and add your fields
Click “Requests” > “Approval Flows” then edit the step you want to capture the fields and check the boxes for “Editable“
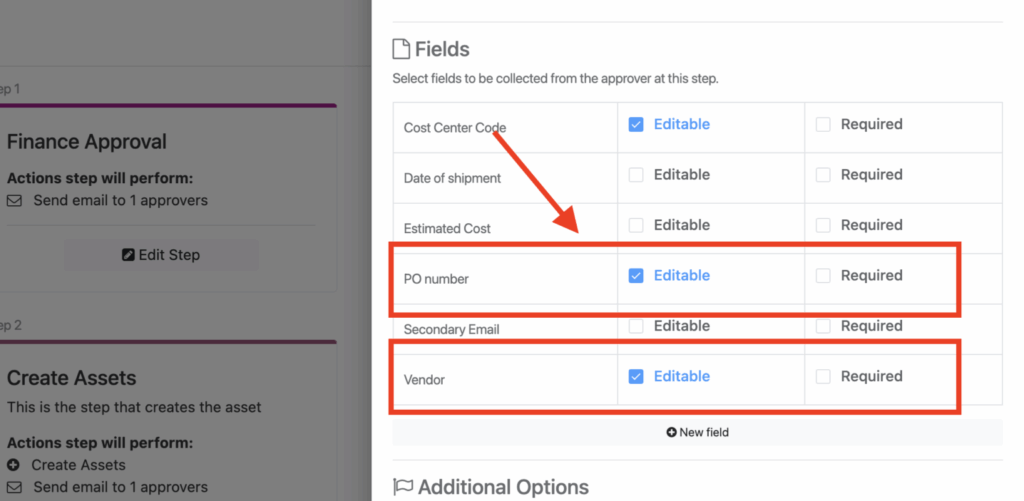
Once done, edit the step that you’ve selected the action for ‘create assets’ and map your asset category fields to your request fields. In the screenshot below, you’re telling Reftab that you want to take a PO Number and Vendor value captured during a request and save their values to the PO number and Vendor field on assets.

And that’s it. When a request comes in, users who you’ve set as approvers can fill out details such as PO Number and Vendor. This image below shows what the approver sees and fills out at their designated step:
Then, when the items are received and ready to be added to inventory, your step that ‘creates assets’ will run, the assets will be created and the values that were captured are saved to the asset:

Fulfilling a Request
Back in Reftab, administrators can see the request in the next phase of the request process. “Pending – Fulfillment“

This step is the final action and will turn this request into a loan (if being checked out now) or a reservation, if the check out date is in the future.
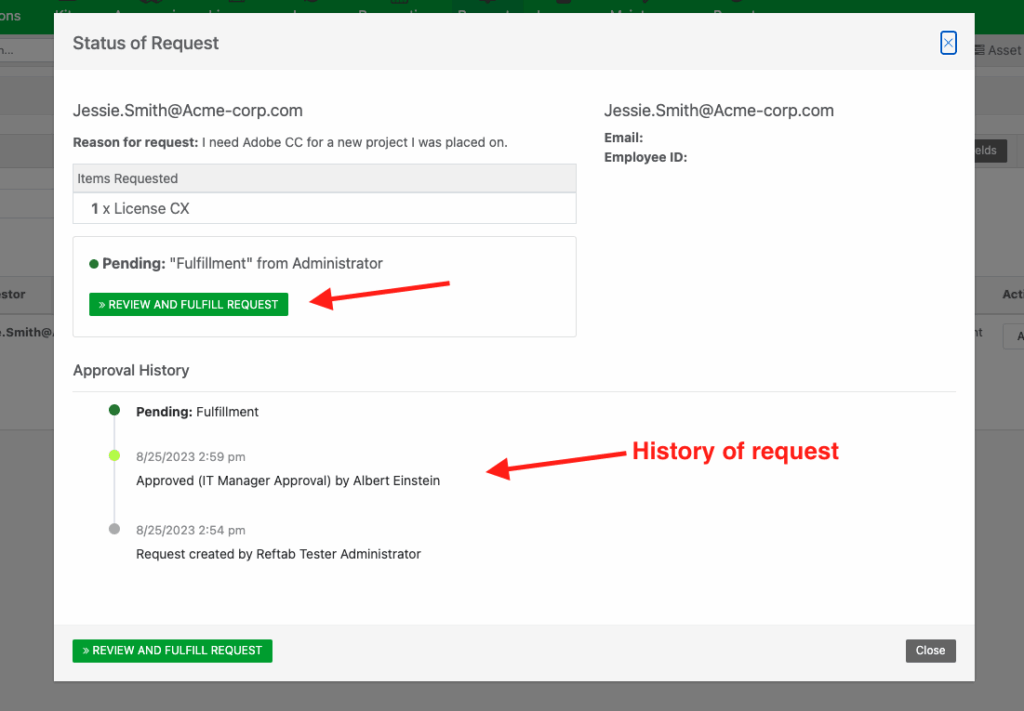
You can click on the request to see history and continue on to fulfill the request:
You can click “Review and Fulfill Request” and click “Search / Add Items”
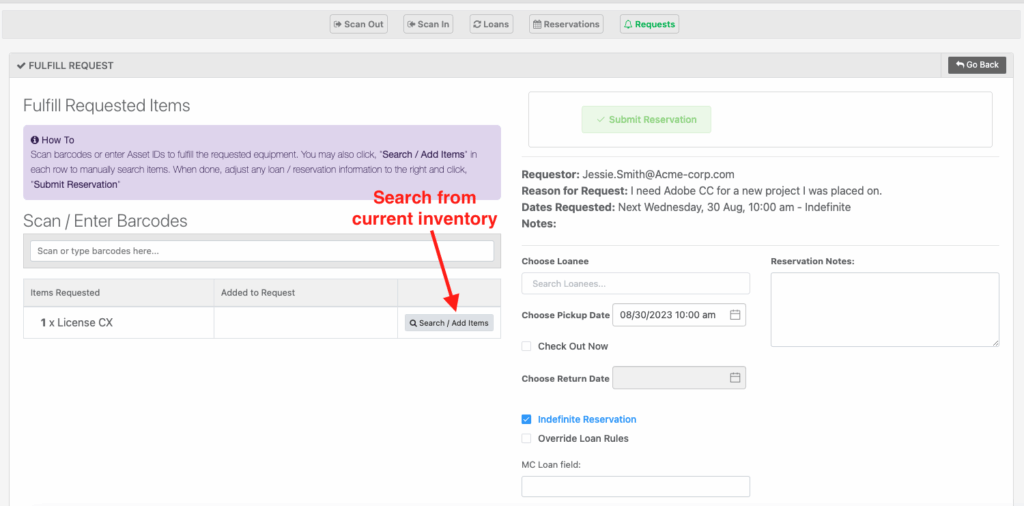
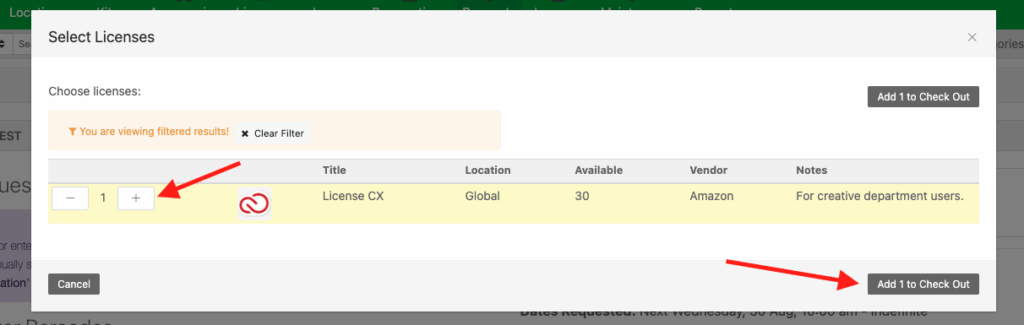
The system will automatically display current inventory available for what’s been requested and you can add the items to your check out.
Next, you can click “Submit Reservation”

The request has now been fulfilled!
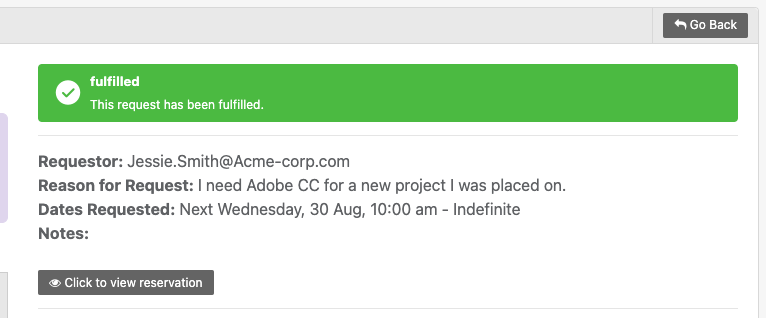
In this example, because the user submitting the request, set a future date for pick-up, we’re automatically using that date as the start date of this reservation. This means the software license for Jessie Smith is now ‘Reserved’. You can view all reservations under the “Reservations” tab.

One the license is checked out, (meaning it was officially given to the user or installed on the users machine) then you’ll see the item appear in the user’s record:

This concludes the overview of Reftab’s approval flow process.
We want to hear from you! Please reach out to ‘help@reftab.com’ and share your feedback. By doing so, we can add more features to our approval flows to meet your organization’s needs.
Need help? We're here for you
For any questions or assistance, feel free to reach out to us.
Your assets, simplified. Begin your journey with us!
50 assets free forever with unlimited inventory & software tracking. Includes email alerts, mobile apps, reports, custom asset tags and more.