MS Intune Integration Guide – How to integrate Microsoft Intune with Reftab
Reftab can integrate with Microsoft Intune to populate your Reftab account with managed devices like Laptops and Desktops. Devices can be automatically checked out to users in Reftab. By doing so, you’ll have a convenient, single pane of glass to see all devices together in one application.
🔹 Preventing duplicate assets for existing devices
When Intune syncs, Reftab checks each device’s serial number against your existing asset records. If a match is found, Reftab updates that asset with the latest Intune data rather than creating a new one. If no match is found, a new asset is created automatically.
For this reason, make sure serial numbers are populated on your existing assets before running your first sync — otherwise duplicates may be created.
Note: After an initial sync, Reftab also uses the Azure AD Device ID to match devices to existing assets. This means even if a serial number changes or is missing in a future sync, Reftab can still correctly map the device to the right record.
Consider Adding Users Prior to Syncing with Intune
We recommend configuring SCIM provisioning before enabling the Intune integration:
- Why: Setting up SCIM ensures that your users are automatically created and managed within Reftab. This allows Intune-synced devices to be automatically assigned to the correct users in Reftab.
- If you skip SCIM: You can still integrate Intune to bring devices into Reftab, but those devices won’t be linked to specific users unless SCIM is configured later.
Best practice:
- Complete your SCIM integration.
- Ensure any existing Intune device in Reftab have a serial number value.
- Then proceed with the Intune integration.
This approach provides the most accurate and automated user-to-device relationships in Reftab.
Contents of This Guide
- Setting up the integration
- Configuring for Autopilot (optional)
- Configuring Secrets, Endpoint, and Reftab Intune Settings
- Syncing asset data fields from Intune to Reftab
- Syncing device owners to automatically assign assets to users
- Types of devices to import
- Limit Categories to import
- Viewing Installed Software
- Move assets to different locations after sync (optional)
- Updating asset ID’s
- Suggested Next Steps
Setting up the Integration
You’ll need a Reftab account on the Business plan or an account on trial of Business Plan to set this up.
Log into Microsoft Azure and click “App Registrations” > “New Registration”.
Click “Add” > “App Registration“
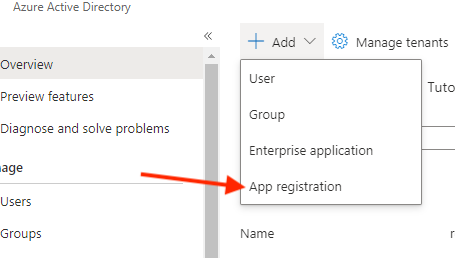
Next, name the app “Reftab” and click “Register“

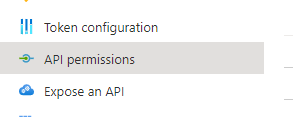
Next, on the left side under Manage , click “API Permissions“
Next, select “Microsoft Graph“
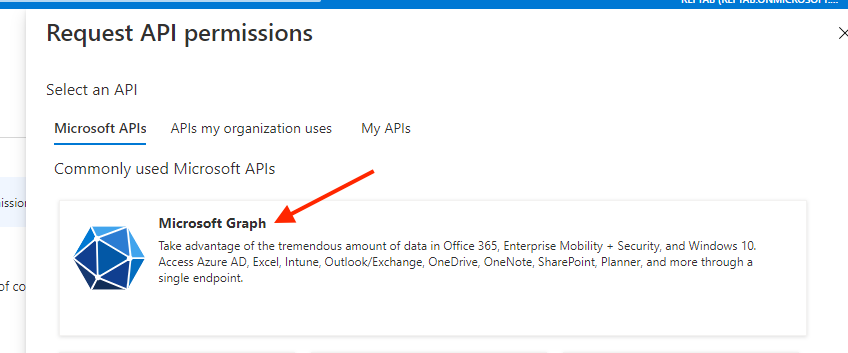
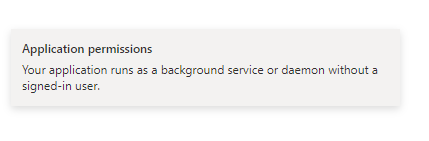
Next, select the option “Application Permissions”.
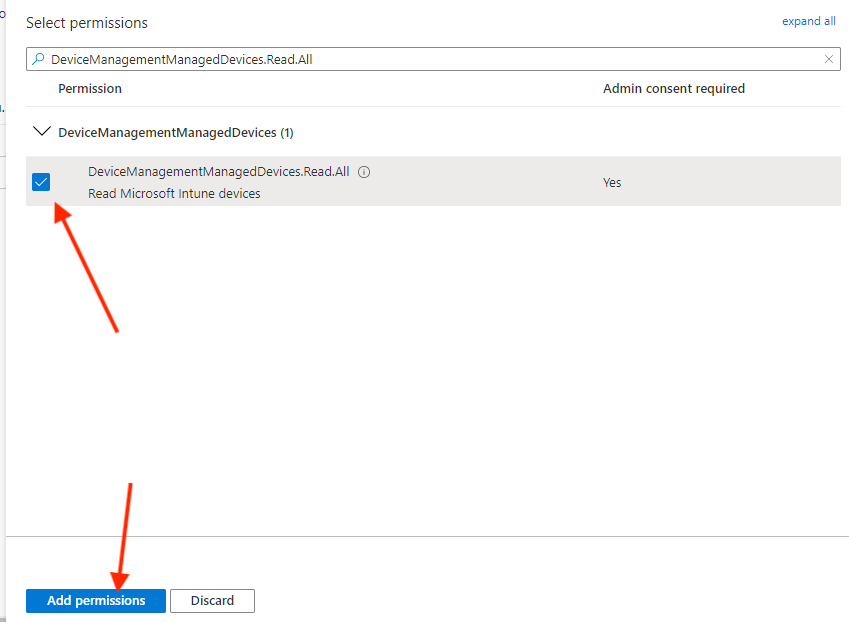
Next, expand the section for “DeviceManagementManagedDevices” and check the box for “Read Microsoft Intune devices” and click “Add Permissions” at the bottom.
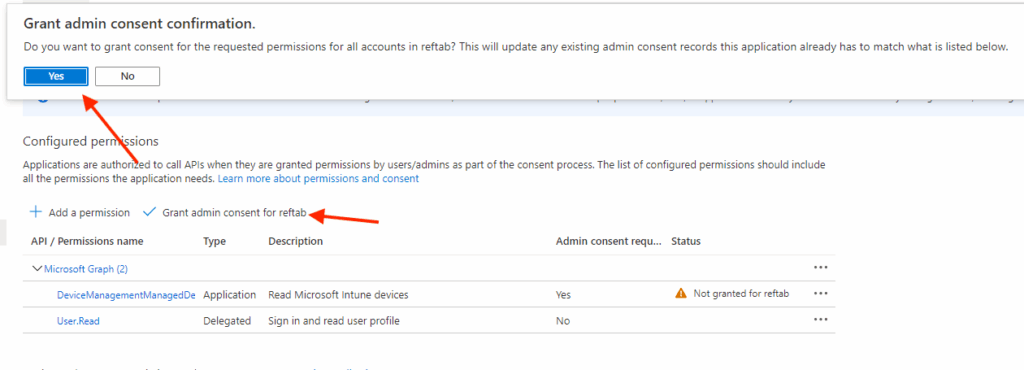
Click the button “Grant admin consent confirmation”. And click “yes”.
Next, click “Add a permission” and search for “Device.read.all” and click the check box to add.
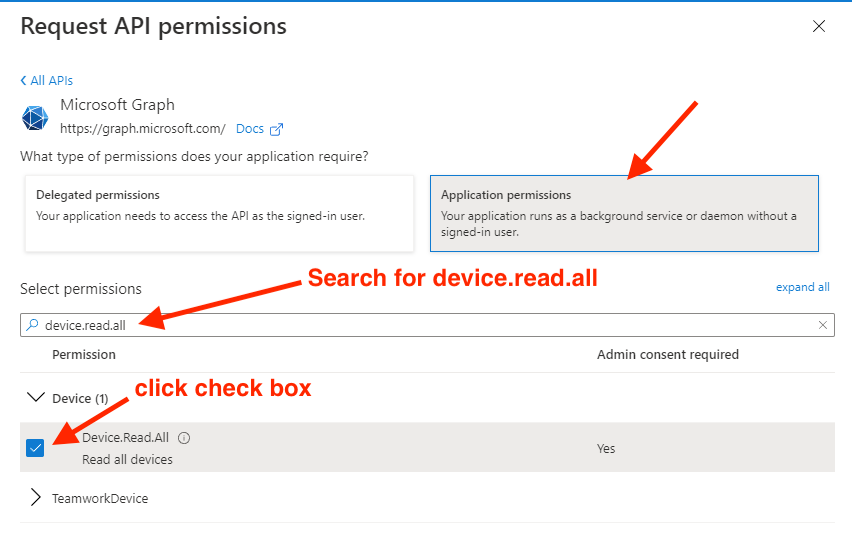
Finally, you’ll need another API Application Permission of “Directory.Read.All“. Enable this permission the same as steps above.
Be sure to “Grant Admin Consent” for above permissions.
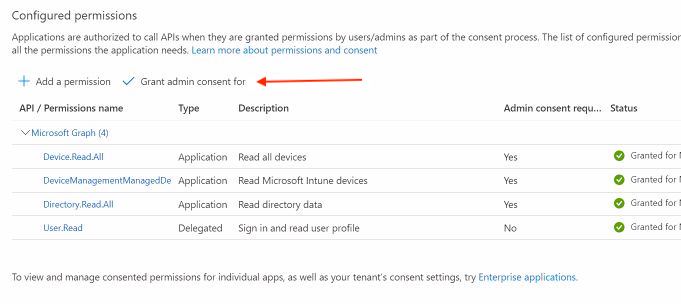

CHECK PERMISSIONS
BEFORE PROCEEDING
Please double check that you have granted “Application” permissions for the following:
- Device.Read.All
- DeviceManagementManagedDevices
- Directory.Read.All
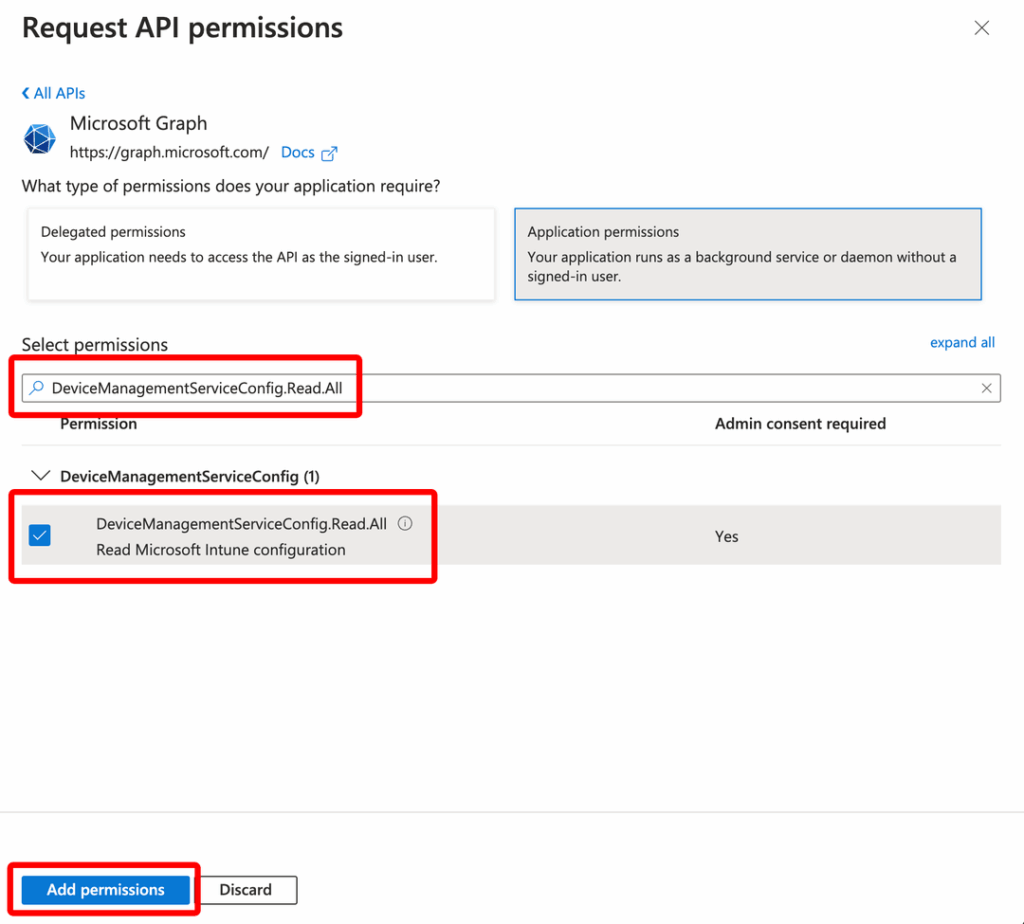
Configuring for Autopilot (optional)
What is Windows Autopilot?
A Microsoft service that lets you pre-configure new devices to ship directly to users, with company settings and apps already applied — no IT setup needed.
Why use it with Reftab?
Importing Autopilot devices into Reftab keeps your inventory updated before devices even ship, making onboarding and device assignment faster and easier.
To set this up, ensure you add the application permission DeviceManagementServiceConfig.Read.All and grant it Admin Consent.
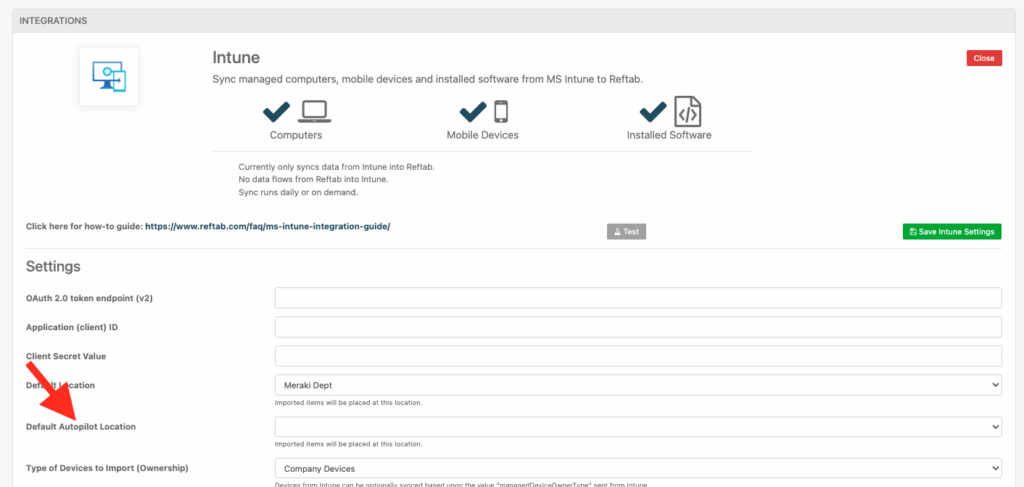
When configuring on the Reftab side, ensure that you set a default location for your Autopilot devices:
Configuring Secrets, Endpoint, and Reftab Intune Settings
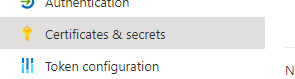
Next, on the left side under manage click, “Certificates & secrets“
Click “New client secret”. Then, on the right, name it “Reftab key” and set expires to “24 months”. Then click “Add” at the bottom.

A value will appear. We will need it later, copy it to a text document for now. This is the only time it will be visible.

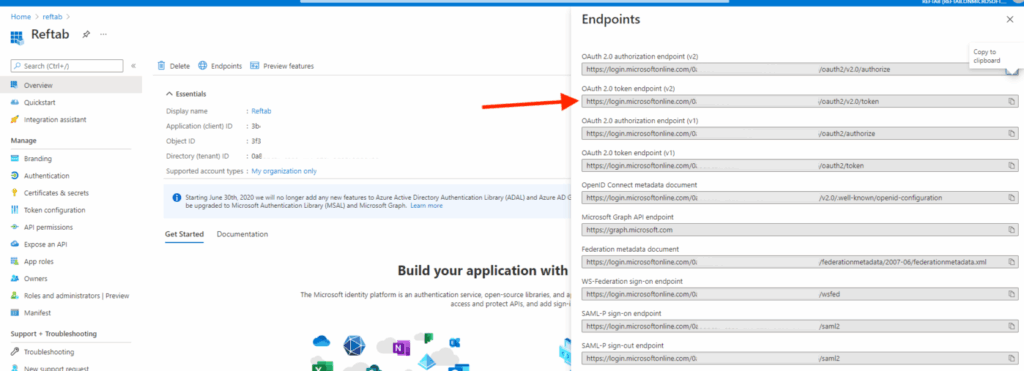
Click “Overview” on the left side. And click “Endpoints”. Then, copy the token on the second line, “OAuth 2.0 token endpoint (v2)” paste this value into a text document.
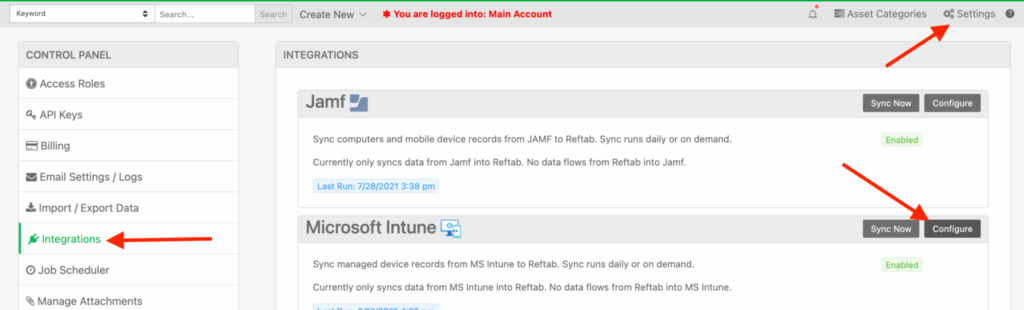
Next, log into Reftab as an administrator. Click “Settings” > “Integrations“. Click “Configure” next to ‘Microsoft Intune’.
In the window that appears, paste in the OAuth 2.0 token endpoint (v2).
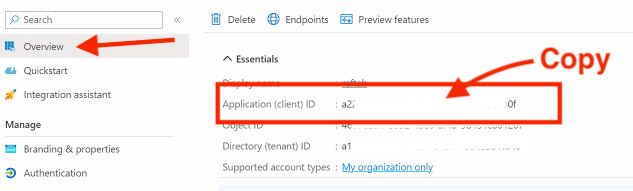
Paste in the Application (client) ID. (This value can be found in your Intune Dashboard under App Registration. Click “Reftab” then click Overview and look for Application (client) ID.)
Paste in the Client Secret value. (note: you’re pasting in the value, not the client secret ID)
Next, choose a Reftab location the Intune devices should be saved to. Then, choose a category for the devices.
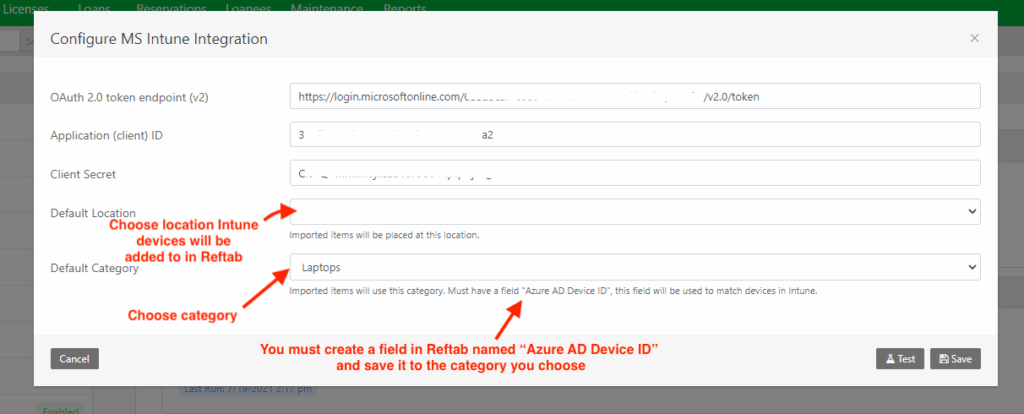
NOTE: The category you choose must have a text field called, “Azure AD Device ID” and “Serial Number” saved into it for the integration to work.
If you don’t have this field, click cancel and click “Asset Categories” and create a new field titled “Azure AD Device ID” with a type of “text”, as well as a field titled “Serial Number” with a type of “text“. Ensure that you mark your Serial Number field with the No Duplicates toggle, and save them to your category for Intune devices. Then, come back to this page.
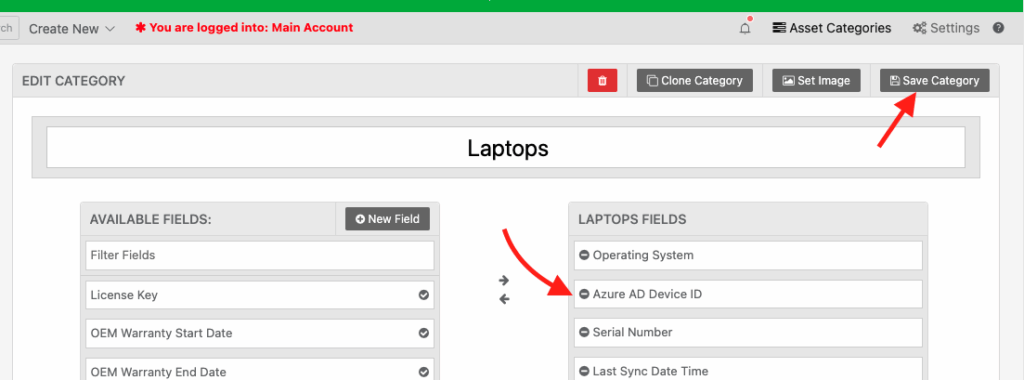
In this example screenshot above, Azure AD Device ID and Serial Number is a text field on category of “Laptops”. “Laptops can be selected as the category to sync Intune devices.
Once all options are selected, click “Save” and then click, “Test“
If the test is successful, you’ll see a response of the data that MS Intune is sending to Reftab.
Syncing Fields from Intune to Reftab
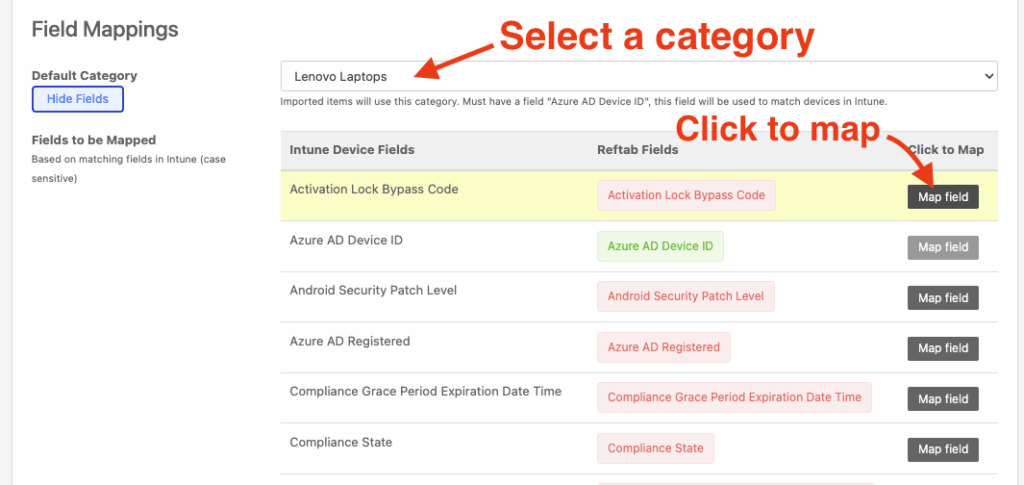
Within the Reftab Intune configuration page you can select certain fields to sync from Intune to Reftab.
First, select your category next “Default Category”.
Then, you will see a table of all the available fields that can be mapped from Intune. Click “Map field” and the system will create a field in your chosen category automatically.
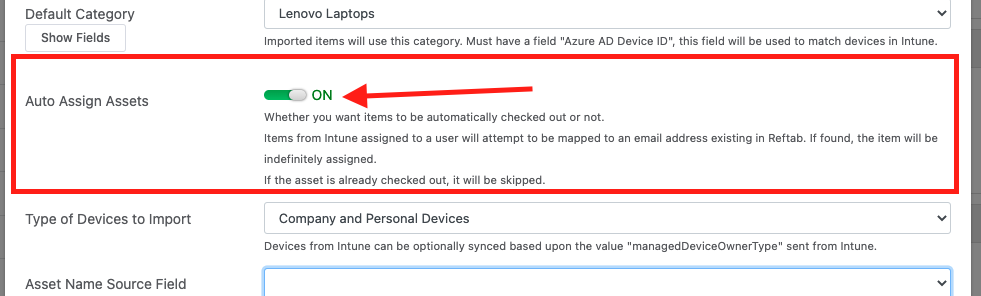
Syncing Device Owners to Auto Assign Assets from Intune
You can automatically assign assets to users after enabling the “Auto Assign Assets” option. Reftab will look for a user via the “emailAddress” attribute sent from Intune. If that email address is found for a user in Reftab, the asset with be checked out to them indefinitely.
NOTE: Setting up a SCIM integration is ideal for this scenario to automatically add users from Azure. See this guide here.
If an asset is already checked out in Reftab, it will not be checked out again even if a value for the emailAddress attribute is sent from Intune.
Types of Devices to Import
Reftab allows you to choose which types of devices to sync. This is helpful if you have some staff who have personally owned devices registered in Intune and you don’t need to track them in Reftab.
- Company Devices – owned by company
- Personal Devices – personal devices
- Company and Personal Devices – both personal and company owned

Limit Categories to import
Optionally, Reftab permits you to restrict which categories you would like to import. For example, if you create a category in Intune labeled “HR Laptops”, you will be able to restrict the integration to only bring in “HR Laptops”. If left blank, the integration will operate normally and import all categories.
If you have shared Entra tenants, this will be useful for pulling devices based on the intune device category.

**Please note that each category will need to be on a separate line.
Types of Devices to Import by OS
Reftab allows you to choose which type of OS to sync from Intune. This is helpful if you only want to sync certain devices such as Windows only or iOS and Android only, etc.

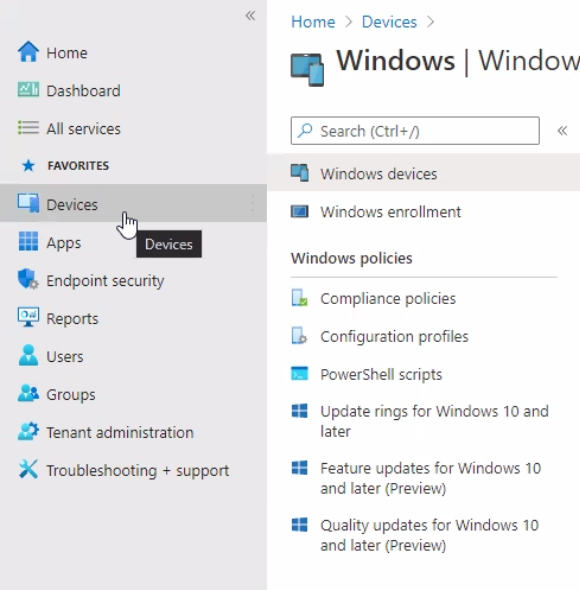
NOTE: By default the asset names that display in Reftab are mapped from the Intune field of: “Management Name”. The values for management name can be edited in MS Endpoint Manager by clicking “Devices” and “Windows Devices”.
However, you can choose to map the asset title to other fields from Intune.

Viewing Installed Software
When viewing an asset synced with Intune, you can click the tab “Licenses and Software“.

You’ll see a table showing a list of applications installed on the computer. You’ll also see column labeled “Vulnerabilities“. Reftab checks the application and the version against CVE databases. If a vulnerability is found, you’ll see it listed in the “Vulnerabilities” column.
Changing Asset ID’s after Sync
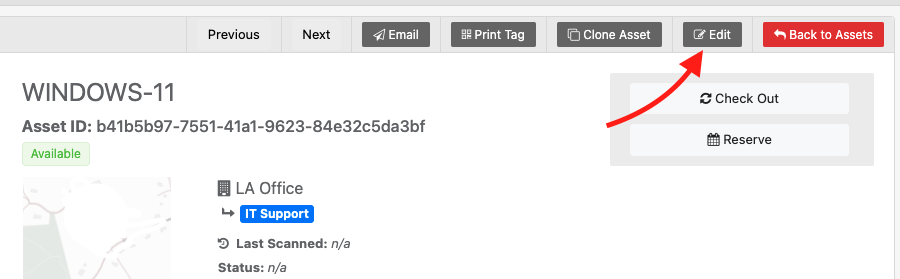
After assets are synced into Reftab, you may manually change an asset’s ID. Find the asset and click “Edit” > “Override and Change Barcode” (note, only Reftab administrators can do this.)
Move assets to different locations after sync
By default, Reftab’s Intune integration saves assets into one location. However, you can configure workflows to move assets based on all sorts of criteria to other locations. See an example here where we utilize workflows to move assets based on a loanee’s location: page here: How to Auto-Assign Asset Locations via Loanee Fields in Workflows
Moving assets into a new category after sync
You may also move the asset into a new category. However, keep in mind the fields that are populated are based upon the fields present in the assigned category. To change an asset’s category, see our FAQ page here: How to Change an Assets Category
Assign Assets Alternative Mode
If assets aren’t being checked out to the correct users in Reftab, you can try enabling this setting. This will parse the data from Intune in an alternative manner to find users.

Notes on changing primary user in Intune
If your team assigns Primary Users in Intune, you’ll want to toggle “Auto Re-Assign Assets.” This will allow Reftab to assign the asset to the new Primary User upon next sync:
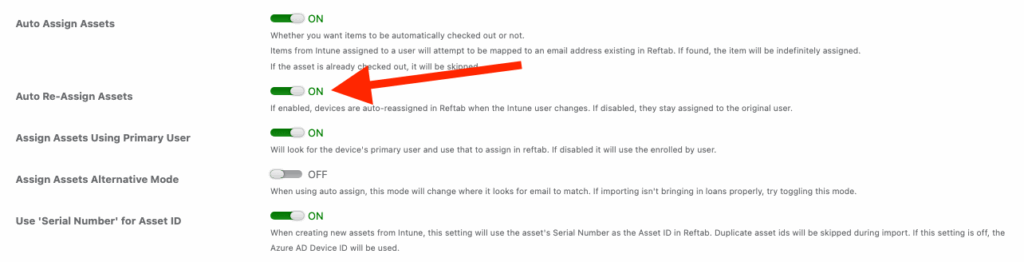
An important note for this, Reftab will not check the asset back in if the Primary User is removed. The system will only re-assign the asset, if there is a new primary user present.
Note on Automated Email Alerts
Default system emails for “check out” and “return” do not trigger by default when Intune assigns or returns assets. If a user wants to use emails or any other actions, workflows can be used to achieve this purpose.
Why Assets May Be Skipped During Intune Sync
Reftab requires a unique and stable serial number to correctly match an incoming Intune device to an existing asset. In some environments, devices may report non-unique or placeholder serial numbers — such as generic BIOS values, default manufacturer strings, or reused identifiers. When this occurs, multiple assets may appear to match the same device.
To prevent records from incorrectly overwriting each other, Reftab will skip the affected device entirely rather than risk applying a bad update or creating a duplicate.
If you’re seeing assets skipped during sync, you can resolve this by either correcting the serial number on the asset record, or by providing the Azure AD Device ID directly on the asset. Reftab will use the Azure AD Device ID to uniquely identify the device and map it correctly, bypassing any serial number conflicts.
Suggested Next Steps: Sync Software Usage
Enhance your asset management by integrating Reftab with Microsoft Entra for seamless SaaS discovery and utilization tracking. This setup builds on your current infrastructure, automating the management of both hardware and software assets. Click here to get started.
For support, email “help@reftab.com”.
Your assets, simplified. Begin your journey with us!
50 assets free forever with unlimited inventory & software tracking. Includes email alerts, mobile apps, reports, custom asset tags and more.