Multi-Tenancy, Creating/Deleting Tenants and Provisioning Users
Reftab supports multi-tenancy which allows an organization to provision multiple unique instances of Reftab under one organizational structure.
In this guide we’ll cover:
- What multi-tenancy is
- How to know if you need multi-tenancy
- How to know which tenant users belong to
- How to know which access role a user should have within a tenant
- How to Run Reports Across all Tenants
- How to create a new tenant
- How to Delete a Tenant
- Automatically provisioning users with just-in-time provisioning
- Automatically sync users to tenants via SCIM
- Manually add users to a tenant
- Users that belong to multiple tenants
What is Multi-Tenancy in Reftab?
In a nutshell, multi-tenancy is when a software can serve multiple, independent user groups. For example, a university may want a Reftab account for the IT Department, while at the same time, wanting to use Reftab for the AV Department and for the Business School separately. Multi-tenancy would help here because these separate groups can manage their own assets and data without worrying about sharing access with other groups.
Single sign-on can be configured so that each user can sign in using their work / university credentials and route automatically to their Reftab tenant without hassle.
The users wont see any difference, but Reftab will do the work behind the scenes so that, for example, users in the Business School land in the Business School tenant, AV Department users land in the AV tenant and so on, without knowing any other tenant exists.
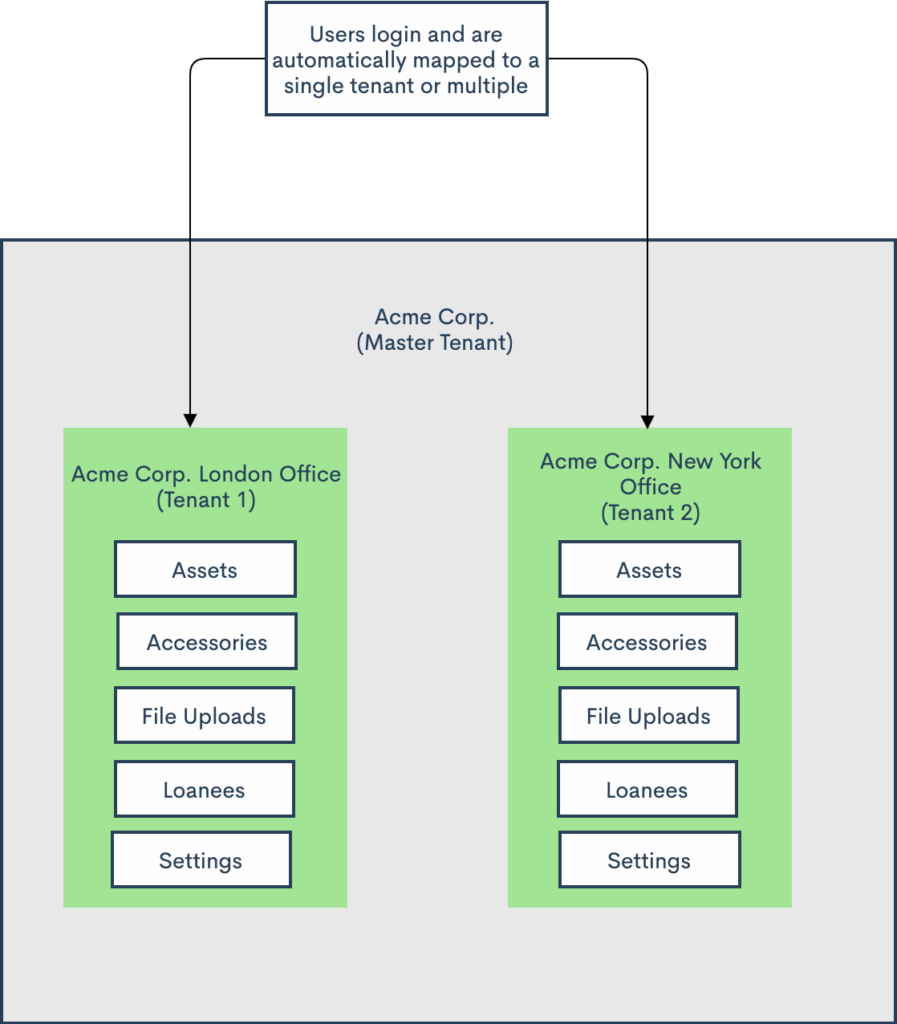
The image below shows an example of two tenants: London and New York, under one “Acme Corp.” company. The image illustrates data separation between tenants.
To setup multi-tenancy, you’ll need to reach out to help@reftab.com as this requires an upgrade.
How Do I Know if I Need Multi-Tenancy?
If you use single sign-on and have divisions within your school or company that want / need information to be separate from one another, then you should use multi-tenancy.
However, if not, you can use a single Reftab account and setup access roles to limit what users can and cannot do.
Or, each department can create a Reftab account for their own group of users by signing up here: https://www.reftab.com/sign-up
Benefits of multi-tenancy
- Completely separate assets, categories and locations.
- Completely separate list of users.
- Manage user in multiple Reftab tenants using one SCIM connection.
- Completely separate account-wide settings. For example, each tenant can have its own timezone (important for running workflows and sending automated emails).
- Completely separate maintenance forms and schedules.
- Administrators can be given access to switch between tenants easily.
Limitations of multi-tenancy
- Cannot transfer data between tenants. Multi-tenancy is designed to separate assets, users, etc. As of today, there is no option for example, to transfer a group of assets from one tenant to another.
Limitations of single-tenancy
- Account settings are shared. For example, only one timezone can be set.
- Reports are all or nothing. For example, if you give someone access to reports, they can run reports on all locations across all categories of assets across all tenants. The only way to prevent this is to completely hide reports for the users you want to limit access.
- The loanee page will display all users no matter their department, organization or location they belong to.
- (You can still prevent users from checking out equipment at specified locations by using workflows)
- Maintenance jobs cannot be separated by access restrictions. All users who can log into Reftab can see maintenance forms.
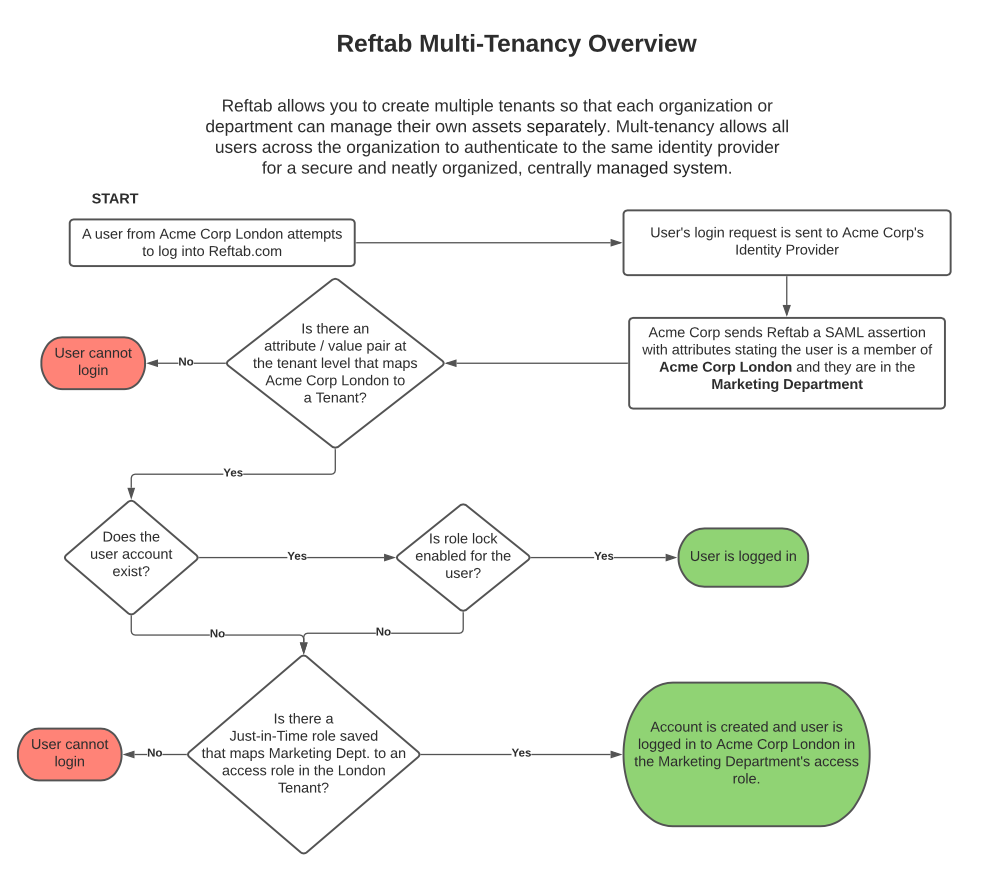
How Does Reftab Know Which Tenant a User Belongs to?
Each tenant has attributes that define the type of users that should have access. Administrators need to define an attribute and value in Reftab and pass that attribute and value from their identity provider so that Reftab can read them and know information on who is logging in. Reftab looks at the SAML token being passed and, if mapped attributes are found, the user is allowed to access a tenant.
For example if you have a tenant for the “Photography” department, when users login, Reftab looks to see if the user is a member of the photography department based upon their SAML token. If so, they can access the Photography tenant.
If your organization does not have attributes like this, you can use a wild card. Click here to jump to the section on wild card routing
How Does Reftab Know The Access Role a User Belongs to?
Every user in Reftab needs to belong to an access role within Reftab. Examples of access roles are: “administrator”, “viewer”, “loanee”, “editor”, “disabled”, or any custom defined role.
By establishing attribute and value pairs, administrators can place users into an access role upon login. For example an attribute of, “department” and a value of, “IT” can save employee’s in the IT Department as Reftab administrators.
See the section below titled, “Automatically Provision Users Into Tenants” for more information.
This flow chart below gives an overview of the multi-tenancy mapping procedure:
How to Run Reports Across Tenants
To run reports across tenants in Reftab, users with super tenant access can simply select the “Report Across Tenants” checkbox when building a report. This allows them to generate data spanning all tenants. Alternatively, they can use the report designer to select specific tenants for more targeted reporting, customizing the results to meet their needs.

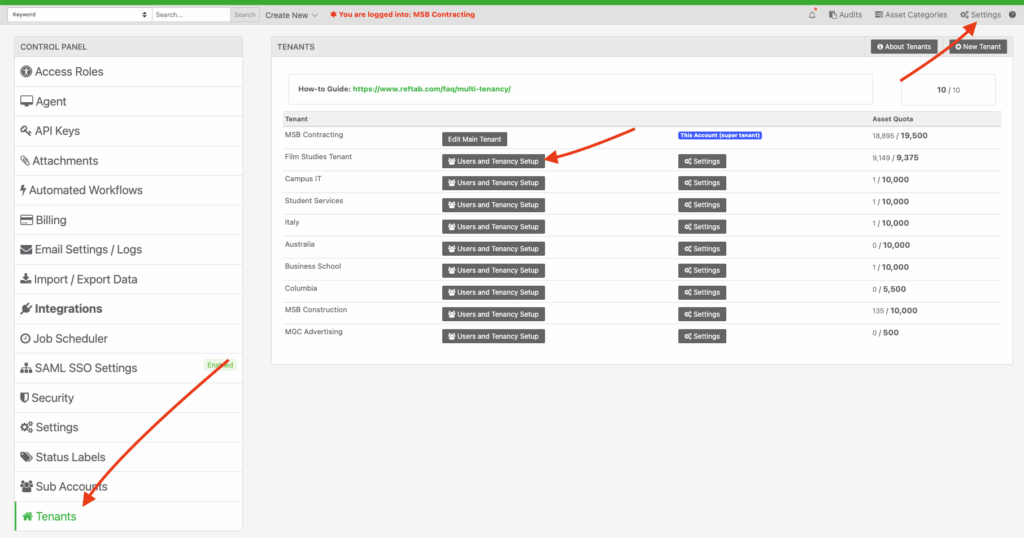
How to Create a New Tenant
1) Log into Reftab in the Super Tenant as an administrator.
2) Click “settings“
3) Click “Tenants” > “Add Tenant“
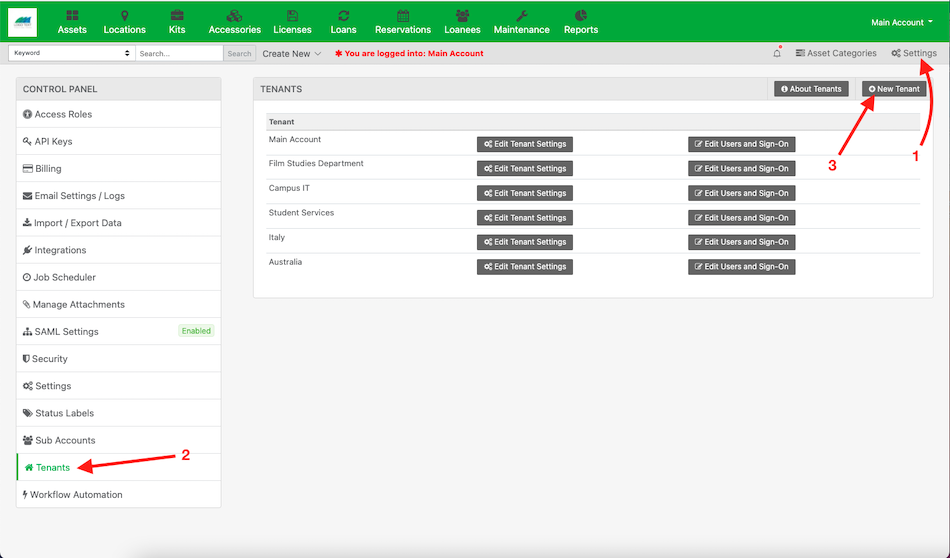
Note: If you do not see “Tenants”, this means your account is not configured for multi-tenancy or, you’re not logging into the super tenant.
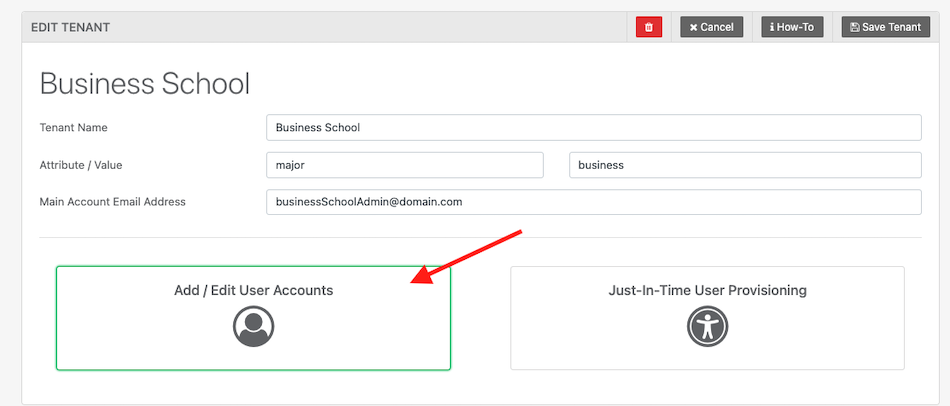
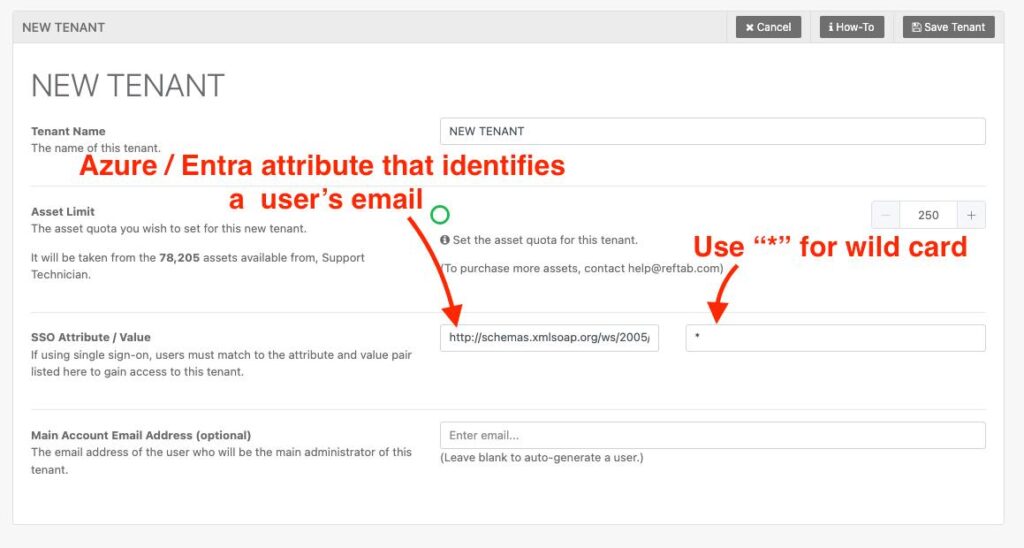
4) Next, provide the following information:
Tenant Name: A tenant name identifies the tenant within Reftab. If a user has access to more than one tenant, the tenant name will display to help identify which tenant to log into.
Asset Limit: The asset quota you wish to set for this tenant. When adding assets, they will be taken from your super tenant’s available asset quota. When reducing assets, they will be added back to your super tenant.
Attribute / Value: This is an attribute / value pair from your identity provider allowing users access to a tenant. For example an attribute of “Department” and a value of “Facilities” will mean that people in the Facilities Department will access this tenant.
- If you’re not using SSO, you can leave this blank.
- If you are using SSO, and don’t have an attribute for your users at the organizational / department level, use a wild card. Click here for more info on using wild card
REMINDER: If using SSO, you must expose the attribute from your identity provider before users login. This is because each user logging in, must match a tenant’s attribute / value mapping, or they will get an error saying ‘the user authenticated but mapping failed’. If you are not using SSO, you can add users manually to a tenant.
Main Account Email Address: This is the email address that you set as the main account admin for the tenant. When this person logs in, they will be a main account holder for the tenant and can make changes / add more users etc. It is usually recommended to leave this blank. Reftab will auto-generate a user.
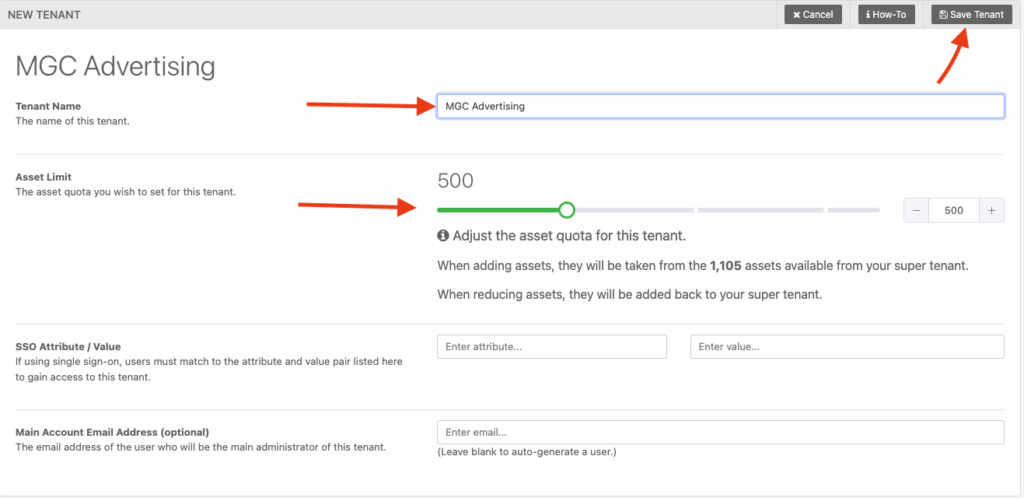
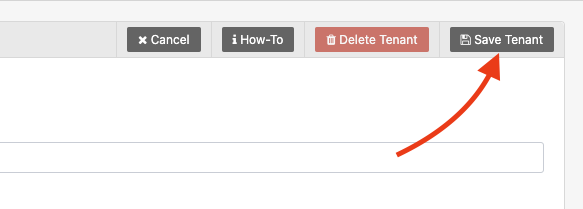
Click “Save Tenant” when done.
Next, the tenant will appear in your tenant list. You will be added as an administrator to the new tenant automatically. You’ll see a notice to indicate this:

To access the new tenant, simply hover your mouse in the upper right corner. You’ll see your new tenant name which you can click to switch into.
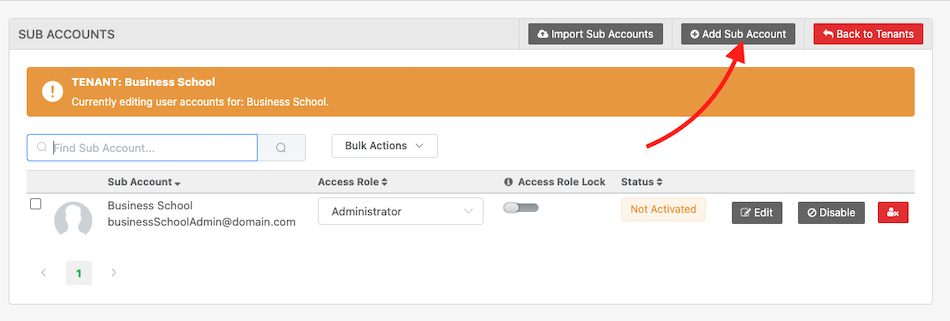
Otherwise, if you want to continue adding users to your new tenant within the main tenant page:
Click “Users and Tenancy Setup“

Next, click “Add / Edit User Accounts“

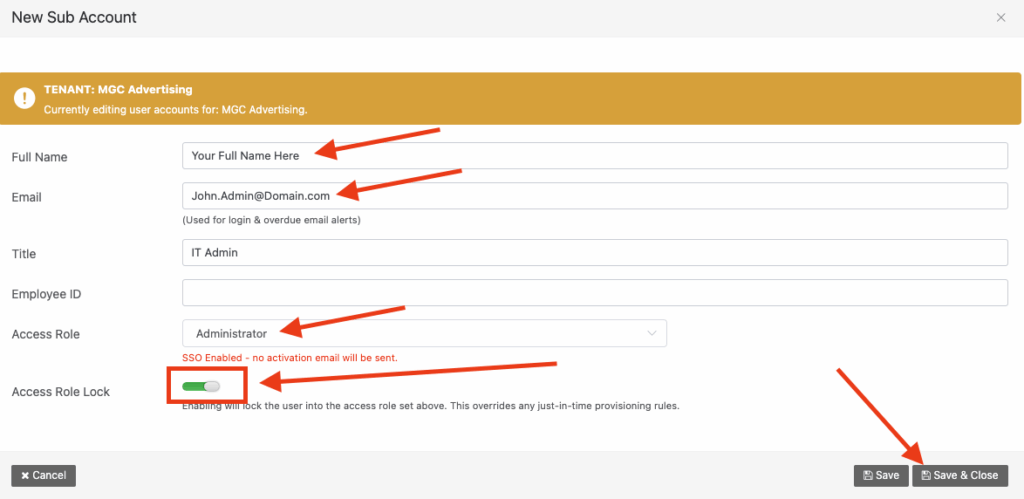
Next click “Add Sub Account” and add the other users.

Add full name, email address and set role and enable “Access Role Lock“
This will create the user and lock them into the access role you selected. By doing so, they’ll remain in the account and wont inadvertently become disabled if you setup SSO incorrectly at a later time.
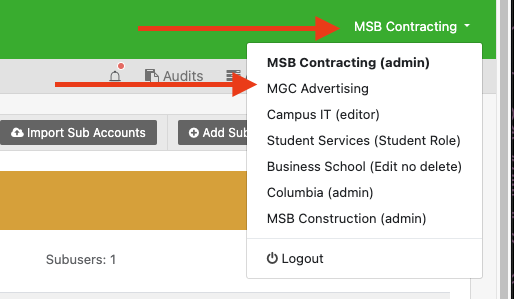
That’s it! You now have a new tenant created that you can access. You can refresh your page and in the upper right corner of the screen, you’ll see a drop down list showing all the tenants you can access. Click on any of them to go directly into the tenant.
Accessing a Tenant via Single Sign-On (SSO)
When a user logs in via single sign-on, your identity provider handles the authentication. However, the system still needs to know which tenant the user should be routed into. There are three stages regarding accessing a tenant via single sign-on:
- The user authenticates with single sign on.
- Next, Reftab checks that the user is allowed access to a tenant. This is done via the tenant’s attribute / value mapping. (Remember, wild card routing can be utilized)
- Finally, Reftab checks that the user is mapped to an access role within the tenant. This is done via
- the user’s pre-selected access role or,
- the SCIM groups assigned to access roles or,
- the just-in-time access role
Without single sign-on, users log into Reftab normally with their username and password and access the first tenant they were added to. With single sign-on, users with access to multiple tenants will see a tenant selector page to choose their desired tenant.
How to Delete a Tenant
To delete a tenant, first sign in as the main administrator of your super tenant. Then, navigate to Settings > Tenants. Locate the tenant you wish to delete and select Users and Tenancy Setup. At the top of this view, you will find a red Delete button.
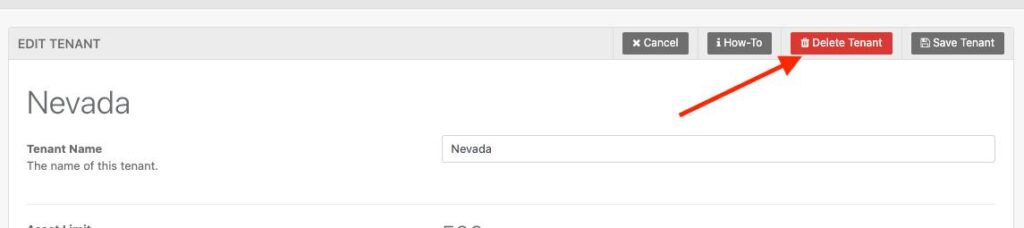
Important: A tenant can only be deleted if it has 0 assets. Ensure all assets are removed before proceeding with deletion.
Adding Users to Tenants
In this next section, we’ll cover adding users to tenants. There are three ways you can add users:
Add Users Manually to Tenant:
If you don’t want to sync users from your IT infrastructure via SCIM or use just-in-time provisioning, you can add users manually into tenants.
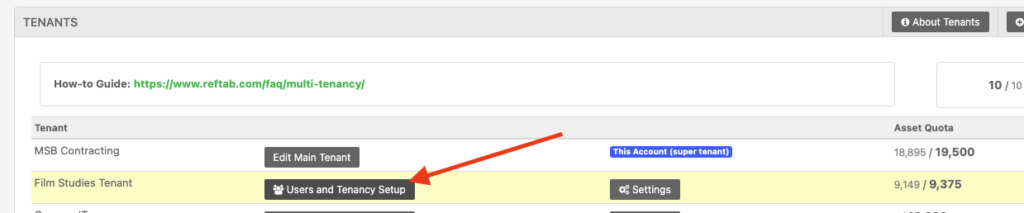
An administrator who has access to the super tenant can login and click “Settings” > “Tenants” find your tenant and click “Users and Tenancy Setup“
NOTE: If you do not see an option for “tenants”, you are not logged into your super tenant.
Next, click “Add / Edit User Accounts“
Next, click “Add Sub Account“
From here, you can add the users email address (which is what they will use as their username) and save them to an access role.
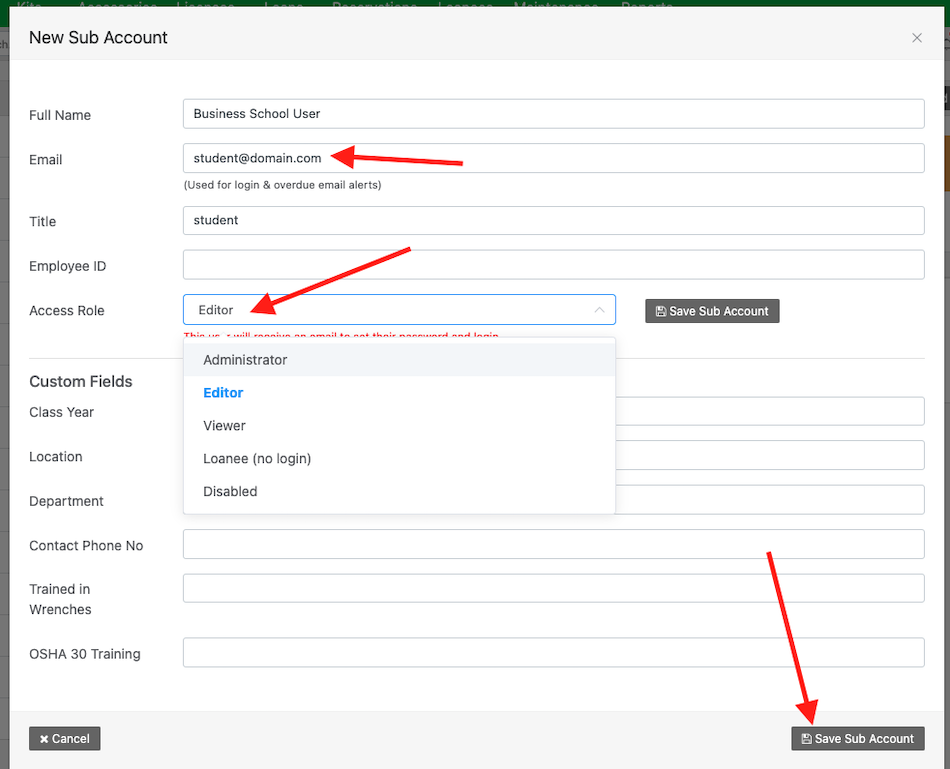
Click, “Save Sub Account” when done.
Sync Users to Tenants via SCIM:
SCIM automates user management by syncing user details from platforms like MS Entra and Okta. Reftab supports SCIM integration at the super tenant level, allowing centralized user management across shared directories—ideal for large organizations or universities. Alternatively, MSPs can configure SCIM separately for each tenant, ensuring independent management for unrelated user groups.
Using SCIM as an MSP:
MSPs should create tenants for each of their customers. Then, within each tenant setup SCIM for that individual customer. Once in a tenant, click “Settings” > “Integrations” find SCIM and click “Configure“

Follow our guides on setting up SCIM here
Using SCIM as Single Organization:
Reftab recommends setting up SCIM at the super tenant level for single organizations using multi-tenacy. To do this log into your super tenant as an admin and click “Settings” > “Integrations” find SCIM and click “Configure“.
Once complete, click “Settings” > “Tenants” and for your tenants click “Users and Tenancy Setup“

You’ll see a section for SCIM User Provisioning Settings. Select “Yes” next to “Sync Users via SCIM From Super Tenant“. Then, select the groups you want to sync to the tenant and then select the role you want each group member to be placed into.
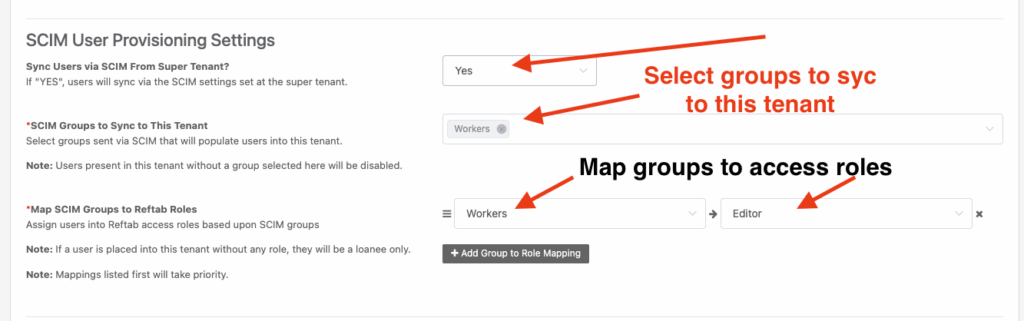
Click “Save Tenant” when done.
Guides on how to setup a SCIM integration:
Azure AD: https://www.reftab.com/faq/scim-azure-active-directory
OKTA: https://www.reftab.com/faq/scim-okta
Notes on SCIM With multi-tenancy:
If you set up the SCIM integration at the super tenant level, it applies to all the tenants. Meaning, you can filter users into their respective tenants by mapping groups to tenants.
Otherwise, if you setup the SCIM integration within one, individual tenant, the SCIM connection will only be applicable to that one tenant.
It’s not suggested to setup SCIM in both the super and individual tenants. It should be done either only at the super level or within each individual tenant.
Automatically Provision Users Into Tenants with Just-In-Time Provisioning
This is not recommend for most cases. We suggest using a SCIM integration instead of just-in-time provisioning.
After a user is allowed to access a tenant they must have an access role assigned to them. Just-in-time provisioning automates this process thus, eliminating the need to create user accounts in advance.
For example, when an “employeeRole” (attribute) from the “finance” (value) team attempts to login, Reftab will create them as a user under an access role appropriate for them. (It is perfectly acceptable to use the same attribute / value as saved at the tenant level.)
After saving the tenant, click “Users and Tenancy Setup“.
Next, click “Just-In-Time User Provisioning“

You will need to define attribute and value pairs for each type of user and set the role they will belong to and set an access role such as, Administrator, editor, viewer, etc, or a custom role.
Click “Add Row” and provide an attribute, value and a role.
The screenshot below shows the just-in-time settings for a tenant called “Business School”. There are two rows in the screenshot establishing two mapping rules:
1.userType student -> viewer
2.userType staff -> Administrator
This means, On the SAML token, there should be an attribute for “userType”. If a value for userType is, “student” then the user will be provisioned with the the role of “Viewer“. Users with the userType of “staff” will be provisioned with the role of “Administrator“. If someone logs in and they’re not a student or staff userType, they will not be allowed in.

Click “Save Just-In-Time Provisioning” when done. Now whenever a user logs in, the system will be ready to determine who they are and provision them accordingly.
Wild Card Routing
When using SSO to login, Reftab needs to know which tenant the user may access. This access is governed by an attribute and value pair. To determine which users can access a tenant, assign a specific attribute and value or use a wildcard attribute common to all users, like “email” in a SAML Assertion. For example, the wildcard “*” allows any user with the specified attribute to access a tenant. So for example if you want anyone with an email address to access a tenant, you would use the attribute for email address and the “*” symbol. Wildcards simplify access management…. but for stricter controls, specify an exact attribute and value instead.
Using Email Address as a Wildcard Example
To streamline user management, assign users to tenants and configure the system to check the email attribute. Using a wildcard asterisk with the email ensures users are automatically routed to their correct tenant, simplifying the login process.

If you are using Azure/Entra ID
Setup your attribute mapping as shown below:
Attribute: http://schemas.xmlsoap.org/ws/2005/05/identity/claims/emailaddress
Value: *

If you are using Okta
Setup your attribute mapping as shown below:
Attribute: email
Value: *
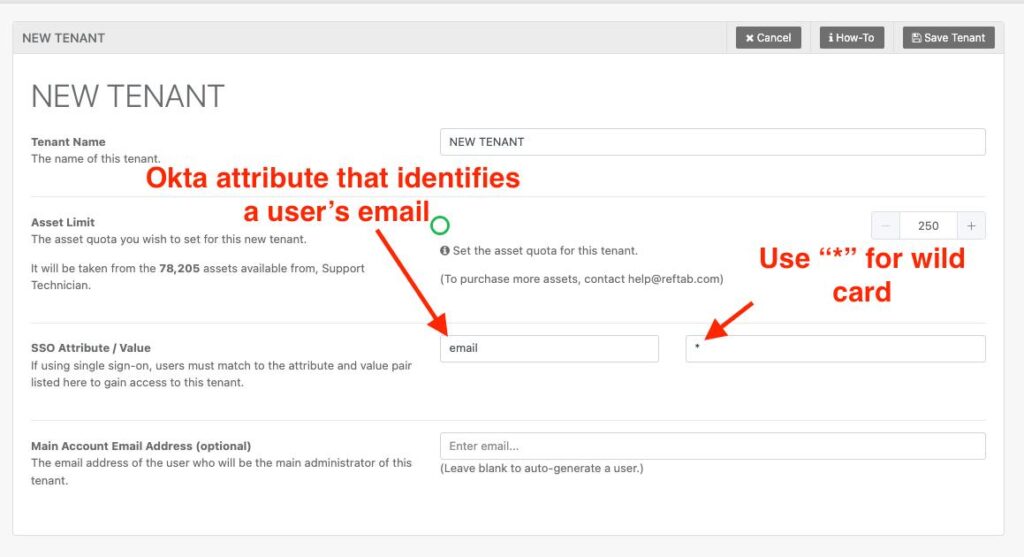
Click “Save Tenant“
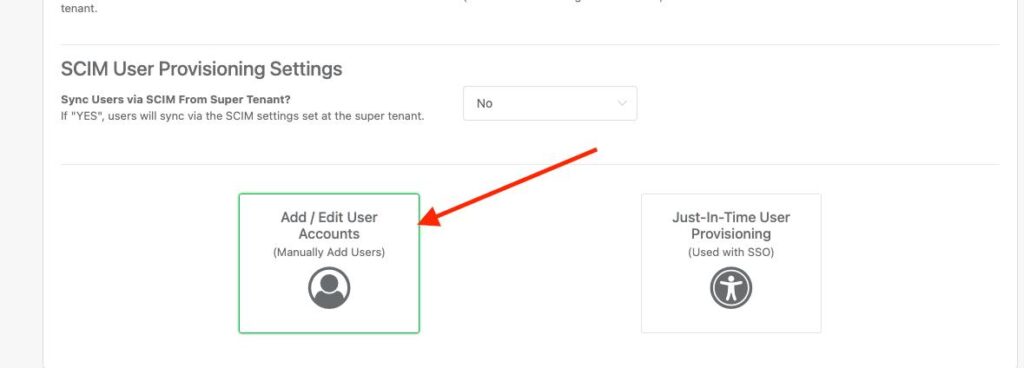
Find your tenant then click “Users and Tenancy Setup“

Click “Add/Edit User Accounts“
Click “Add Sub Account“
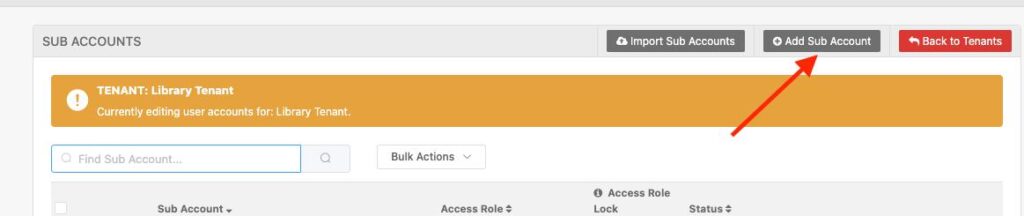
Type in the user’s name, fill out their email address, then click “Save & Close“

Now when this user signs into Reftab via SSO, the system will recognize which tenant they belong to and add them in. The system is not checking what group they are in, rather it is the fact that they have an email address which allows them access to a tenant.
Users Can Belong to Multiple Tenants:
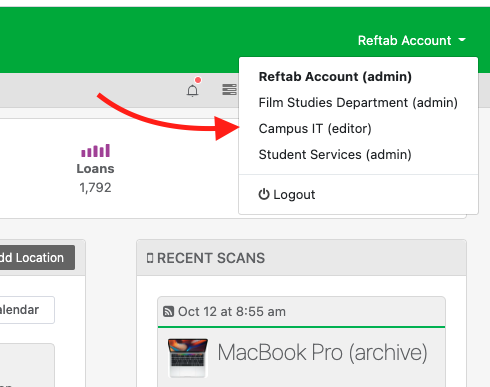
If a user is allowed access to multiple tenants, upon login they’ll be asked which tenant they would like to proceed to:

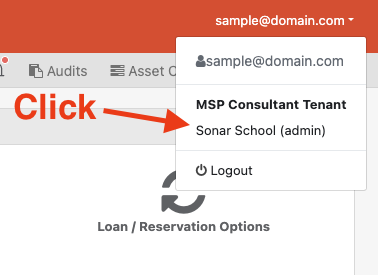
Once logged in, if a user wants to switch to another tenant, they can do so from the upper-right hand corner:
If a user only has access to one tenant, they wont be able to see other tenants. Only administrators can add other users. If someone wants to be added to another tenant, they will need to reach out to their Reftab admin.
For Help
Email help@reftab.com for any assistance or questions.
Thank you!
Your assets, simplified. Begin your journey with us!
50 assets free forever with unlimited inventory & software tracking. Includes email alerts, mobile apps, reports, custom asset tags and more.