If you are reading this, you’re already well-versed in why asset tags are needed. However, most organizations aren’t using them to their fullest potential.
This process doesn’t have to be time-consuming. And, what you can do once your process is dialed in is nearly infinite.
In this post, we’re sharing how you can print and assign asset tags in bulk, as well as some specific use cases.
Let’s dive in.
Save time managing physical assets
If you are still relying on paper sign-out sheets or manual check-in processes, you are wasting a lot of time. The chances of introducing human errors are high.
In the pre-smartphone days, this was understandable. There wasn’t a quick way to scan a piece of equipment from your phone and immediately see all of the details about the contents, who last checked it out, when it was last checked back in, etc.
Fortunately, these days, there is asset management software with integrated barcode generators, like Reftab, that make this process more efficient and secure.
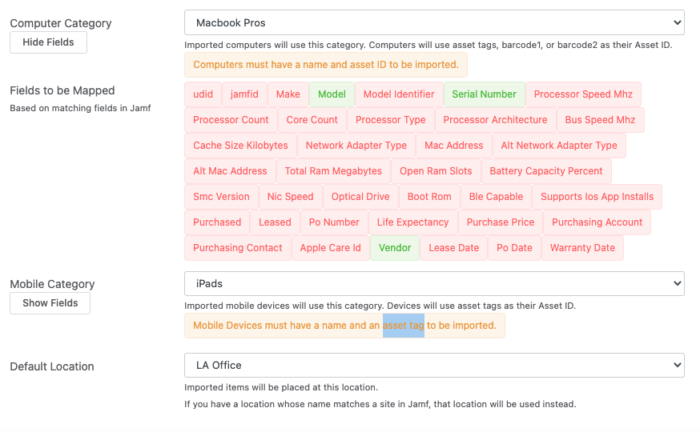
For example, if you are already using Jamf or Microsoft Intune, you get all of your equipment automatically populated in Reftab. When an IT person scans an asset tag, you can see all of the details on the phone or tablet.
5 different use cases
As we alluded to earlier in this post, the biggest reason to use this integration is to save time. Here are some specific use cases:
Managing equipment for commercial and photo shoots
Let’s say you work in IT for a large advertising agency. You are surrounded by mountains of physical hard drives, laptops, film gear, chargers, and boxes upon boxes of tech accessories.
In addition to your normal day-to-day IT responsibilities, your team is also responsible for updating all of the company laptops (for security purposes), getting new employees set up with all of the gear and software they need to do their jobs, and checking in and out all of the gear that agency employees need to go on film shoots.
You could keep all of this information logged in an Excel spreadsheet. That can work okay when you are a small company and don’t have much physical equipment outside of laptops and cables.
However, when you start to have hundreds or even thousands of employees and millions of dollars in expensive tech and camera equipment, it doesn’t take long for that spreadsheet to become slow and unwieldy to manage.
On top of that, if you are looking for a specific file for a photographer, you need to know the exact hard drive it is on. Or else, you could be spending several hours frantically connecting different hard drives up to your machine until you find the one you are looking for. That’s if the hard drive was backed up properly in the first place and not lost.
Then, when you have to loan out equipment to an employee for a commercial shoot, you need to log all of the gear, including specific cables and tech accessories they check out, and then manually check and update it once it is returned. It is easy to leave chargers, cables, and other small tech accessories behind. So, you wind up wasting time trying to look for these items or spending extra money when you are replenishing these things that may or may not be lost.
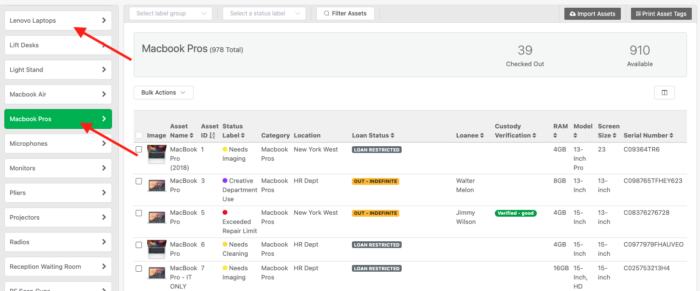
That’s where having printed asset tags on all of your gear and an integrated barcode generator in Reftab is key to bridging the physical with the digital. Now, instead of having to spend hours in the equipment room, you can simply scan a barcode on your smartphone. You can see the exact contents of the item when it was last checked, and so forth.
Loaning equipment to students
The same systems and processes that apply to large advertising agencies and film studios can also be applied to schools and universities. If you have a media lab, a robotics department, or even just loan out Chromebooks and tablets to students, adding printed asset tags to each piece of equipment and using an integrated barcode generator can save a ton of time and ensure that items don’t get lost.
Instead of having an IT team member, teacher, or even a teaching assistant log the check-in and out information in a spreadsheet or paper sign-out sheet, they can simply scan the item(s) when it is checked in and out. All of the information is accessible in one central database.
This can also apply to laboratories. If you have students or even scientists working on research, you can use this same system for managing lab equipment.
Keeping tabs on employee badges
Most medium to large companies give out badges to all employees. These badges ensure that only your employees – and no outsiders – can get into the building. You may even restrict specific areas in the building to just certain employees. For example, your large sales team probably doesn’t need full access to your equipment room.
When you have thousands of employees and potentially a hundred or more employees joining every month, keeping up with employee badges can be a full-time job. That’s where adding barcodes to badges can be helpful. You can scan an employee’s badge to quickly check things out to them, verify a person’s information, etc. It can also make it easier to deactivate someone’s badge automatically if they leave the company.
Scanning physical folders and files with confidential information
In the same way that you can scan employee badges, you can do the same with physical folders or paper files.
For example, we see a lot of big law firms, government agencies, and hospitals do this. If you need to keep a paper trail for insurance or regulatory purposes, you can add a barcode to the folder. You can automatically log the contents and necessary details to a centralized, secure digital database. This is a way to bridge the physical and digital for casework and record management.
Securing evidence for crime scene investigations
This one might sound a little odd, but if you work for a police department or jail, there is a good chance you are in possession of a lot of vital records, evidence, and personal property. This is usually housed in evidence locker rooms, and can be vital for investigations, court cases, etc. You don’t want every single person in your department to have access to this information for obvious reasons. That’s where having asset tags on each piece of evidence can be helpful. So, when a police officer needs a specific folder or piece of evidence, you can log who’s using it, who needs that folder and why, when it is returned, etc.
How to connect Reftab to Avery Sheets
The process for connecting Reftab to your Avery Sheet templates couldn’t be simpler. You can print out your barcodes in a big batch using your normal printer.
By default, Reftab prints to pre-defined Avery templates. You can print barcodes using a normal office laser-jet printer.
Ready to get started? Try Reftab for free.