Reftab June 2022 Release Notes

Release notes image

Reftab is excited to bring to you these latest release notes. We’ve not issued release notes in a few months, so this will include some of the major updates since February.

As always, we’d like to extend our thanks to those who have submitted feature requests and provided us detailed use cases. We’re proud to be able to develop new enhancements and features to support our customers.

Loan Groups (June 2022) 

Items checked out & reserved together are bundled together for easier management. This update makes the platform more visually conducive to bulk reservations and loans and generally improves overall management and ease of the platform.

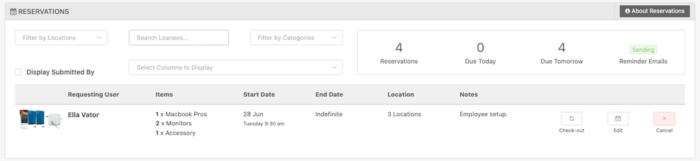
For example, when multiple items are reserved in bulk, they will appear under one row on the reservation table. In the sample image below, we can see that these 4 items were reserved together for the same person. As an administrator, it’s easy to view that these items belong together in one reservation.

A reservation group shows items reserved for the same person at the same time and is easily editable.

When clicking “Edit”, you’re now able to edit the items within the group. You can add / edit details, add more items to the group, cancel specific items or check-out the entire group at once.

A detail view of the reservation group

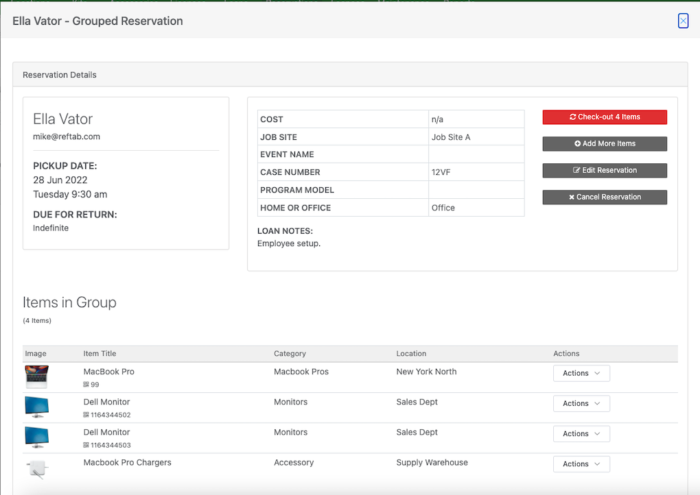
Additionally, you can search and filter based upon field values for loan groups. For example, if you checked out a group of items and logged it under a specific job code or an event name, you can use the search bar on the loans and reservations table to find all the items matching that field value. This is a major time saver because now you can find items grouped together easier, make edits easier and check items in / out much faster.

Prior to this update, if multiple items were reserved (or loaned) to someone it was:

  • a manual process to edit each item, and
  • not visually clear that these items belong together and were part of the same reservation.

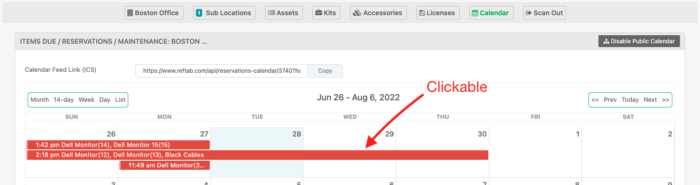
Furthermore, the calendar loan events are now clickable. You can see the included items, make edits, return the items, etc..

Calendar events are clickable and will display the loan group.

Reservation and loan groups are made automatically when:

  • Items are checked out or reserved from the bulk pages using the checkboxes on the asset table
  • Items are checked out on the scan page when ‘multiple loan’ is selected
  • Items are checked out or reserved from the cart in the user request portal 

This new update makes bulk reservation and loans easier to manage. This particular update was requested by a lot of users and we’re happy to be able to bring this to the Reftab platform.

(Regarding the mobile app, we are making updates in the coming weeks to align with groups better. As of now the mobile app continues to work as before.)

Custom Emails (June 2022) 

You can now create your own custom emails. From “Settings” > “Email Settings / Logs” click the button, “New Custom Email”.

Create as many emails as you require for workflows. For example, if you wanted to be alerted when a new asset was added or an item was returned, you can create an email with custom text and trigger it to send on certain actions so that you’re kept up-to-date when you need to be.

New Barcode / QR-Code Designer For Custom Asset Tags (Feb 2022) 

Reftab now gives you the ability to create your own labels including the size of the label, customizing your own text and adding images. Label designs are saved in your account which you can use at anytime. One of the biggest advantages this brings, is being able to print asset tags to dedicated label printers such as Zebra, Dymo or Brother printers.

Prior to this update, Reftab only printed to pre-defined Avery sheets. Now, you can take advantage of any existing label printers your school or company may already have, (or even purchase a new label printer) and print directly to your printer with custom branding and more. This is a major update,  we see a lot of people are using it already and received some great feedback.

Click here for a guide: https://www.reftab.com/faq/print-asset-tags/

New Security Features and Updates

  • Domain Verification for SAML setup
    • This prevents unauthorized takeover of SAML domains.
  • Force two-factor authentication
    • This setting can be set by administrators. Click “Settings” > “General” > “Require user to use two-factor authentication”.
  • When using SSO there is a new setting to restrict password login.
    • This setting can be set by administrators. Click “Settings” > “SAML SSO Settings” > “Edit Configuration” next to your domain. > “Allow Password Login”  > “Force SSO Login Only”
  • Access logs are now available to administrators. Click “Settings” > “Security” > “Show login log”. 
    • This will show you the email address, dates, IP address and session information of users logging into your Reftab account.

New General Settings

  • Force user to manually input asset id’s instead of having Reftab auto-generate. 
    • Administrators can enable this setting. Click “Settings” > “General” > “Asset Increment” > “Off”.

Updates to Workflows

  • Workflows have a new action of  â€œChange Asset Title” (not currently available to all triggers)
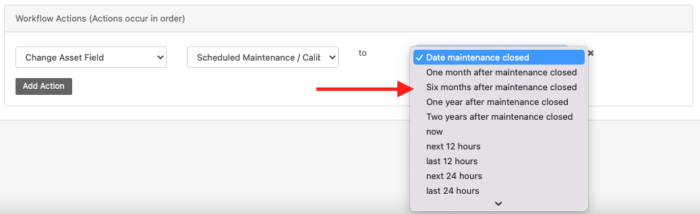
  • Workflows now have reflexive options for changing field data.
    • This is a convenient workflow action that helps situations that require dates adjusted on assets after maintenance for example.
New workflow actions for changing asset field values.

New Additions to Custom Access Roles

  • A new setting to allow someone to see maintenance on assets that are hidden. When editing an access role, under the tab “Access Restrictions” there is a new setting, “All Asset Maintenance Visible” – If “On” users will be able to access maintenance reports on the maintenance page for assets that are otherwise hidden to them.
  • A new setting to allow indefinite loans or not. When editing an access role, under the tab “Loan Rights” there is a new setting, “Allow Indefinite Loan”. This is especially helpful for users with portal access. Prior to this update, there was no option for indefinite reservations and loans for portal users.

JAMF Updates

  • If there is a location defined in the “User and Location” tab in Jamf, and you have a matching location in Reftab, assets will be synced to that location instead of the “Default Location” selected in Jamf settings.

Updates to Reftab’s  Google Data Studio Integration

Updates to Maintenance

  • Ability to delete maintenance records. This action is available to administrators and editors only.

Thank you very much to all our amazing customers and partners who use Reftab every day. We will continue to develop Reftab with your needs at the forefront so please reach out to us for any questions and feature requests, we’re always happy to help.

Log into Reftab: https://www.reftab.com/login

P.S. To enter a support ticket or feature request, please email “[email protected]“.

How To Print Asset Labels

Barcode Printer

Asset tags lets you manage your physical equipment and devices by affixing a unique serial number, QR code, and/or barcode. These QR code or barcode labels allow precise monitoring and tracking of assets.

Establishing a clear system for both asset tagging and printing labels allows you to get the most out of your assets. However, if you are still doing this process manually, it can be incredibly time-consuming.

In this post, we’re going to share how to print asset labels in bulk. 

What should be included on an asset label or barcode?

How do you print asset labels

Step 1. Determine the asset’s category

Step 2. Establish a unique identification number

Step 3. Select the type of asset label needed

Step 4. Enter the information on the asset label or tag

Step 5. Affix the asset label on the item

3 of the best printers for printing asset labels

1. DYMO

2. Brother

3. Zebra

Automate asset label printing with Reftab

What should be included on an asset label or barcode?

The information on an asset label or barcode will vary depending on what type of equipment you’re tagging, how assets are used, and security concerns.

Your IT department can often help identify the types of equipment that need labeling. For instance, your company may want to focus on labeling equipment that is:

  • At increased risk of theft or being misplaced 
  • A potential security risk if lost
  • Used between multiple departments
  • Portable or expensive, like laptops
  • Expensive and not easily replaced

Knowing the items you’ll be labeling and why helps you determine what information to include on the asset label or barcode.

All labels will include a unique serial number or asset identification number that you create using your labeling system. 

For instance, you can set up a labeling system that includes the location, item, and department code within the item’s ID number. If your employees travel with equipment, assigning different codes to different locations makes it easy to know where a piece of equipment belongs.  

To aid with the recovery of an item, you could put the manufacturer’s name and contact information on the tags instead of your company’s name. This step can help you track the lost or stolen equipment back to the manufacturer without revealing your business’s name.

For equipment that requires regular maintenance or high upkeep, consider including the year items were purchased on the label. This makes it easier to follow a maintenance schedule or identify items nearing the end of their life cycle.

How do you print asset labels 

Now that you know which items you need to label, why, and set up a labeling system, making the asset labels will be straightforward.

Step 1. Determine the asset’s category

The category options will be determined by how you set up your labeling system. For instance, you may categorize based on department (e.g., IT, finance) or how it’s used (e.g., furniture, mobile equipment).

Step 2. Establish a unique identification number

Each asset you label will require a unique identification number so you can accurately track it. This also helps you manage your assets, including ensuring proper maintenance is performed and knowing when to reorder more. 

The information you include depends on the labeling system you set up. 

Step 3. Select the type of asset label needed

There are different types of labels and tags. When choosing the kind of label, consider how durable it needs to be, if it will need to withstand being outdoors, and the level of security required. 

Step 4. Enter the information on the asset label or tag

You’ll want to enter the assets into your system as soon as possible. The data you’ll need to enter will depend on the equipment you’re tracking and your labeling system.

Then you can print the labels.

Step 5. Affix the asset label on the item

How the label is attached can vary based on the type of label you’re using. For example, some tags require a mechanical attachment process, while others use a pressure-sensitive adhesive.  

Asset tag barcode
Labels should be clear with enough whitespace around the barcode for scanning

3 of the best printers for printing asset labels

Some asset management software requires that you use a specific laser printer to print asset labels. That’s not the case if you use Reftab. Our asset label printing features are printer and platform-agnostic. So, you can use any of the three label printing printers below or even a standard desktop printer to print everything from standardized bar code labels to permanent adhesive labels designed for extreme durability. 

1. DYMO

DYMO label printers use direct thermal print technology, so information doesn’t smear or fade. The printers can print barcodes and text. DYMO offers handheld, desktop, and wireless printer options, and all options are PC and Mac compatible. 

They work using the DYMO labels, which offer more than 40 different sizes and color combinations to accommodate different color coding systems and sizes of assets. Additionally, the label material is durable and resistant to heat, UV, and water.

2. Brother

Brother’s asset labeling printers, such as the Brother PT-P900 Series Label Printer provide high-quality printing, support multiple label dimensions, as well as printing durable laminated labels with strong adhesive. The printers can print linear and two-dimensional barcodes and include images and graphics.

You can also print labels of different sizes. This allows you to protect all types of assets.

Brother also has wireless asset labeling printer options so that you can print from almost anywhere with a connection. 

3. Zebra

Zebra offers a wide range of asset label printers and tag types to fit your needs, including barcode and RFID printers. There are printer options for desktops, mobile, small offices, and industrial. The RFID printer provides accurately printed and encoded RAIN RFID labels, tags, and cards.

All Zebra printers are designed to work at high speeds and are durable. Their Print DNA software is designed to make it easy to use, can be managed remotely, integrates prints into your existing systems, and includes security tools to help protect against cyber attacks. Additionally, the software can securely integrate into cloud-based apps and connect to your network. 

The printers work with various Zebra labels, so you can find the right combination for your needs. Zebra offers a wide range of sizes, shapes, and up to 12 water-based colors and 8 UV colors. 

Automate asset label printing with Reftab 

One of the best parts of using asset management software like Reftab is that it is printer-agnostic. It can work with any printer to directly print asset labels—be it either via Avery Sheets or more durable thermal printer labels. This way, you can avoid having to purchase labels from a third party vendor.

With our drag-and-drop label designer, you can create different label sizes as well as put your own logo, additional designs, the barcode or QR code, and any additional information about your company. 

Pro Tip: Want to learn more about how you can print asset labels in bulk? Check out our detailed Knowledgebase article. 

In addition, Reftab automatically generates a PDF of all of your asset labels. So, you can click print and choose your connected label printer or desktop printer. 
Ready to give Reftab a try? Sign up for a free account here.

An Overview of Cloud Asset Management

Blog post image

We live in a world where “it’s in the cloud” has become a common way of describing where a business stores its digital assets. 

Admittedly, the evolution of asset management has accelerated quite a bit over the past decade. What started as simple pen and paper ledgers or spreadsheets are now cloud-based asset management software. 

Cloud asset management software offers organizations robust capabilities, from asset tagging and mobile apps, to advanced reporting capabilities

In this post, we’re taking a deeper look at what cloud asset management is, including: 

What is an asset cloud?

An asset cloud is a centralized digital storage facility that operates over the internet. The vast majority of businesses today use either cloud software or cloud services for keeping track of company equipment (i.e. fixed assets).

Though asset records can be stored on internal company hard drives and servers, cloud-based asset storage solutions utilize a remote server. This way, a company’s asset records are accessible remotely via the internet, rather than strictly in-office or within specified geographical constraints. Asset clouds ultimately help avoid costly internal infrastructure, enhance company-wide functionality, and provide detailed asset history. 

In the era of remote work, an asset cloud can also enhance employee productivity. With digital assets available from anywhere in the world with an internet connection, an employee can simply log into any business applications they need to do their job. While this may seem like a security concern, many cloud solutions offer robust security features that grant administrators full access control and management. 

What is cloud asset management?

A company’s ability to simply tap into an asset cloud to retrieve its various digital assets is a wonderful thing. However, as with any physical or digital asset storage solution, proper management efforts must be maintained to ensure strong security and continuous functionality. This is where cloud asset management (CAM) comes into play. 

Cloud asset management is the process used to control an organization’s cloud infrastructure and the application data within the cloud. Many organizations use a variety of cloud-based applications to store and manage their digital assets. With a collection of cloud-based asset sources, CAM helps organize assets to avoid operational hiccups and security concerns. 

Incorporating the use of cloud asset management practices provides an organization with visibility and easy control over the digital assets within the company cloud. Optimizing an organization’s asset cloud allows users to efficiently access company data when necessary and provides a method to effectively monitor internal assets and maintain data security.  

Why is asset management important?

From physical products to digital company data, asset management is a critical component of any organization. For one, asset management is necessary for complete visibility and control over various assets. Fully comprehending the who, what, and where’s of an asset inventory helps streamline operations and allows multiple users to access data whenever and wherever.

Not to mention, it’s easy to mishandle company assets without proper management, allowing data to fall into the wrong hands or become swept under the rug. Assets that fall into the wrong hands, especially digital ones, can also cause costly customer debacles and security concerns that can significantly impact overall operations — or invite cybercriminals to your virtual front door. 

Without a proper understanding of where current assets are located, how they’re used, or modification history, an organization runs the risk of unnecessary spending in the pursuit of lost or outdated assets. The ability to monitor assets for inactivity or depreciation can help eliminate unnecessary ongoing costs, as well as schedule replacements or upgrades to ensure ongoing productivity. 

When to DIY vs. use cloud asset management software?

To fully reap the benefits of cloud asset management, you’ll need a solution that’s best suited for your organization’s specific needs. You can choose to either DIY your asset management with spreadsheets or opt for cloud asset management software. Which option you choose will largely rely on your needs and the size of your organization.

Let’s take a look at the pros and cons of each to determine which is best for you. 

Pros and cons of DIY methods

The simplest solution is to use a spreadsheet(s) through Microsoft Excel or Google Sheets.  Bear in mind, these programs are better suited for one sole manager, as the interfaces have not been developed for a multi-user management approach. 

Some of the pros for using DIY solutions include:

  • Price Point: Options like Microsoft Excel or Google Sheets are much cheaper alternatives than robust cloud asset management software
  • Less Data: DIY methods fit smaller organizations that don’t possess an extensive list of assets
  • Physical Assets: Spreadsheets are ideal for physical assets rather than cloud-based assets that have many attachments
  • Flexible Organization: Enhanced organization from modifiable categories and tag identifiers allows for adjustable organization

However, DIY solutions are not always the answer to your asset management, as they have quite a few cons:

  • Individual Use: Spreadsheets offer limited user accessibility and traceability, as they are typically meant for a sole user
  • No Mobile Scanning and Asset Tagging Integration: It is very costly and time consuming to develop a mobile app to scan barcodes and qr-codes that link to your company assets.
  • Time-Consuming Efforts: A lack of automation means that ongoing manual input can become incredibly time-consuming, especially for bulk data
  • High Risk of Error: Non-stop manual input increases the chances of data recording errors and oversight of details such as depreciation 
  • Limited Resources: The inability to attach asset data such as photos, maintenance records, and SOPs means your will lack key details 

Pros and cons of cloud asset management software

If the features of manual DIY asset management solutions just don’t cut it for your organization, you’ll be relieved to learn that there are several cloud-based asset management software options on the market. 

Cloud asset management software is often better suited for larger organizations that simply possess a higher quantity and wider variety of both physical and digital assets. 

Unlike DIY methods, software improves the visibility into each digital asset and its data. This way, your company can keep a finger on the pulse of depreciation, application updates, warranty expirations, and more. Software also comes equipped with strong security features, like dedicated servers and encrypted data, to keep company (and consumer) data safe and out of the wrong hands. 

  • Centralized Data: Cloud-based software centralizes all data in one location to search and organize 
  • Advanced Accessibility: Cloud-based solutions allow for multiple users and remote access
  • Attachment Functionality: Software increases asset efficiency by allowing users to attach vital asset information such as pictures, SOPs, user manuals, and more
  • Less Time and Effort: Software automation helps reduce typically time-consuming management processes while maintaining data accuracy.
  • Mobile Apps: Mobile apps are handy to scan barcodes and qr-codes that display on asset tags.

And while cloud-based asset management solutions can truly pack punch, here are a few cons to remain mindful of:

  • Price Point: Cloud asset management solutions can become pricey depending on your company needs
  • Internet Reliance: Cloud access requires an internet connection, meaning assets may not be available if internet connection is lost 
  • Heightened Processes: Despite automation abilities, companies must be in control of how they establish processes like tagging inventory for assets to be discoverable
  • Learning Curve: It can be a challenge to reach complete software efficiency without the appropriate training and education

Is cloud-based asset management right for you?

Figuring out which asset managing solution is right for your company can be quite the task. If you’re an organization with few digital assets and limited physical inventory, a DIY method may suffice. For developed organizations looking for a highly accessible solution with in-depth management capabilities, cloud-based asset management software may be your answer.

Try a free cloud based, asset management platform like Reftab here: https://www.reftab.com/sign-up

Reftab January 2022 Release Notes

Release notes image

Hello, it’s been a little over a month since the new year. 2021 had been quite an amazing year of growth for Reftab and we are excited to continue improving the platform into 2022. We’re including some highlights from late 2021 here as well.

Business Plan Updates

Installable Windows agent now available.

  • Downloadable from the, “Settings” > “Agent” page. You’ll see instructions on screen for installation.
  • After the agent is installed on a Windows computer, it will add a new asset into Reftab and maintain a connection to your Reftab account. You can sync data such as: “Hostname”, “Free Storage Space”, “Geo Location” , “Serial Number”, and more.
  • The agent is ideal if your organization doesn’t use a management system such as MS Intune because it reduces repetitive and manual tasks such as adding assets into Reftab by hand.

Intune and Jamf Auto Assign Assets to Users

  • Assets synced from Intune and Jamf can now automatically assign assets to users.
  • By having Intune and Jamf automatically assign assets, you no longer need to manually perform repetitive tasks such as checking out assets to users after the asset is added to Reftab.
  • With this update, Reftab is well suited as a “single pane of glass” to manage all  Apple and Windows devices, both networked and non-networked devices along with their current users in one, easy-to-use system.
  • There’s also a setting to map the asset title to a chosen field from Intune and Jamf.

Maintenance Reporting and Assigning Improved

  • You can now build reports on ‘Upcoming Maintenance’.Being able to see the maintenance that is due for an upcoming time period helps manage equipment usage and ensures people who need to be aware of maintenance are kept informed easily.
  • Display Results in Email Body: Scheduled Reports can now display results in the body of the email instead of sent as an attachment. To enable this, edit your scheduled report and check the box,  â€œEmail Results in HTML Table?”
    • When the report arrives in your inbox, you’ll see results on screen  instead of needing to open an attachment.
  • Assign Maintenance to Loanee: Maintenance alerts can be assigned to the “loanee”, meaning whoever is assigned to the item when maintenance is due will receive the alert.
    • Prior to this update, scheduled maintenance only allowed for choosing a specific user to be alerted. Now, you can choose “Loanee” .
    • This is particularly helpful if you have equipment  assigned to users that need to drop-off the equipment to someone else for maintenance. 
    • To enable this, edit your preventative maintenance jobs  and select ‘Loanee’ for ‘Assigned To User”.

Pro Plan Updates

Automated Workflow Enhancements:

  • When building workflows, you can now update asset details automatically.
    • Example 1: when maintenance work is complete, update the asset field of “Date of last complete maintenance” to the date the maintenance completed.
    • Example 2: When maintenance work is complete, update the asset field of “Date of next maintenance”  to one year ahead.
  • New action of “Fulfill Reservation” 
    • This action can automatically fulfill a valid reservation based upon triggers and conditions in the workflow. This is helpful to reduce manual work for users.
    • Example 1: When maintenance is completed on an asset, if the asset has a valid reservation, the workflow will automatically fulfill the reservation at that time.
    • Example 2: Every day at 3:00pm fulfill any valid reservations that have been set on Studio Rooms. 

Updates to Consumables

  • Pick and choose which default transactions to display
    • From the accessory page, click “Custom Transactions” and choose which ones you’d like to keep or remove.
  • New transaction type of “Set Stock”
    • Set stock is a transaction you select when you want to reset the current quantity of a consumable. For example, if you need to do stock take to record how much you currently have, create and use a transaction type of, “set”.

All Plan Updates

  • New setting to default to “Indefinite” loan.
    • Click “Settings” > “Loan Options” > “Default value for indefinite on loans”.
  • Categories and Locations can now have a default image.
    • For categories, click “Asset Categories” > Select a Category > “Set Image”
    • For locations, edit a category and click “Set Image”
    • As of now, these images only display within the mobile app and user portal.
  • Check out emails can now be disabled when loaning items indefinitely. With this setting enabled, check out email only sends for short-term loans.
    • Click “Settings” > “Loan Options” > “Send Indefinite Check Out Emails”
  • Asset details can now appear on the loan emails.
    • Click “Settings” > “Email Settings / Logs” > edit “Loan Checked Out”. You will see a button for “Show Replacement Fields”. Copy and paste any values available into the body of the email.
  • New setting to select a location to move an asset to when checking out and checking in.
    • Click “Settings” > “Loan Options” > “Loan Location Changeable on Return / Loan Location Changeable on Checkout”
    • This is a helpful setting if when assets are checked in / out, you need to move the item to a new location. (Otherwise, you can automate this task with a custom workflow).
  • You can now re-arrange the column ordering on the assets page.
    • Click and drag on column headers to move left and right.
  • You can now  transfer accessories between locations without having to set the accessory as “global”.
    • Prior to this update, only global accessories could be transferred. Now, if you have an accessory created at a specific location, you can transfer it to another location without having to save it to “global” first.
  • New Access Role setting for “Kit Access”. This is a setting that works for all kits as opposed to singular kits. At this time, kits are still governed by the location they are in. If a user logs in and cannot access a location, the kits within that location wont be visible either. This new setting governs access to kits on a global level.
  • Dates are now appended to the automated reports file name. This is helpful because filenames with dates give you an idea of when the report was run.

Performance Enhancements

  • Our team has been working hard to not only keep systems up-to-date on the back end up but to improve performance across the board. Recent updates have been made so that for some users, speed improvements should be noticeable. 

Upcoming Feature Highlight

  • New label designer and print tool
    • We have had a lot of users express interest in being able to directly print barcodes and qr-codes to their dedicated label printers. There are quite a few brands and models of printers, such as Brother, Zebra and Dymo to name a few.
    • This new tool will generate a PDF sized for whichever dedicated label printer, roll size, or desktop printer you use. 
    • You will be able to create and save custom sizes, add images, move the barcode / qr-code and add text.

Thank you for taking the time to read our release notes. As always, these features and improvements are directly from you, our customers. We enjoy building them and working with you to improve, automate and streamline your operations – keep the suggestions coming!


P.S. To enter a support ticket or feature request, please email “[email protected]“.

The 5 different approaches to asset management solutions

5 Different Approaches To Asset Management Solutions

From spreadsheets and pen and paper to hybrid solutions and custom asset management software, there are many ways that IT teams can manage both software and physical assets. 

Asset management solutions help you not only track your business assets, monitor asset efficiency, control costs, but also make it easy to manage software licenses (and renewal process) and provide deeper insights and reporting capabilities. 

In this post, we’ll discuss 5 of the best asset management solutions available for businesses of all sizes. We’ll share how they work, the pros and cons of each, and the average cost for the solution.

Analog Approach 

Most businesses start out with an informal approach to asset management. When it is just you and maybe one or two employees, it is fine to keep track of your limited assets in a notebook or whiteboard.

Tracking inventory by hand gives you the freedom and flexibility to build your systems and organize your notes the way that works best for you. You can also take notes quickly without the need to input tedious data into a spreadsheet or app. Another plus is that there’s little to no learning curve with an analog asset management system.

As your business scales and you acquire more assets, you’ll find that you outgrow the capabilities of this method quickly. 

With pen and paper, you can’t rely on the same digital features that come with software or web-based systems. For instance, you won’t have the ability to run reports automatically. You won’t have real-time oversight of your inventory at multiple locations, a search function, or maintenance reminder notifications. You also won’t have a digital backup of your records.

Not to mention, the biggest drawback to analog record-keeping is the possibility of human error and time wasted with tedious, manual tracking.

Cost

In terms of pricing, you probably have everything you need already for this manual asset management solution. If not, paper and pens are pretty inexpensive and available just about everywhere. You don’t need to purchase expensive software or equipment for this method.

But how do you place a dollar amount on your time? Think of the opportunity cost when it comes to analog recordkeeping. Manual recordkeeping is time-consuming. The time spent on tedious pen and paper tracking could be better spent elsewhere in your business. Before you go the pen and paper route, consider if this is something you would be willing to stick with long-term or if you’ll need a more robust solution in the future. If you do make the switch to a different solution, you’ll have the time-consuming chore of manually entering your records all over again into the new system.

Spreadsheets

Spreadsheets are often seen as the next step up from manual pen and paper. With Excel or Google Spreadsheets, you’ll still need to enter your inventory data by hand, but the solution is a bit more customizable and flexible than an analog system. 

For instance, you can input formulas that allow you to sort your inventory or rank it by certain criteria like quantity, value, or date. Of course, you’ll need to accurately input the formulas, and you’ll be limited with what the formulas can do, but it’s still more functional than analog tracking.

Excel and Google Spreadsheets are also low-cost options. Chances are, you probably are already using one or both solutions for other aspects of your business today. The basics of the software are easy to master as most people are familiar with the software already. Typically, if you know how to use Excel, you can learn Sheets and vice versa. 

The biggest downside of using a spreadsheet to manage all of your assets is that they can get unruly to manage once you have multiple people who have editing privileges. It is easy to override changes by mistake. 

Plus, if you have thousands or tens of thousands of assets in one spreadsheet, it can be slow to load and update. 

Cost

If you already have Excel, then using it for asset management will cost nothing extra. If you don’t already have the software, you can get a Microsoft 365 plan that includes Excel and other Microsoft tools and starts as little as $5 per month. Google Sheets software is free for personal use, with business plans beginning at $6 per month. Free templates are also available with a quick Google search to help you get started.

Keep in mind that while the cost is low, properly using spreadsheets can be time-consuming and tedious. You need to be sure you have the time to devote to maintaining accurate records if you go this route.

The Workaround Solution

If you’re already using spreadsheets and want to add more functionality, then a workaround solution could be right for your business. This is also a good option for those that aren’t ready for the full capabilities of asset management software but need more than spreadsheets can offer alone. 

The most common workaround approach we see is people using Zapier in conjunction with a Google Sheet to manage their assets. 

Zapier offers different ways to handle repetitive tasks in your workflows, so you can use the solution for more than just inventory tracking. You can connect all of your work apps through the platform. It’s great for those using spreadsheets already that want to step up their workflow game, including asset management. 

While you can automate a lot of things with Zapier, there is a bit of a learning curve to get started. It is also a scrappy approach, so it is not uncommon for a zap to break out. And, the more zaps you have and the more tasks you run, the more expensive it gets. So, your workaround solution could end up costing you a lot more time (to fix bugs!) and money than paying upfront for asset management software, like Reftab.  

Cost

As mentioned above, Zapier plans can get costly the more you use them to automate stuff. While there is a free basic plan, it’s not enough for most teams. A starter plan begins at $19.99, but enterprise plans can cost as much as $898.50 per month. Of course, automating tedious tasks can save your team a lot of time. However, if you’re able to afford a larger Zapier plan, your funds might be better invested in a more robust IT asset management software solution.

Custom Solution

Of course, you always have the option of building your own asset management solution. This is best for large companies with a large budget, a dedicated team, and unique needs that can’t be addressed with off-the-shelf asset management software. 

Developing your own software gives you full flexibility and control of your software features. When you build your software, you can decide what features you need and how the software will integrate with your existing systems. The software can also be personalized to match your brand.

However, even if you have the funds, a custom-built solution isn’t always the right choice. There are several factors to keep in mind when deciding whether you should build or buy. 

Whether you have a software developer in-house or decide to outsource, the upfront cost of building the software won’t be your only expense. You’ll also need to update and maintain the software throughout its lifetime. 

Aside from the cost, you also need to consider the time it takes to build software. Developing new software takes time. Are you prepared to wait? What if there are delays? What if the lead developer leaves the company? How will you handle asset management in the meantime?

Cost

Building custom software is a significant investment. Because prices vary so greatly, you’ll need to scope out your needs and budget accordingly. Be prepared to pay more than a ready-made software solution, and know that you’ll likely have to pay for updates, maintenance, and support down the road. 

Keep in mind that building the software takes time, but it can be a worthwhile investment if you need a custom solution. Be sure to research existing software before making the jump to a custom solution. The features you need could be available through a cheaper, existing software option already.

Asset Management Software

This solution takes the painstaking, manual tracking out of asset management (including both physical and software assets). Asset management software, like Reftab, is an integrated platform that lets you track important asset data, including asset health and maintenance costs in real-time. This means you can easily scan, tag, and search for assets, prioritize maintenance and IT service tickets, perform routine audits, and quickly determine the lifetime cost of assets in one centralized location, among many other tasks. The software can also provide deeper insight and reporting that can’t be generated through spreadsheets alone.

Not to mention, asset management software is a robust solution that’s ready to go from the day you purchase it. It can also be used across mobile devices with many even having a dedicated mobile app. 

Cost

As mentioned above, asset management software is typically more cost-effective both in terms of time and money than any workaround or custom solutions. 

Many asset management software companies even offer freemium plans, including Reftab.  has the potential to be costly. Paid plans start at $30 per month for up to 500 assets. 

***

When deciding on an asset management solution, it’s important to think about your current as well as future needs. The solution you choose today should work with your future goals and have the potential to scale with your team. Otherwise, you could be looking at a messy transition to a different asset management solution in the future.
If you are interested in trying out Reftab, get started for free here.

Integrate Reftab and OKTA for SSO and SCIM

Reftab Okta Integration Image

For many companies, Okta has become almost synonymous with single sign-on (SSO). With over 7000+ integrations, it is not hard to see why.  

Okta makes it easy for employees at your company to securely log in to all of your cloud and custom applications without having to authenticate each one individually. 

And, it makes it easy for your IT team to securely manage and monitor user access across all of the applications—cloud, web-based, and on-prem—that your company uses. 

In this post, we’re diving into how you can connect Okta to Reftab, as well as some potential use cases. 

How to connect Okta to Reftab

5 use cases for integrating Reftab and Okta

1. Make it easy for employees to sign into Reftab

2. Enable user provisioning and deprovisioning

3. Spend less time on password reset requests

4. Secure company proprietary equipment and data

5. Create a booking portal for students

How to connect Okta to Reftab

Reftab’s Okta integration makes it easy to add single sign-on (via SAML) as well as user provisioning.  

You can check out this post to see a step-by-step guide for how to set up our Okta integration. 

The real benefit of our Okta integration is simplicity. 

Some added benefits of using this integration include: 

  • Allows you to manage Reftab access alongside all of the other cloud, web, and on-premise custom applications that your company has
  • Centralizes identity management 
  • Helps protect company IP and data by requiring strong login authentication practices 
  • Reduce the time that you and your team spend on repetitive administrative tasks, like adding and removing users to and from multiple systems or performing password resets

5 use cases for integrating Reftab and Okta 

As we alluded to earlier in this post, the primary benefits of Reftab’s Okta integration is single sign-on and user provisioning. Here are a few ways that companies can (and have) used our integration. 

1. Make it easy for employees to sign into Reftab

Did you know that the average company uses 80 SaaS apps as of 2020? 

While every employee isn’t logging in to all 80 apps (hopefully not!), they are probably actively using anywhere from 5-15 apps to do their job.

IT team members are logging into a lot more apps because of the nature of their role. 

If you have to log in to each app individually, that can become tedious and repetitive, not to mention a security risk. 

That’s where implementing single sign-on can be beneficial. With Reftab’s Okta integration, this means that all of your employees who need access to Reftab can sign in the same way as all of your other apps. They log in once and now have access to all of your company’s applications through Okta. 

2. Enable user provisioning and deprovisioning

An added benefit of using Okta and Reftab is that once a user is added to Okta, for example a new employee, that user is automatically added into Reftab. This is a huge time savor and reduces the possibility of error. You’ll have users who are ready for equipment to be deployed to them without the tedious work of user management.

You can also enforce access restrictions based upon users’ groups. For example, this means that instead of giving the entire company full access to authenticate into Reftab, they might only give access to any employee who works in HR, IT, or an operations-heavy role. On the other hand, end-users are added to Reftab but the integration is smart enough to know which users simply need to be added as a ‘loanee’, (meaning users who exist in Reftab to have items assigned to them), and which users need to be added as administrators to actually log in.

Pro Tip: Want to learn how to set up user provisioning in Reftab? Check out our guide here

This also means that there is one single hub where your IT can manage account/app access, troubleshoot login issues, and enable and disable user access. For example, when a user is disabled in Okta, Reftab will also disable the user within Reftab.

3. Spend less time on password reset requests

Without single sign-on, employees have to log into and authenticate each app individually. This means more opportunities to forget passwords, which means more password request tickets to your IT department. 

Or, employees resort to using weak and easy-to-remember passwords, like “abc123,” for all of the apps they have to use for work. By doing this, they are putting their account and company data at risk of being hacked. 

4. Secure company proprietary equipment and data

This is almost too obvious to include, but Okta offers a secondary level of security protection via multi-factor authentication (i.e. MFA) for the company. 

More employees access their email, company documents and conduct work on their personal smartphones (and computers) all the time. 

Since March 2020, many more employees are working from home and other places that may have less secure access to their cubicle over at HQ. 

Enforcing MFA is becoming more important than ever if an employee is logging in from a new device or a new location, especially if you work in heavily regulated industries like healthcare,  

For example, if you work for a large hospital and one of your nurses loses her phone, where she was logged into her work email and had a few sensitive patient records on it, after a night out with friends, that’s a HIPAA violation. 

That could not only cost the nurse her job but the hospital could be fined anywhere from a few hundred dollars to $50,000+ depending on the violation.  

5. Create a booking portal for students

Another use case that’s becoming more popular since the COVID-19 pandemic is to set up booking portals within Reftab where college students can log in and rent specific equipment that they need, like cameras, microscopes, iPads, etc.

You obviously don’t want anyone to be able to log in and “borrow” thousands of dollars of equipment and then skip town. 

So, you can use Okta to ensure only fully authenticated, registered students at your university with a university email address and who are in “good standing” can rent equipment. 

***

In sum, these are a handful of ways that you can use our Okta integration to make it not only easier but more secure for your employees to access company applications. 

Looking to try out Reftab? Get started with a free trial. 

How to integrate Reftab and Azure Active Directory

Reftab and Azure Integration

If you are reading this guide, there is a good chance you are one of the more than 7,200 companies that are using Microsoft Azure Active Directory.  

Azure Active Directory is a comprehensive identity and asset management solution for small, midsize, and enterprise companies. 

You can integrate it with dozens of software that you are company is already using, including Reftab. 

In this post, we’re taking a deep dive into how you can integrate Reftab and Azure AD as well as a handful of different use cases. 

Let’s dive in.  

What is Azure Active Directory?

End User Computing

If you work in the IT department for an enterprise company that relies on Microsoft products, then you are likely well-versed in Azure Active Directory (a.k.a. Azure AD). 

But, a quick refresher for anyone new to Azure AD, it is a cloud-based, enterprise access management software that you can use for single sign-on, manage user and group access and ensure full security and compliance across the entire company.  

With single sign-on, this means that once an employee is authenticated in Office365, they can then access all of the company’s other SaaS software and custom web applications without having to authenticate each one individually. 

Some added benefits of using Azure Ad are threat detection, identity protection, asset management (of devices and accounts), and security reports and monitoring.  

How to connect Reftab with Azure Active Directory

If you are already using Reftab for asset management, then integrating Reftab and Azure AD is easy. 

In fact, there are two ways you can integrate Azure AD. You can configure Reftab as a SAML application in your Azure AD environment to use with single sign-on. Here is a how-to article with step-by-step instructions.  

Alternatively, you can set up SCIM with Azure AD. Check out this Knowledgebase article with step-by-step instructions. 

Regardless of which route you take, you can add, delete, lock, or modify Reftab users along with creating and syncing user groups. This not only saves you time on administrative, repetitive tasks but it is also a security measure. 

4 use cases for integrating Reftab and Azure Active Directory 

Similar to our Okta integration, here are a few Azure AD use cases. 

Make it easy for employees to sign into Reftab

Single sign-on not only saves time and is more convenient for your employees. It is also more secure for your company.  

Once an employee is authenticated through Office365, they can access all of the company’s software—both cloud and custom applications—without having to log in to each app individually. 

Not to mention, this cuts down on the number of login issues and password reset requests that can inundate your IT team. It is one secure password to remember instead of dozens of passwords that, let’s face it, are often reused across multiple sites or weak, easy-to-remember ones, like “abc123.” 

Eliminate tedious user management tasks

An added benefit of syncing Azure AD and Reftab is it makes it easier to add, manage, and remove users between the two applications. You can also create and update user groups and individual account roles. 

Secure all of your company’s IP and assets

The pandemic and the resulting explosion of work-from-home arrangements means IT departments have their hands full, ensuring the company’s devices, assets, and IP are secure. 

When you have employees, independent contractors, and vendors accessing your company’s data from their home WiFi networks, personal smartphones, or working from coworking spaces and coffee shops, you can use single sign-on and multi-factor authentication to protect your company from security breaches.

Get comprehensive monitoring and reports 

A big part of securing your company’s assets is also having detailed reports to be able to better track what users have access to what information, where assets are currently located and stay ahead of potential issues. 

*** 

In sum, these are a handful of ways that you can use our Azure AD integration to make it not only easier but more secure for your employees to access company assets and data. 

Looking to try out Reftab? Get started with a free trial. 

A guide to enterprise asset management software

Manually tracking assets for any company can be a logistical nightmare. When it comes to large enterprise organizations, it’s nearly impossible. Fortunately, enterprise asset management software exists. This software is an invaluable tool that not only tracks inventory across multiple locations, but also helps companies with asset maintenance, regulatory compliance, and more.

In this post, we’ll cover everything you need to know about choosing an enterprise asset management tool, including:

What is enterprise asset management software? 

Enterprise asset management software, also known as EAM, makes it easy for a company to track and manage all of their operational assets, like physical assets and software (including keeping tabs on asset lifecycle costs). This means you have full asset lifecycle management from design or procurement through to maintenance operations and disposal.

The software is also helpful for inventory management, asset management tasks, regulatory compliance, as well as financial management (think asset utilization, financial reporting, depreciation, business intelligence, etc). 

Who uses EAM software?

Traditionally, large-scale enterprises have been the primary users of enterprise management software. But fast-growing, smaller companies on the rise are now seeing the benefits of implementing this type of software early on.

Managers of small, growing companies or large-scale enterprise operations looking for transparency and accountability with asset tracking should leverage EAM software. Companies looking to control operational costs are also good candidates for the software. For example, IT managers will usually deploy EAM software to track a company’s IT equipment and involve finance so they can keep a record of asset depreciation as well as HR to keep on top of on-boarding and off-boarding.

Likewise, companies with asset-heavy operations can benefit from using the software to gain full oversight of company assets. The software can also be used as an invaluable tool for setting up employee request portals, maintenance management, as well as companies needing to focus on regulatory compliance, such as those in manufacturing or construction industries.

What are the top benefits of EAM software? 

Company leaders in all industries looking to manage their assets can benefit from EAM software. Here are some of the top benefits after implementing this type of software:

  1. Efficient asset monitoring: EAM software delivers actionable insights in a centralized location so managers can quickly and efficiently monitor data. The software helps to bridge the gap between information silos to allow for more educated decision-making.
    1. For example, EAM software can provide an IT department a single pane of glass to see equipment being used by employees such as networked (i.e. laptops, printers) and non-networked equipment (i.e. monitors) and, equipment not being used such as old laptops, monitors or printers.
  2. Maximum utilization of assets: With EAM software, assets can be tracked throughout the entire lifecycle. This means they can be fully utilized and properly disposed of, replaced, or sold when they no longer make financial sense for the company to maintain. EAM software can help tell you when this may occur with current, deployed equipment and how much has already been sold or retired.
  3. Improved maintenance management: Tracking all of your assets across the enterprise means you’ll have a firm grasp of maintenance schedules and needs. Maintenance is typically more cost-effective than fixing something that’s broken. Using EAM software to monitor maintenance schedules can save the company a lot of money in the long run.
    1. For example, there’s many companies who need to ensure certain equipment is calibrated every year or six months and it’s vital that those calibrations are never missed, and if they are, the equipment must not be used.
  4. Simplified regulatory compliance: Abiding by industry regulations and policies is much easier if you can track your assets. For example, being able to pull up maintenance records or track machine parts to comply with recall repairs.

Cloud-based vs. on-prem EAM solutions: Pros and Cons

You essentially have two options when it comes to implementing asset management tools for your organizations: cloud-based software, like Reftab, or an on-premise solution. With cloud-based, your data is hosted on the vendor’s server, and you access the software via the internet. With on-premise, the software is installed locally on your company’s computers and servers.

Here are the pros and cons of each option:

Cloud-based pros

Easy / no hassle setup

Cloud-based solutions require no work to get started. The software is accessible via a browser. All you and your team need to do is create an account, login and import your data. You’ve got a working solution up and running very quickly.

Cost-effective

Cloud-based solutions are typically more affordable. You don’t have to have someone create a custom solution and install it onsite. Monthly subscription or plan fees may add up, but you still don’t have upfront costs with cloud-based software or ongoing maintenance. You also have reduced energy costs without the need to run physical servers on location.

Support

Upgrades and updates are handled by the software provider, not your in-house team.

Scalability

It’s quick to get started with cloud-based software and even faster to scale. As your business grows, you can simply choose a new plan with more storage or advanced features. You can even reduce your plan features if you find the current plan you’re on is more robust than necessary.

Cloud-based cons

Connectivity

If you’re having internet issues, then your entire system could go down. You’ll need a reliable internet connection to access your cloud data at all times. With an on-premise solution, you can still access your data if you’re still physically at the office and you loose connection to the internet.

Less customizable

While you can certainly pick from features and plan tiers with cloud-based software, cloud-based options are still less customizable. The software isn’t designed specifically for your business needs, so you’ll need to find the pre-made software that aligns most closely with your asset tracking goals.

On-premise pros

Lifetime cost

Upfront and maintenance costs are often higher for on-premise solutions, but depending on the length of time the solution is utilized you may end up paying less in the long run for on-premise vs. cloud-based. This is because you’re typically paying once for the license and installation, whereas cloud-based is an ongoing monthly or annual fee.

Flexibility

An on-premise solution gives you complete control of your asset management data. This is because you own the software or hardware. You can set up the system however you want.

On-premise cons

Maintenance

Ongoing maintenance is typically included as part of a cloud-based plan. With on-prem, you’re the one responsible for when and how maintenance will occur. This includes backup, storage, and disaster recovery when applicable. Costs can quickly add up.

Implementation

It simply takes longer to get started with on-premise solutions because they have to be manually installed first. The solution must be installed on servers, computers, and other individual devices before you can get started.

Best practices for choosing EAM software

For most companies, a cloud-based EAM software solution is a better option than on-prem solutions. But selecting the right EAM software for your business requires a bit of research and knowing your criteria beforehand. We’ve made the process easier for you by rounding up 6 of the best practices to keep in mind when shopping for EAM software.

Set a budget

Before you go searching for EAM software, you’ll need to set a monthly or annual budget for the software. 

Keep in mind some providers charge a flat rate while others charge per user or location. Pay close attention to add-ons or caveats that affect the pricing. 

Look for compatibility

The best EAM software is the one you’ll use. If the software isn’t compatible with your existing systems, software, or solutions, then you’ll struggle to implement it in your business. Look for software that can be integrated with your current tools. 

Make a list of your must-have features 

What features are a must-have, and which ones would never be used? Do your research to determine which features you need from the software. You don’t want to be without the functions you need, but you also don’t want to overpay for robust software features that you’ll never use.

Read customer reviews

Look for reviews of the software before you commit on review sites, like Capterra, G2, and TrustPilot, as well as social media reviews.  If possible, look for reviews from users in your same industry. This will give you a good sense of how the software could be used for your company. 

***

Remember, the software you choose should be a good fit for your business. Not everyone has the same asset tracking needs or goals.

On the market for asset management software? Schedule a free demo of Reftab here: Reftab Calendar

How to improve your business’s operational efficiency

When’s the last time you reviewed your IT department’s day-to-day operations? Are you utilizing assets effectively? 

Operational efficiency is all about continuous improvement, maximizing resource utilization, and reducing unnecessary costs. 

In this post, we’ll share how to measure operational efficiency and give you tips to help you improve efficiency in your department and across your organization. 

What is operational efficiency?

Why does it matter?

How to measure operational efficiency

Ways to improve operational efficiency

1. Understand the ins and outs of the business

2. Conduct an audit

3. Utilize asset management software

4. Benchmark against competitors

5. Test different processes

What is operational efficiency? 

Operational efficiency is a business’s relationship between inputs and outputs. Inputs refer to what the company puts into operating, such as labor, expenses, and time. Outputs can include customer acquisition and retention, product quality, and revenue.

When we talk about operational efficiency, we’re thinking specifically about how well the organization reduces wasted effort, time, and materials. The goal of operational efficiency is to produce the best product possible with the least amount of wasted resources.

Why does it matter?

Wasted time and resources are equal to wasted money. Inefficiencies can drastically cut into your profit margin. It pays to be efficient with business operations. The more efficient the business is, the better. However, don’t take that as permission to cut corners. You don’t want your employees, customers, or the final product to suffer in your efforts to improve efficiency.

For example, one way to streamline operations is to provide employees with as many self-service tools as possible. For example, an IT department can set up a user request portal so that employees can check-in and out equipment when they need it. This improves efficiency by allowing employees to self-service and frees up your IT team’s time to work on more strategic tasks.   

How to measure operational efficiency

The primary metrics to look at when gauging your organization’s operational efficiency are operating expenses and total revenue. Once you have those numbers, you can use them to calculate operational efficiency with this formula:

operating expense / total revenue = operational efficiency

This would give you your operational efficiency ratio. For example, let’s say total revenue for the year was $100,000, and your operating expenses were $15,000. Using the formula above, you get .15 as your operational efficiency ratio.

You can turn this ratio into a percentage by multiplying the result by 100. This is how that formula would look:

(operating expense / total revenue) x 100 = operational efficiency rate

Using the same numbers as above, the .15 operational efficiency ratio multiplied by 100 would equal 15%. This means your operational efficiency rate is at 15%. The lower this rate, the more efficient you are at running your business.

Ways to improve operational efficiency 

Here are some ways to improve your efficiency if you’re currently not operating as lean as you would like. 

1. Understand the ins and outs of the business

It is easy to get tunnel vision and only focus on your specific role in the business. However, there’s something to be said for knowing all parts of your business. This will allow you to better understand your role in the company, and you may be able to spot and fix more inefficiencies firsthand.

2. Conduct an audit

In addition to observing operations firsthand, you can also perform a thorough audit to reveal inefficiencies in your department. For example, auditing your asset log may reveal that you are only using 50% of all of your equipment. Knowing this, instead of going out and buying a new computer for the new hire, you could send them one of the computers that are sitting in your equipment room. 

3. Utilize asset management software

There are a lot of software options out there to help you run your business more smoothly. One such type of software is asset management software, like Reftab. This software can be used to tag and track assets across multiple locations, help you maintain maintenance schedules for your assets, create user request portals, run reports, and more. 

4. Benchmark against competitors

Look to others in your industry to see how they run efficient operations. Use them as a benchmark to make your efficiency improvement. But don’t just use their operations to measure yours. Use their operation to inspire ideas for implementing operational efficiency in your business.

5. Test different processes

Test, test, and test again. Continuous improvement is the name of the game. You won’t know if an alternative process will help improve operational efficiency until you try it. Be sure to set a fixed time to conduct the test, designate team members, and set a clear tracking framework. This will give you clear variables or numbers to review when determining if the test was a success.

***

No matter the size of your team or business, you can always make improvements to your operational efficiency. Remember, the more efficiently you operate, the more you can have a positive impact on your bottom line.

An overview of the best computer inventory systems

Are you still tracking your IT inventory with spreadsheets or old-fashioned pen and paper? There’s a better, more efficient way that can greatly improve your business operations and have a positive impact on your bottom line.

As your business grows, it gets more complicated to do asset tracking without a comprehensive platform. The sooner you implement your asset management solution, the better.

In this post, we’ll discuss what a computer inventory system is, the benefits that come with it, and four of the top asset management solutions available.

What is a computer inventory management system? 

Computerized inventory systems are a type of software that helps businesses monitor their inventory in real-time to simplify business operations. You may have heard these systems referred to as asset management software. Essentially, the software is used as a tool to help businesses track assets or inventory, generate reports, comply with industry regulations, and understand demand.

What are the benefits of using an inventory management system? 

No matter what the size of your business, if you have physical inventory, then you can benefit from implementing an inventory management system. Here are some of the top benefits that most IT teams see from utilizing the software including: 

  • Simplified overall inventory management
  • More efficient use of employee hours
  • Reduced risk of human error
  • Track monetary value of asset inventory

4 examples of computer inventory systems 

There are multiple solutions to choose from, including modifying existing tools you may already be using as dedicated asset management software. 

It comes down to understanding the key features your company needs. 

1. Excel

With all the inventory management solutions available, some still prefer the DIY approach. For others, the volume of inventory isn’t high enough to justify investing in a more robust inventory system yet, or the budget simply won’t allow for it. In these cases, using Excel spreadsheets can be a viable option.

The biggest advantage to using Excel is the low barrier to entry. It’s easy to get started, and most people already have experience with the software. This means no extensive training to learn how to use the tool. Often, businesses that decide to go the Excel route for inventory management already use the software in their processes and can easily work it into their existing operations. 

The problem with using Excel is that the software wasn’t designed specifically for asset management. Though it’s a useful tool that can be customized for a variety of projects, Excel can’t track inventory in real-time. It relies on users to input inventory changes as they happen, which opens your system up to human error. Plus, sharing an excel file more often than not leaves you with unreliable data.

If you already have Microsoft 365 or Excel on your devices then there’s no additional cost to add the spreadsheet tool to your business operations. If you don’t have it yet, then you’ll need to purchase it. Microsoft 365 Business Basic plans begin at $5 per user each month. You’ll get the full suite of Microsoft products with the plan, including PowerPoint, Outlook, Team, and OneDrive. For many, these additional tools are well worth the cost.

2. QuickBooks Enterprise 

QuickBooks is a popular accounting solution for small businesses. Some QuickBooks packages, including QuickBooks Enterprise, include basic inventory management features. If you’re a small business already using QuickBooks Enterprise or if you simply need an accounting function to go along with your inventory system, then this could be the right tool for you.

In addition, it can also integrate readily with a variety of other apps and business tools. This is helpful if you already have other software baked into your business processes. Another advantage is the ability to generate reports.

Unfortunately, QuickBooks Enterprise isn’t the most robust inventory management solution out there. It was designed for small businesses and isn’t really designed for IT teams. Not to mention, some users have experienced difficulty with backing up data, which can be concerning when you have a significant inventory volume.

QuickBooks Enterprise is affordable for most small businesses. Keep in mind, it’s a multi-use tool, so you’re paying for accounting and bookkeeping features in addition to inventory tracking. QuickBooks Enterprise version 22 begins at just under $1,500 for the year. This plan includes up to 30 team members with unique roles and logins.

3. Enterprise Resource Planning Software (ERPs)

Microsoft Dynamics 365 and Netsuite are two of the most robust ERP solutions. It can include inventory management as well as accounting, supply chain management, and point-of-sale functions in a single platform, depending on your plan. This solution is good for larger businesses or those that are looking to scale their operations within the confines of a single tool. 

ERPs typically also have artificial intelligence capabilities that provide data-based recommendations for business intelligence, trend spotting, and more. 

One of the biggest cons can also be a strength, which is ERPs are a blank canvas. There is a steep learning curve, and a ton of customization is needed in order to start using it. Most businesses will need specialized consultants and developers to not only launch an ERP but also to maintain it. 

Given these are enterprise tools, you can expect enterprise-type pricing, with most ERPs costing upwards of $100k per year. 

4. Asset Management Software 

While business owners in small businesses with minimal assets might find Excel to be more than enough and large enterprises need the functionality of enterprise-level software, like an ERP, dedicated asset management software, can be a great alternative for midsize businesses.  

For starters, this software is specifically designed to streamline the asset tagging and tracking process in real-time across your entire network. Both physical assets and software assets can be tracked. 

In addition, you can set up user request portals, create asset maintenance processes, run inventory reports, set up role-based access rights, scan asset bar codes on a mobile device, and more. 

Many asset management software companies, including Reftab, offer a limited freemium version. Paid plans start around $30 per month and include unlimited users and mobile apps for iOS and Android so you don’t have to purchase extra equipment to scan barcodes.

***

When it comes to computer inventory systems, you have options. Keep in mind that you want to find the best solution that not just fits your organization today but where you want your company to be in the future.

Ready to get started? Try Reftab for free.