Audit Scanning and Reconciliation Guide
Overview
Audits let you verify the physical location and status of your assets against your records. There are two distinct phases — scanning and reconciliation; and two distinct roles: Auditor and Reconciler.
Creating an Audit
When creating an audit, you:
- Give it a name and optional notes/due date
- Select which assets to include — by location, category, kit, or individual selection
- Assign one or more Auditors (required) — the people who will physically scan assets
- Assign one or more Reconcilers (optional) — the people who will resolve discrepancies after scanning
Auditors and Reconcilers can be the same person. If no reconciler is assigned, auditors typically handle both roles.
The Two Phases
Phase 1: Scanning
Once created, the audit is open and ready for scanning. Auditors scan asset barcodes / qr codes using camera of their phone. The audit dashboard shows a running completion percentage as assets are checked off.
- Scanning an asset in the expected location marks it as found
- Scanning an asset in a different location flags it as Location Mismatch
- Assets in the list that are never scanned remain Asset Not Scanned
- Scanning a barcode not on the original list is tracked separately as an Unlisted Scan (accessible via the View toggle)
When scanning is complete, click “Proceed to Reconciliation.” If there are unscanned assets, a warning dialog will appear asking you to confirm. Confirming closes the scanning phase permanently.
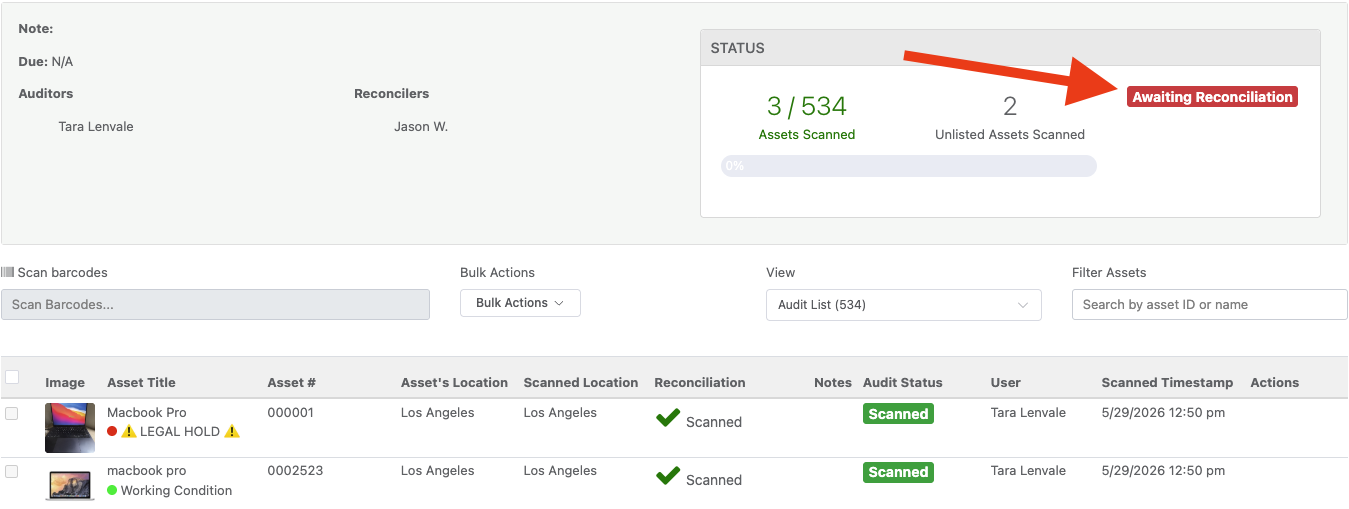
Phase 2: Reconciliation (Status: “Awaiting Reconciliation”)
Scanning is now locked. The audit status shows “Awaiting Reconciliation”. At this point the user assigned as the “Reconciler” must log into the desktop web app and perform the reconciliation which means they must resolve every flagged asset before the adit can be completed.
What “Awaiting Reconciliation” Means
This status means:
- Scanning is complete and locked
- The system has identified discrepancies between what was physically scanned and what the database says
- A reconciler must resolve every flagged asset before the audit can complete
Understanding the Asset Table
During reconciliation, the table shows all assets with the following columns:
| Column | What It Shows |
|---|---|
| (checkbox) | For selecting assets for bulk actions |
| Asset Title | Asset name and current status label |
| Asset # | Asset ID |
| Asset’s Location | Where the database says the asset is |
| Scanned Location | Where it was physically found |
| Reconciliation | The current flag or resolved state |
| Audit Status | Whether the asset was scanned or not |
| Actions | Per-asset reconciliation dropdown |
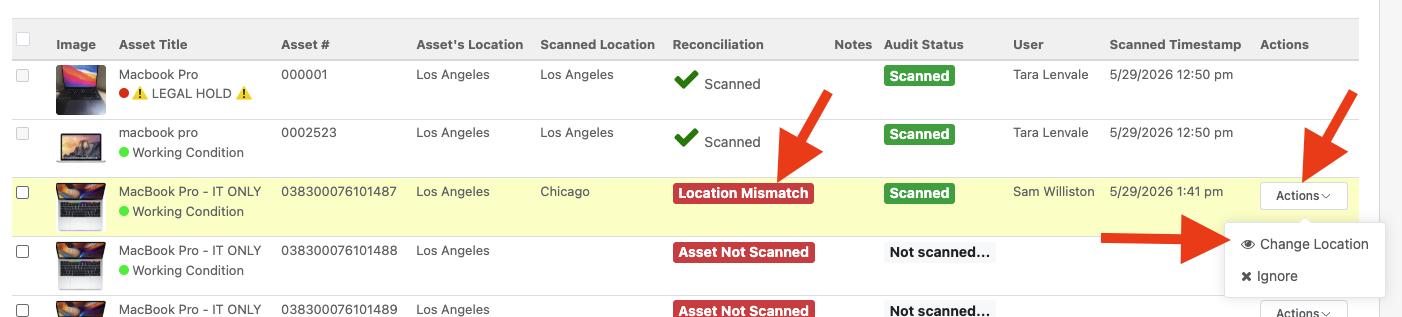
The Reconciliation column shows one of these badges:
| Badge | Meaning |
|---|---|
| Location Mismatch (red) | Scanned in a different location than the database shows |
| Asset Not Scanned (red) | Was on the audit list but never scanned |
| Asset Not in Database (red) | Barcode was scanned but doesn’t exist in the system |
| ✓ Location Updated (green) | Reconciled — location moved in the database |
| ✓ Status Label Changed (green) | Reconciled — status label updated |
| ✓ Ignored (green) | Reconciled — discrepancy acknowledged and dismissed |
Unlisted Scans (barcodes scanned that weren’t on the original audit list) appear separately. Use the View dropdown above the table to switch between “Audit List” and “Unlisted Scans.”
Performing Reconciliation
Option A: Single Asset — Actions Dropdown
Each flagged asset row has an Actions button in the rightmost column. Clicking it opens a dropdown with options that depend on the flag type:
| Flag Type | Available Actions |
|---|---|
| Location Mismatch | Change Location, Ignore |
| Asset Not Scanned | Change Asset Status, Ignore |
| Asset Not in Database | Ignore |
Change Location — Opens a confirmation dialog showing the current location and the scanned location. Clicking “Yes – Move Asset” updates the asset’s location in the database to match where it was physically found.
Change Asset Status — Opens a dialog with a Status Label dropdown. Select a label from the list (or add a new one if you have permission) and click “Change Asset’s Status” to update the asset.
Ignore — Opens a confirmation dialog. Clicking “Yes – Ignore” marks the discrepancy as acknowledged without making any changes to the asset record. Use this when the discrepancy is expected or not actionable.
Option B: Bulk Actions — Checkboxes + Bulk Actions Dropdown
To reconcile multiple assets at once:
- Check the boxes next to the flagged assets you want to act on. Only assets with an active flag (Location Mismatch, Asset Not Scanned, Asset Not in Database) can be checked — already-resolved assets are not selectable.
- Use the checkbox in the table header to select all currently visible flagged assets at once
- Hold Shift and click a second checkbox to select a range of rows
- Click the Bulk Actions button above the table (it animates when assets are selected). This opens a dropdown showing how many assets are selected and three options:
- Transfer Location — Updates the location of all selected “Location Mismatch” assets. Disabled if no selected assets have that flag.
- Change Status Label — Opens a confirmation dialog with a status label selector that applies to all selected assets. Disabled if any selected asset is deleted or untracked (no title).
- Ignore Selected — Dismisses the discrepancy on all selected assets at once.
- A Bulk Reconciliation dialog confirms the action, breaking down how many assets of each flag type are affected. Confirm to apply.
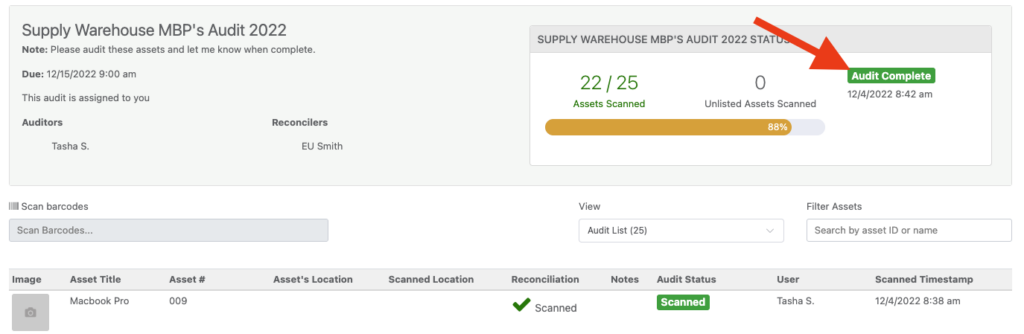
Audit Complete (Status: “Audit Complete”)
Once all flagged assets have been resolved (via any combination of Change Location, Change Status, or Ignore), the audit automatically transitions to “Audit Complete” status. The completion date is recorded and no further actions are possible.
Status Summary
| Status Shown | What It Means |
|---|---|
| Progress bar (no badge) | Audit is open; scanning in progress |
| Awaiting Reconciliation (red badge) | Scanning closed; reconcilers need to resolve flagged assets |
| Audit Complete (green badge) | All discrepancies resolved; audit is closed |
Tips
- Use the Filter Assets search box to find a specific asset by name or ID during reconciliation
- The Unlisted Scans view (via the View toggle) shows barcodes that were scanned but weren’t on the original audit list — these can be ignored in bulk if needed

- If you need to add a new status label mid-audit, the Change Status dialog includes an “Add Status Label” button (visible to users with status configuration permissions)
Need help? We're here for you
For any questions or assistance, feel free to reach out to us.
Your assets, simplified. Begin your journey with us!
50 assets free forever with unlimited inventory & software tracking. Includes email alerts, mobile apps, reports, custom asset tags and more.