Getting Started with Reftab — IT Asset Management Guide
Who this guide is for: IT administrators and IT managers who are setting up Reftab to track laptops and other IT equipment — and who are likely migrating from a spreadsheet.
Reftab is a full IT Asset Management (ITAM) platform that handles both hardware (laptops, monitors, peripherals, networking gear) and software (SaaS licenses, renewals, seat tracking). This guide walks you through hardware first, then software.
Part 1 — Hardware Asset Management
Step 1: Import Your Assets from a Spreadsheet
Most IT teams come to Reftab with an existing spreadsheet of assets. The fastest way to get up and running is to import that spreadsheet directly.
Before you import, set up your categories and custom fields:
Navigate to Settings → Asset Categories. This page lets you define the types of assets you track (e.g., Laptop, Monitor, Keyboard, Network Switch) and add custom fields to each category — things like “Purchase Order Number,” “Warranty Expiration Date,” “Serial Number” or anything specific to your environment. Take a few minutes here before importing so your data lands in the right structure.
To import your spreadsheet:
- Go to Settings → Import / Export Data
- Download the import template, or map your existing columns to Reftab’s fields
- Upload your
.csvor.xlsxfile - Review the column mapping — make sure Serial Number, Asset Name, and any custom fields are correctly matched
- Run the import
Tip: Make sure your spreadsheet includes Serial Numbers. Reftab uses serial numbers as the unique identifier to match assets across integrations — which means when you connect Intune, Jamf, or other tools later, the system will recognize your existing assets and update them instead of creating duplicates.
Once the import completes, head to the Assets page and confirm everything looks right. You can always re-import or bulk-edit from here.
Step 2: Connect Your Identity Provider via SCIM (Microsoft or Okta)
Your assets are in. Now you need your users. Rather than manually adding every employee, Reftab supports SCIM provisioning with both Microsoft Entra (Azure AD) and Okta. This keeps your user list automatically in sync — when someone joins the company they’re added to Reftab, and when they leave they’re deprovisioned.
To set up SCIM:
- Go to Settings → Integrations – search Entra, Okta, etc
- Follow the SCIM setup instructions for your identity provider (Microsoft or Okta)
- Once configured, Reftab will automatically pull in your user directory and keep it current
This is one of the highest-leverage steps in the setup process. With SCIM running, you never have to manually manage your user list again.
Step 3: Connect Intune or Jamf (MDM Integration)
With your assets and users in place, the next step is connecting your MDM platform so Reftab can automatically pull in device details — hardware specs, OS versions, last check-in times, enrollment status, and more.
Reftab integrates with:
- Microsoft Intune
- Jamf Pro / Jamf School
- and many more…
To connect your MDM:
- Go to Settings → Integrations
- Select Intune, Jamf (or search for your specific MDM) and follow the authentication steps
- Reftab will begin syncing devices into your asset list
Important: Reftab uses Serial Number to match incoming devices against your existing assets. This means if you already imported a laptop with serial number C02XYZ123, Reftab will recognize it when Intune or Jamf reports the same device and will update that existing asset record — not create a duplicate. As long as your spreadsheet import included serial numbers, you’re protected.
The MDM sync runs on a schedule, so your asset records stay current without any manual effort.
Step 4: Connect Lenovo, Dell, and Apple Business Manager
Now that your devices are being tracked, it’s time to enrich them with purchase and warranty data. Reftab integrates directly with:
- Lenovo — pulls in purchase dates, warranty status, and service contract details
- Dell — pulls in order information, warranty expiration, and support entitlements
- Apple Business Manager — syncs device enrollment records and purchase data
To connect these:
- Go to Settings → Integrations
- Find the vendor you need and follow the API credential setup
- Once connected, Reftab will automatically populate warranty and purchase fields on matching assets (again matched by serial number)
Having accurate warranty dates in your asset records is what unlocks the automated reporting you’ll set up in a later step.
Step 5: You’ve Reached Autopilot
At this point, pause and appreciate what you’ve built:
- Your existing assets are in Reftab from your spreadsheet import
- Your MDM integration (Intune or Jamf) is continuously discovering devices and keeping hardware details up to date
- Your SCIM integration is keeping your user directory synchronized
- Your vendor integrations (Lenovo, Dell, ABM) are keeping warranty and purchase data current
This means Reftab is now largely self-managing. New laptops that get enrolled in Intune or Jamf will appear in Reftab automatically. New employees added in Entra or Okta will appear in Reftab automatically. Warranty data gets refreshed without anyone touching a spreadsheet.
You’ve put your asset management on autopilot.
Step 6: Set Up Automated Warranty Expiration Reports
One of the most immediate time-savers in Reftab is automated warranty reporting. Instead of manually auditing your spreadsheet, you can have Reftab email you a report of assets with expired or expiring warranties on a recurring schedule.
To set this up:
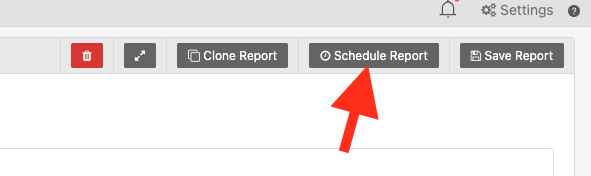
- Go to the Reports page from the main navigation
- Create a new report and in Report Design section: “Show Assets” Where Asset Warranty Expires anytime before now.
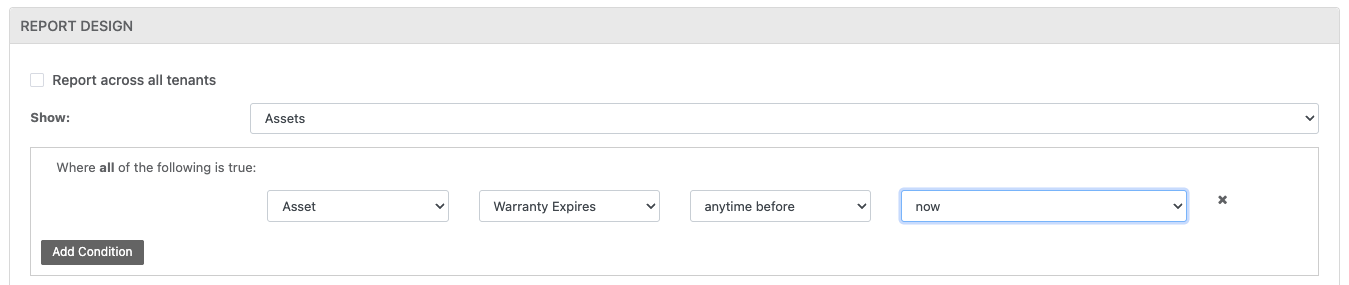
- Save the report
- Enable the scheduled delivery option, set the frequency to Weekly, and enter the recipient email address
From this point on, you’ll receive a weekly email every Monday (or whichever day you choose) listing every asset that needs attention. No manual checking required.
Step 7: Print Asset Tags and Labels
Reftab includes a built-in label designer so you can print barcodes and QR codes for your physical assets.
To create labels:
- Go to Assets → Print Asset Tags (or access it from the asset detail page)
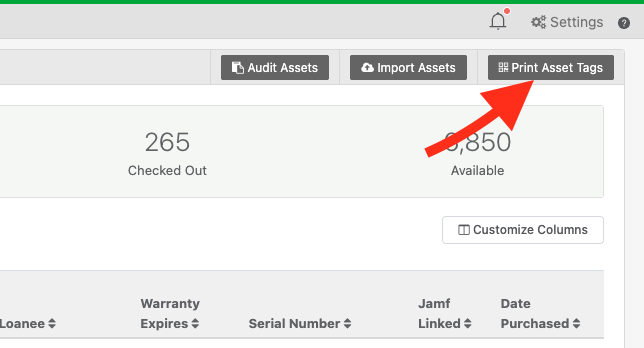
- Choose a label template or design your own — you can include the asset name, barcode, QR code, serial number, or any custom field
- Select the assets you want to label and print to any standard label printer (Dymo, Zebra, Brother, etc.)
Labeling your assets makes it fast and accurate to scan them in the field — especially once you have the mobile app (next step).
For a more detailed guide, click here: https://www.reftab.com/faq/print-asset-tags
Step 8: Download the Reftab Mobile App
The Reftab mobile app lets your team scan asset barcodes and QR codes directly from their phones.
- Available on iOS and Android
- Log a loan, check asset details, update a field, or confirm a location — all from a scan
- Works with the labels you printed in the previous step
This is especially useful for physical audits: walk the room, scan each asset, and confirm it’s still where the system says it is — in a fraction of the time it would take with a clipboard and spreadsheet.
Step 9: Track Accessories and Consumables
Not everything in your IT inventory is a serialized asset. Cables, adapters, mouse and keyboard sets, spare batteries, cleaning kits — these are accessories and consumables that you track in bulk rather than individually.
In Reftab:
- Accessories are items you check out to users (like a spare power adapter) and expect to get back
- Consumables are items that get used up and depleted from stock (like batteries or cable ties)
Go to the Accessories section in the navigation to add items, set stock quantities, and track who has what. This keeps the full picture of your IT inventory in one place, not split across tools.
Step 10: Use Status Labels for Asset Lifecycle Tracking
Status Labels let you apply meaningful lifecycle states to any asset — beyond just “active” or “inactive.”
To set up Status Labels:
- Go to Settings → Status Labels
- Create labels like:
Needs RepairSent for RepairLegal HoldPending DisposalDisposedLost / StolenIn Storage
You can apply these labels to individual assets or in bulk from the asset list.
Archiving assets with Status Labels:
When an asset reaches end-of-life, you can set a Status Label as an archive label. Archived assets are removed from your active asset count — and importantly, archived assets do not count toward your Reftab quota. This means you can keep a complete historical record of every laptop that has ever passed through your organization without being charged for retired devices. Auditors and compliance teams love this.
Step 11: Ship Laptops Back from Remote Employees with Hello Retriever
One of the trickier logistics challenges for modern IT teams is recovering equipment from remote employees — when someone leaves the company or returns from extended leave, getting that $2,000 laptop back from across the country is a real operational problem.
Reftab integrates with Hello Retriever, a service that handles the entire return shipping process for you. From within Reftab, you can initiate a retrieval request for a specific asset, and Hello Retriever coordinates the packaging, shipping label, and return logistics directly with the employee.
To set this up, go to Settings → Integrations and look for the Hello Retriever integration. This is especially valuable for distributed or fully remote IT teams.
Part 2 — Software Asset Management
Why Hardware and Software in One Platform
Tracking hardware and software separately — in different tools or spreadsheets — creates blind spots. You might know you own 200 Microsoft 365 licenses but have no idea which 200 devices they’re deployed on, or whether 40 of those seats are assigned to former employees.
Having both in Reftab means you can connect the dots: see which users have which software, on which hardware, with full cost visibility and automated renewal alerts. This is ITAM best practice, and it’s how enterprise IT teams operate.
Accessing the Software Section
From the main navigation, go to Licenses (or Software). The left panel gives you quick access to everything:
| Section | What It’s For |
|---|---|
| Licenses | All your software licenses — per-seat, site licenses, OEM, etc. |
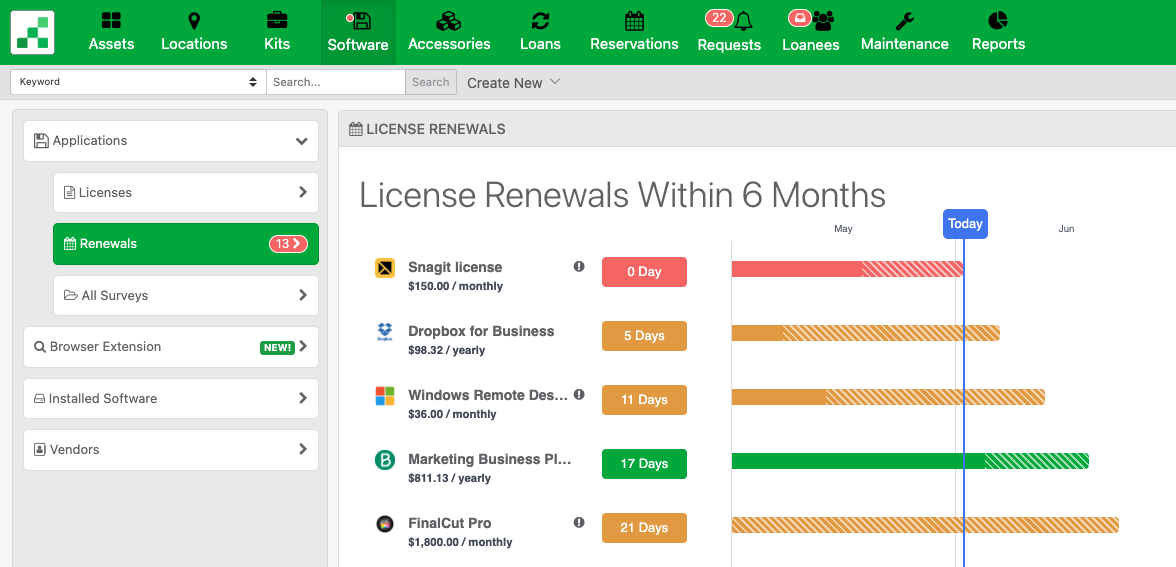
| Renewals | Upcoming renewal dates across all your licenses, in one view |
| Surveys | Send a survey to users to confirm whether they actively use a piece of software |
| Browser Extension | Automatically discover what SaaS apps your team is actually using |
| Installed Software | Software detected on managed devices via your MDM integrations |
| Vendors | A directory of your software vendors and contracts |
Step 12: Let Integrations Populate Your Software — No Import Required
You could import your software licenses from a spreadsheet, and that option is available. But for most IT teams, a better approach is to let your existing integrations do the work:
- Microsoft 365 / Entra integration — Reftab can pull in your M365 subscriptions, licenses, and assigned users automatically
- Okta integration — surfaces which apps are assigned to which users across your Okta-managed application catalog
- Browser Extension — when deployed to your team’s browsers, this passively discovers what SaaS tools people are actually signing into and surfaces them in Reftab’s Discovered Applications view
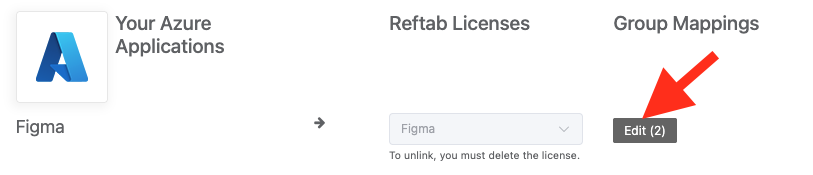
Group Mapping
In Microsoft Entra ID, software is often assigned to users via groups rather than individually. Reftab supports group mapping so you can tell the system: “anyone in this Entra group holds this license.” This is particularly useful for applications that don’t report individual user assignments directly — you map the group, and Reftab resolves the group membership to populate the seat holders list. It also means that as people join or leave a group in Entra, their license assignment in Reftab updates automatically.
Step 13: Add Renewal Dates and Set Up Renewal Alerts
For any license where you control the renewal, add the renewal date in the license record. Reftab will then automatically send you renewal alert emails before that date arrives.
You can configure multiple alerts per license — for example:
- 90 days before renewal
- 30 days before renewal
- 7 days before renewal
This means no more surprise renewals or missed cancellation windows. Go to any license record, set the renewal date, and configure your alert thresholds under the renewal settings.
The Renewals panel in the sidebar gives you a consolidated calendar view of everything coming up across all your software, so you can plan budget conversations in advance.
Step 14: Seat Tracking, Cost Visibility, and Billing Cycles
For every license in Reftab, you can track:
- Seat count — how many licenses you own vs. how many are assigned
- Cost per seat — so Reftab can calculate your total spend
- Total cost over time — Reftab tracks spend historically so you can see how your software costs have grown
- Billing cycle — Reftab handles monthly, quarterly, annual, and multi-year billing cycles, so the cost reporting reflects your actual cash flow, not just a raw number
Seeing unassigned seats is particularly powerful. If you’re paying for 150 seats of a tool and only 90 are actively assigned, that’s immediate savings waiting to happen. Reftab surfaces that gap directly in the license view.
Bringing It All Together
Here’s where you land after completing this guide:
You have a single platform where:
- Every laptop, monitor, and piece of IT gear is tracked, with up-to-date hardware specs from your MDM, warranty data from your vendors, and a full history of who had what and when
- Every software license is visible, with seat assignments, renewal dates, cost tracking, and automated alerts — connected to the same user directory as your hardware
- Integrations keep everything current automatically — no one is manually updating a spreadsheet
- Retired assets are archived and preserved for history without counting toward your quota
- Reports and alerts proactively surface what needs your attention, on a schedule you control
This is what modern ITAM looks like: not a spreadsheet you maintain, but a system that maintains itself — and gives you the visibility to make faster, better decisions about your IT environment.
Need help with any of these steps? Visit reftab.com or reach out to the Reftab support team from within your account.
Need help? We're here for you
For any questions or assistance, feel free to reach out to us.
Your assets, simplified. Begin your journey with us!
50 assets free forever with unlimited inventory & software tracking. Includes email alerts, mobile apps, reports, custom asset tags and more.