User authenticated, but email not in Reftab and attribute mapping failed
When logging in to Reftab via SSO, you may see the error, “User authenticated, but email not in Reftab and attribute mapping failed“. This means you’ve configured SSO, but the user you’re trying to log in with does not yet exist in Reftab. (The wording that refers to, “attribute mapping failed” is only relevant if you’re using just-in-time provisioning – this is addressed further in this article)
The first thing to do is:
- Log back into Reftab as an administrator and add the user you were trying to log in with via SSO.
- Then, log out and try logging in via SSO with the user account that caused the error.
If that did not work:
- Log into Reftab as an administrator and click “Settings” > “SAML SSO Settings“.
- Then, click “Edit” next to your domain.
- On the screen that appears, check the “Email Attribute“ value. This is likely incorrect.
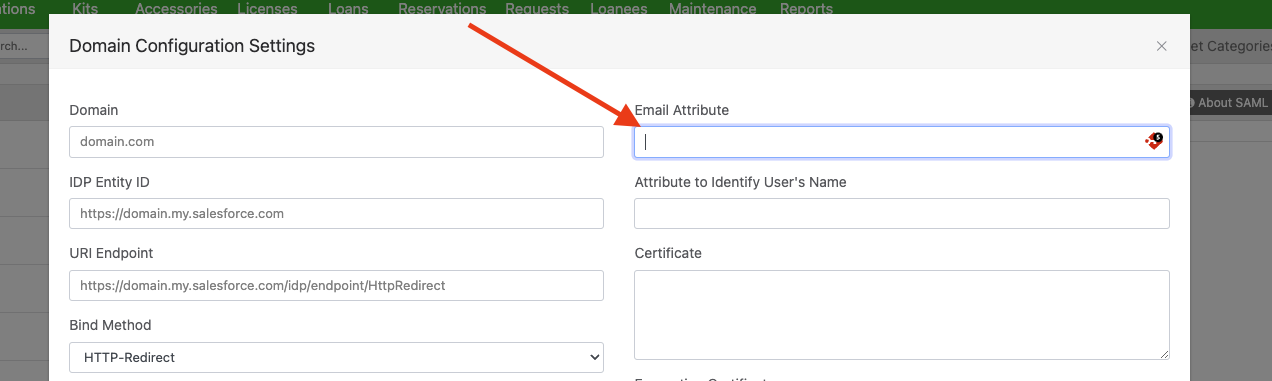
3. If you’re using MS Entra, (previously named Azure) you can copy and paste this attribute: http://schemas.xmlsoap.org/ws/2005/05/identity/claims/emailaddress
3a. If you’re using Okta, the email address attribute is usually: email
4. Once you enter that new value, click “Save SAML Settings“

Now, try logging into Reftab with SSO again. If you still get the same error message, Reftab will show you an output on screen of the attributes your system sent.
Find the attribute that your identity provide has sent that denotes email address. Save that attribute in the “Email Address” field on the SSO Domain Configuration Settings page within Reftab.
(You may need to contact your administrator and have them assist.)
How to fix attribute mapping failed when using just-in-time provisioning (JIT)
This is a much less common scenario (it is recommended to use SCIM user provisioning instead). But if you’re using just-in-time (JIT) rules, this error indicates you’re not exposing the attribute and value pair that you configured Reftab to look for. You will need to verify the exposed attribute and values being sent from your identity provider’s SAML token.
To verify the attributes that are being sent, download the Google Chrome extension called, “SAML Chrome Panel”.
Then, go to Reftab.com/login and do not login.
Then, right clicking anywhere on the page and click “Inspect“ – this will open your browsers development tools.
Then click the tab, “SAML”.
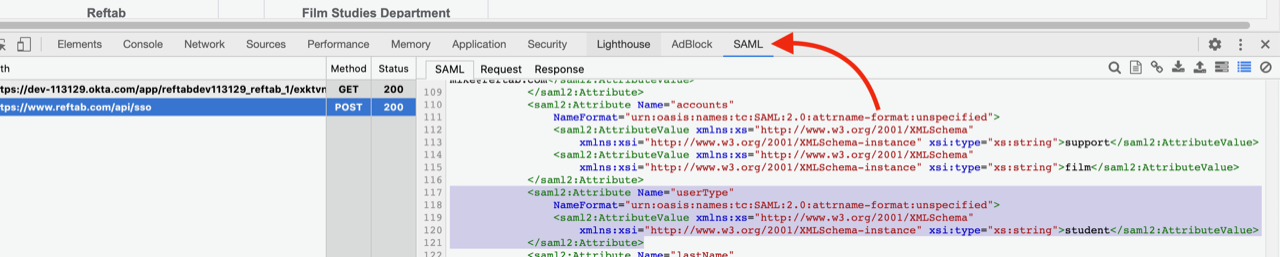
Now try logging into Reftab via SSO.
In the screenshot above, we see the SAML token passed to Reftab and we can now inspect what is being sent to us.
For example, I’ve highlighted that I have an attribute called “userType” and a value of “student”. This is sent from the identity provider to Reftab.
In my just-in-time settings, I have a role that maps the attribute for “userType” with a value of “student” into the role, “New York – Portal Access”
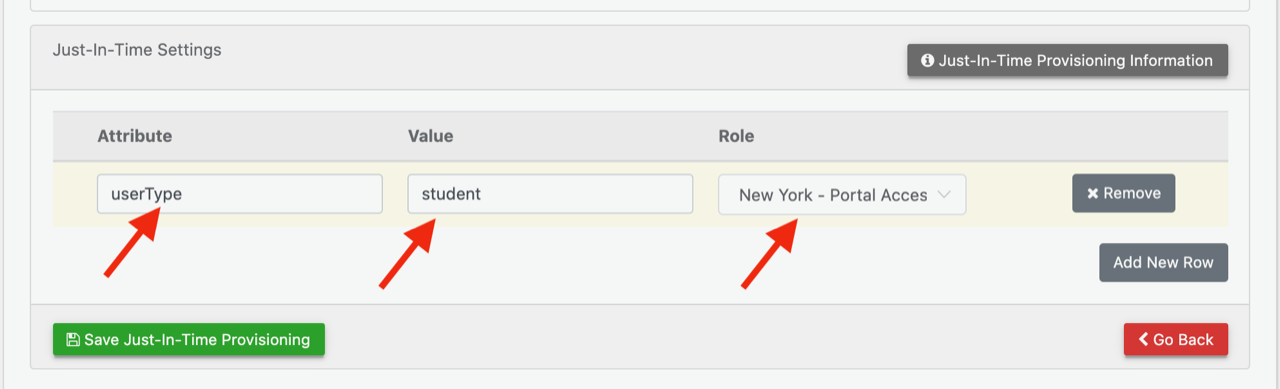
Since the user userType attribute is being sent, users can login via SSO without having to have an account premade in Reftab.
If my SAML token does not expose the attribute for userType with a value of student for the user logging in, then the error, “User authenticated, but email not in Reftab and attribute mapping failed” will appear. To fix this, expose the additional attributes on your SAML token, or update your just-in-time provisioning rules or, enable “role lock” on the Reftab account.
You can refer to this link to both edit and add new claims to your SAML tokens for MS Azure. https://docs.microsoft.com/en-us/azure/active-directory/develop/active-directory-saml-claims-customization
Override JIT Rules
If you enable role lock on any account, JIT rules are ignored and the user is logged in to whatever role they are locked into.

Determining if Just-In-Time is Necessary
Every user user logging into Reftab must belong to an access role. Reftab needs to know if the user is an administrator, editor, viewer etc. or some other custom role you’ve created…
If you are adding users manually you don’t need just-in-time rules. You manually add users to a Reftab access role prior to them logging in for the first time.

If you don’t want to manually create users you have two options:
- Use just-in-time rules so that users are created on-the-fly the first time they login.
- Create users via a SCIM integration: Click here to setup SCIM with Azure
If you’re both manually creating users and using just-in-time provisioning, you’ll want to turn on ‘role lock’ for the users you’re creating manually so that they are locked into their access role.
Need help? We're here for you
For any questions or assistance, feel free to reach out to us.
Your assets, simplified. Begin your journey with us!
50 assets free forever with unlimited inventory & software tracking. Includes email alerts, mobile apps, reports, custom asset tags and more.