
Importing Assets from an Excel Spreadsheet into Reftab
This guide explains how to import assets from an Excel spreadsheet into Reftab. Reftab now supports importing multiple asset categories from one spreadsheet. See what changed.
Reftab supports two import options:
- Single-category import: Use this when every row in your spreadsheet belongs to the same asset category.
- Multi-category import: Use this when one spreadsheet contains several types of assets, such as laptops, monitors, phones, and networking equipment.
The multi-category importer can guide you through creating categories, custom fields, and locations during the import. You do not need to configure all of these items beforehand.
Step 1: Review your spreadsheet
Before importing, review your spreadsheet for duplicate records, confirm which column contains the asset category, and decide whether to retain your existing asset IDs or have Reftab generate them.
Make sure the first row contains clear column headers describing the information in each column.
For example:
- Title
- Asset Type
- Serial Number
- Date Purchased
- Purchase Price
- Vendor
If your spreadsheet contains multiple types of assets, make sure it includes a column that identifies the type or category for each row. This column may be named Asset Type, Category, Equipment Type, or something similar.

Step 2: Open the asset importer
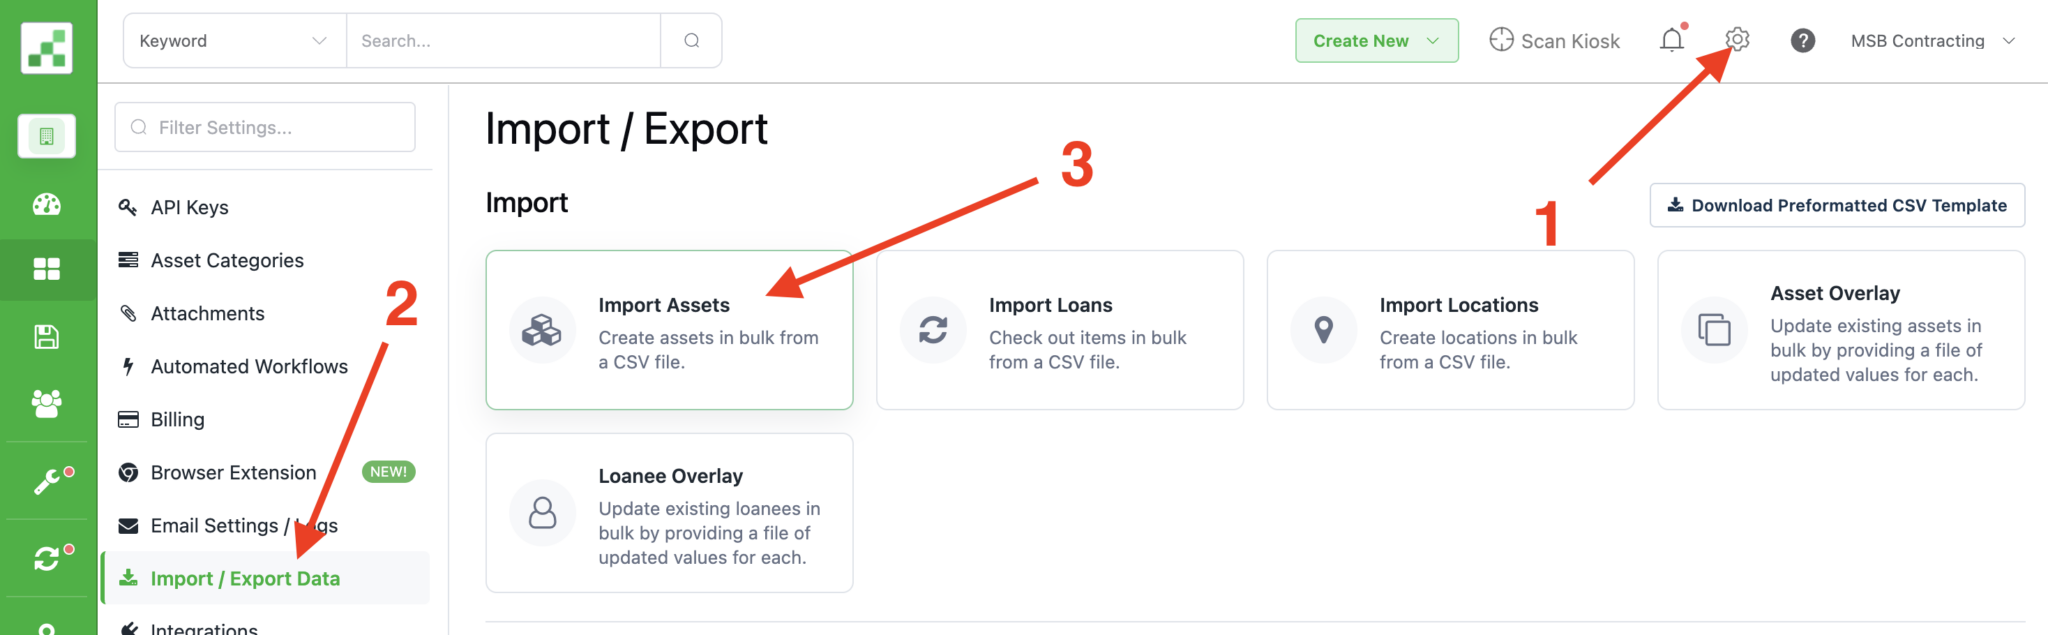
Log in to Reftab and navigate to:
Settings > Import / Export Data Click Import Assets.
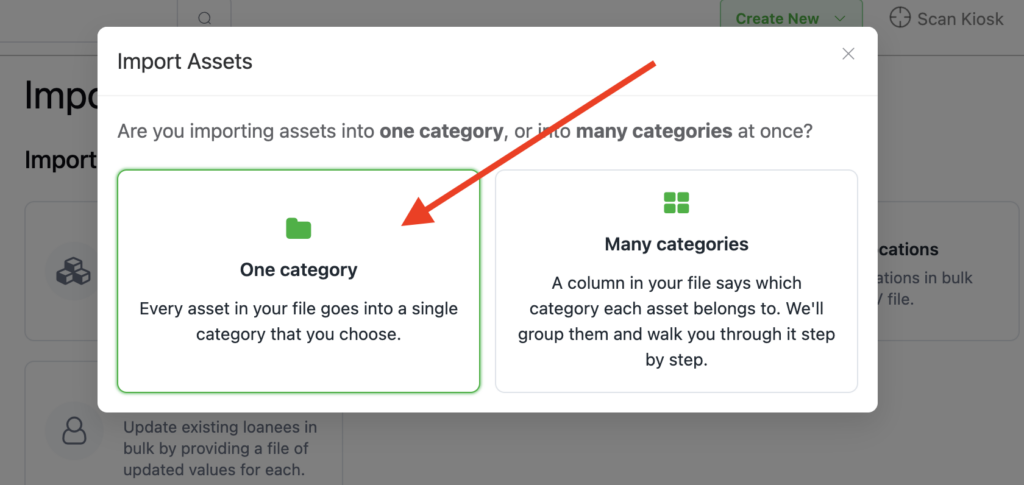
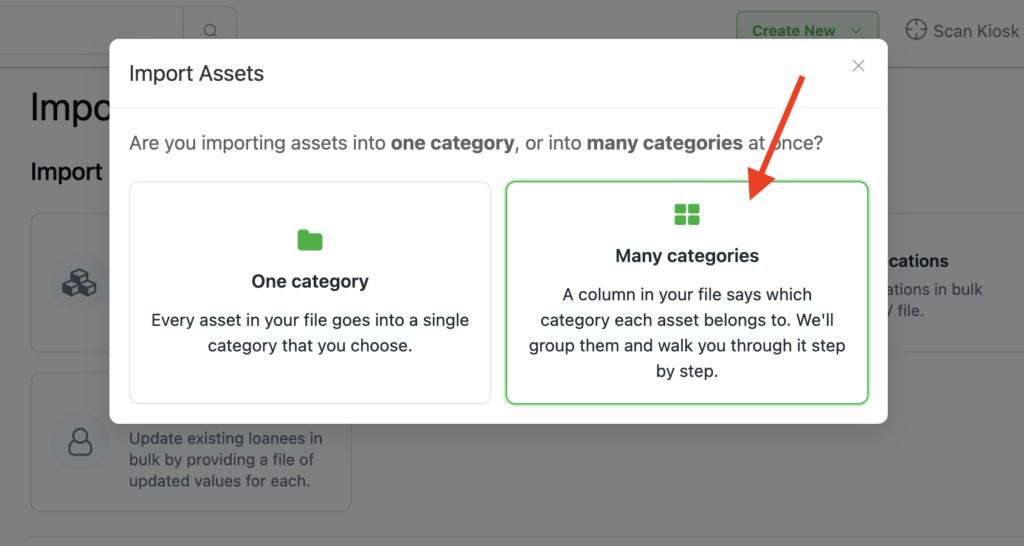
Reftab will ask whether your spreadsheet contains assets from one category or multiple categories.
Next, choose whether you’re importing assets into one category or many categories:
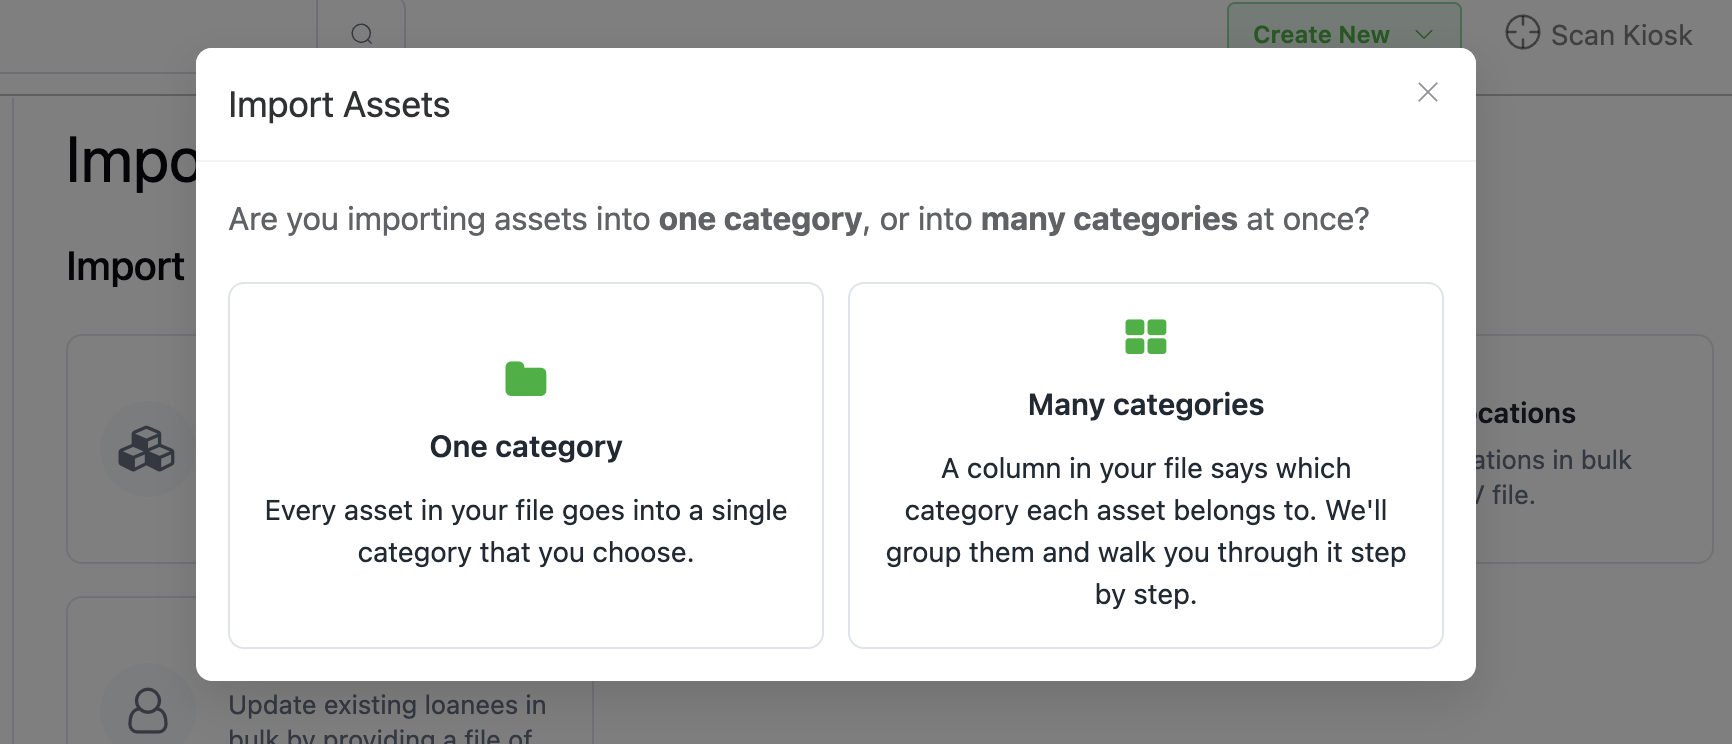
Option 1: Import assets into one category
Choose this option when every row in your spreadsheet belongs to the same Reftab category.
If you’re new to Reftab and importing a larger spreadsheet that contains assets across multiple categories, you may want to jump to option 2 – importing into many categories
Step 3: Prepare the category and fields
Before beginning a single-category import, make sure the category and fields you need already exist in Reftab.
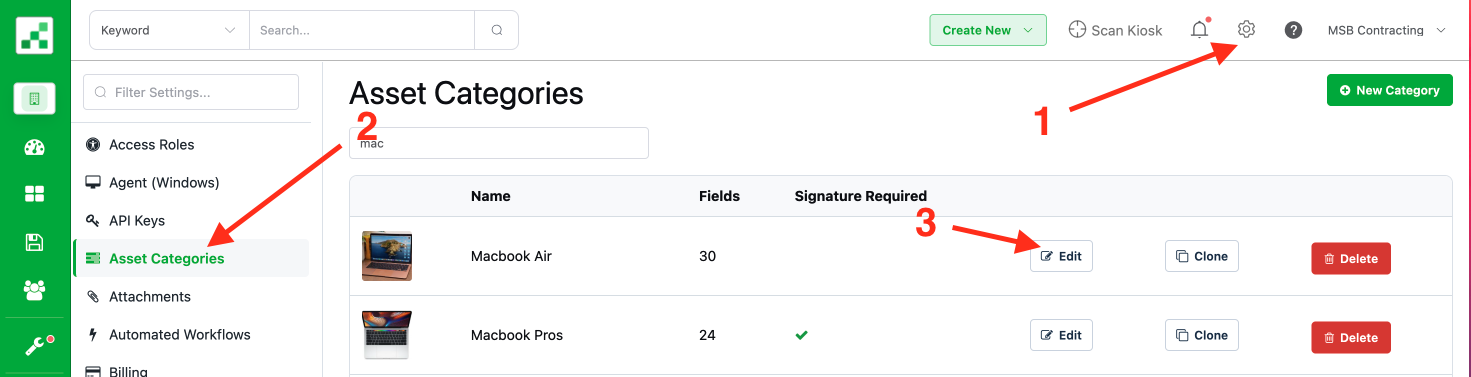
Navigate to: Settings > Asset Categories. Open the category you will be importing into and create a field for each spreadsheet column you want to import.
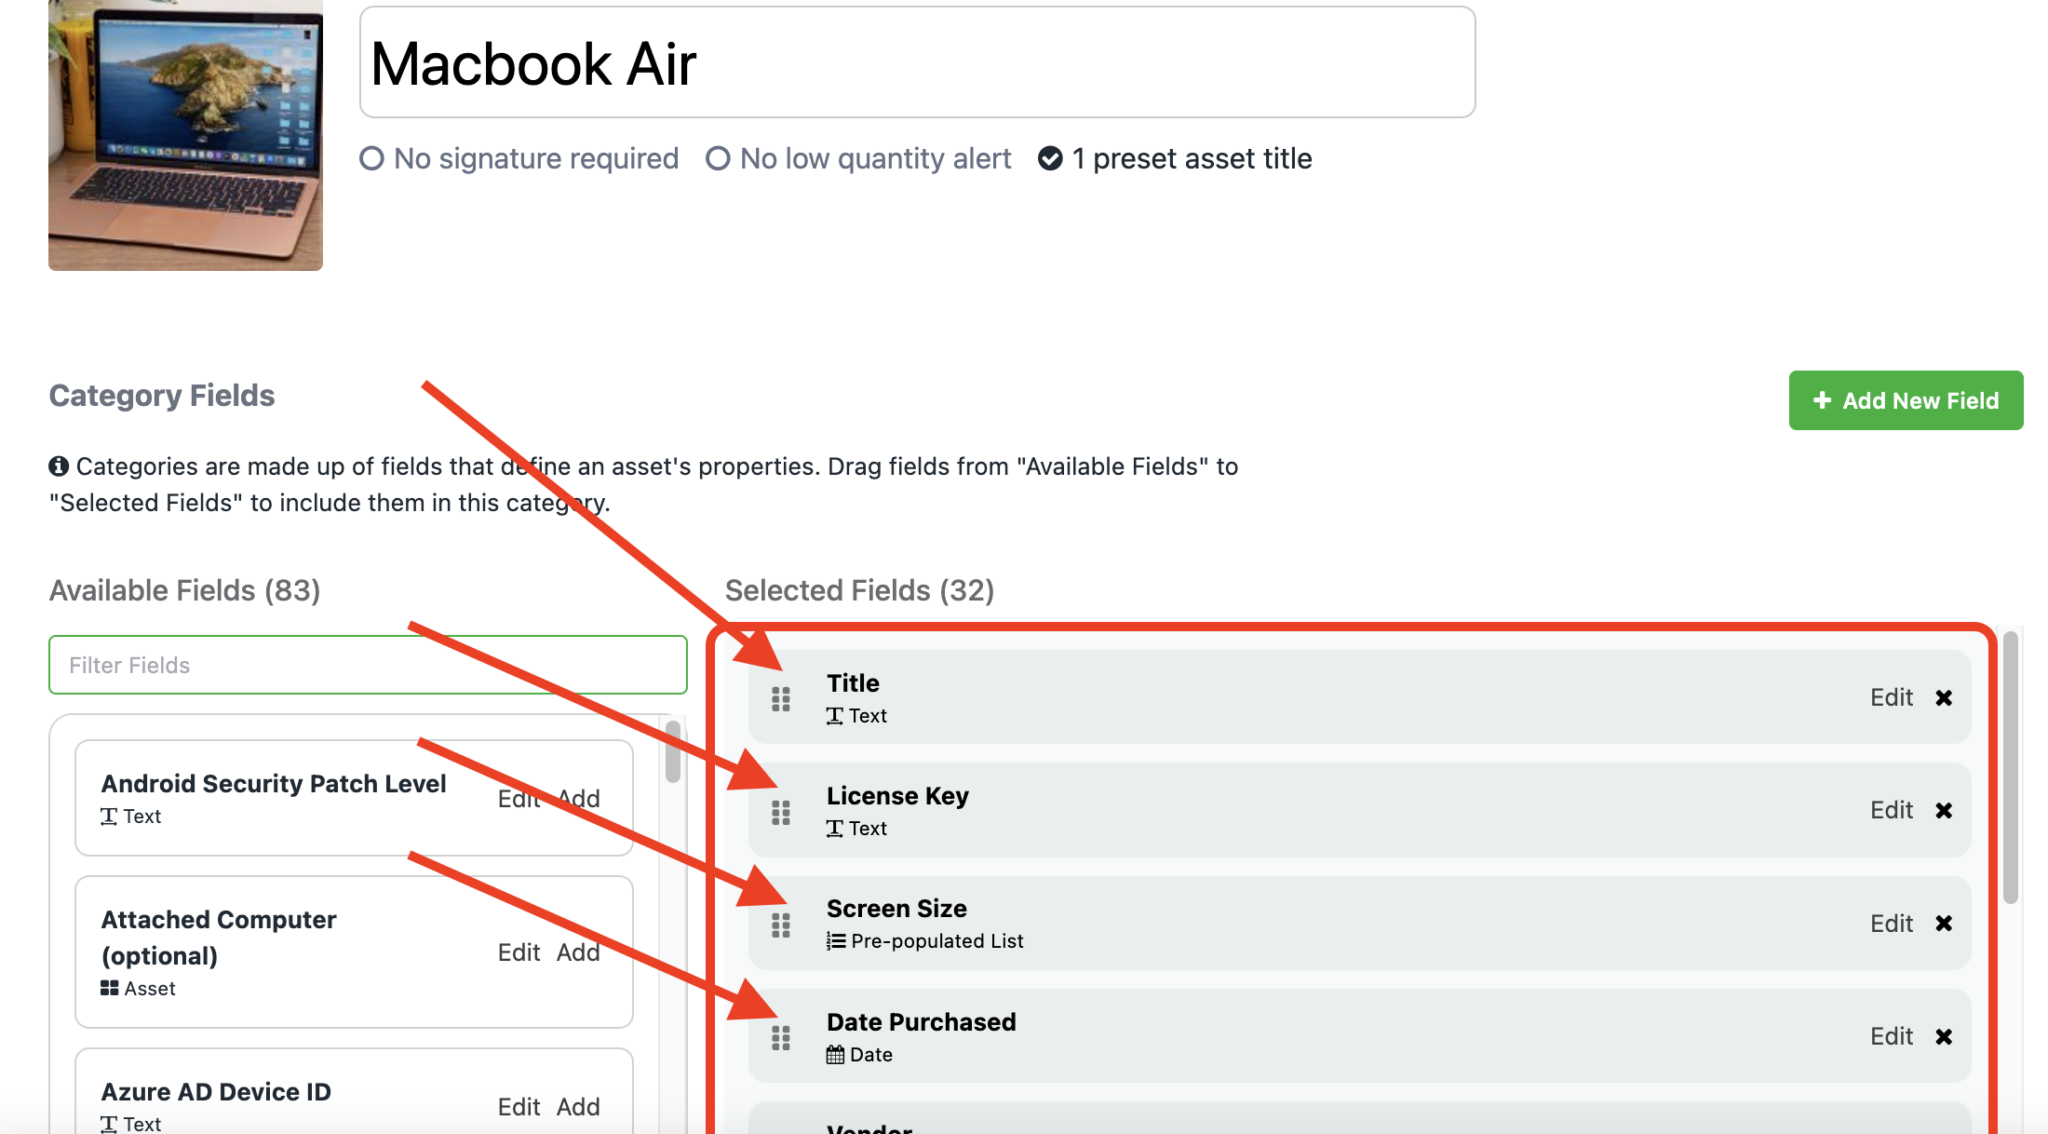
For example, if your spreadsheet contains Macbook Airs and has the following columns:
- Title
- License Key
- Screen Size
- Date Purchased
- Vendor
Your Reftab category should contain those same fields for that information. Click “Settings” > “Asset Categories” and find your Category and click “Edit“
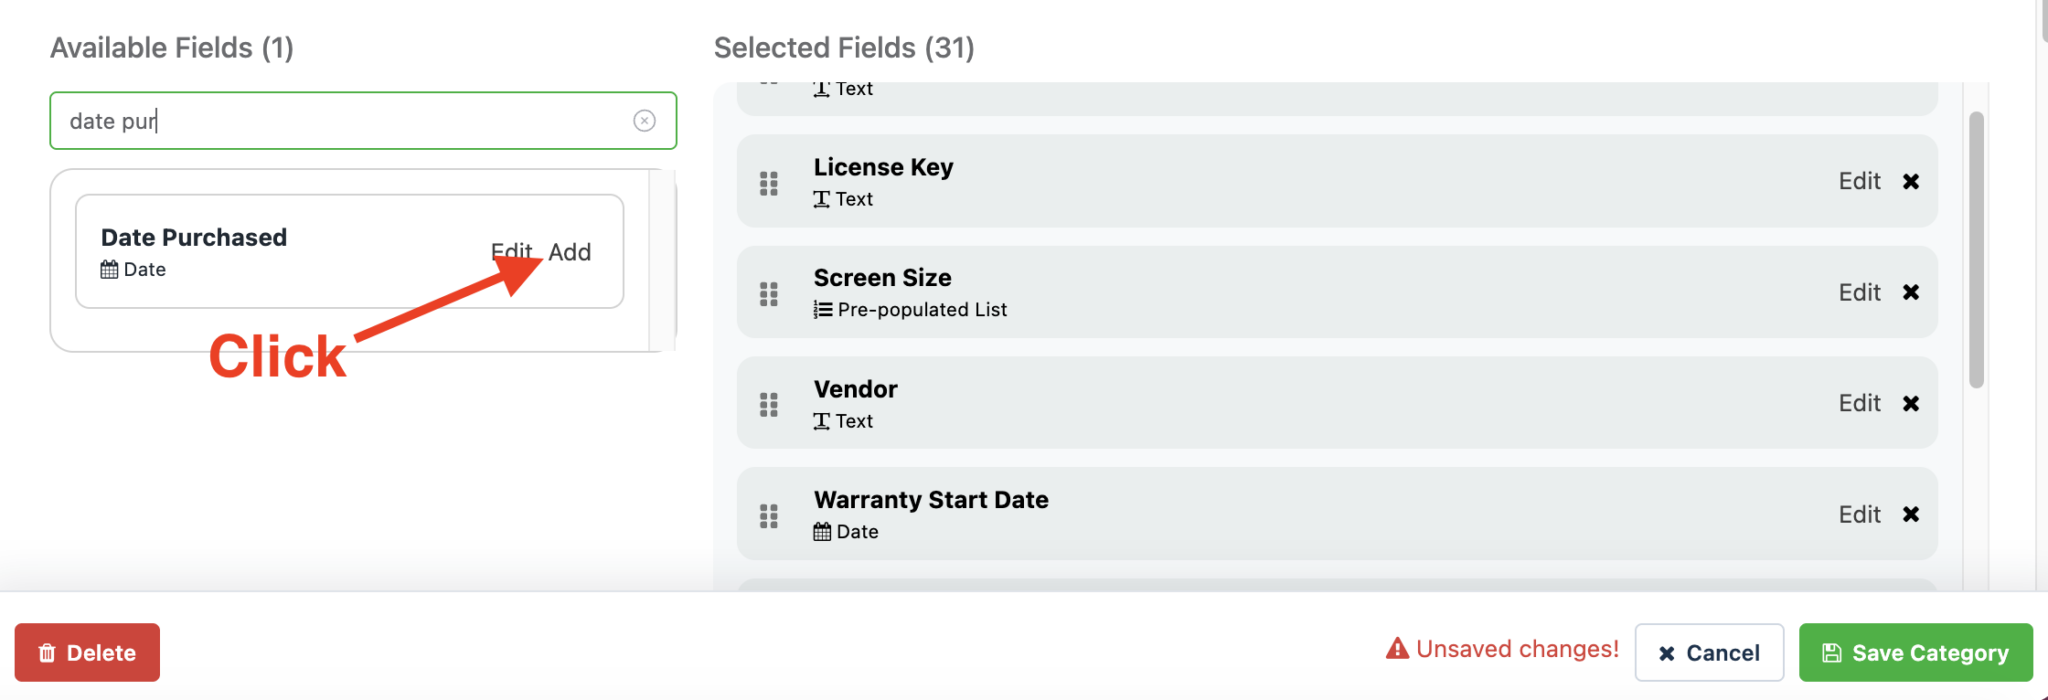
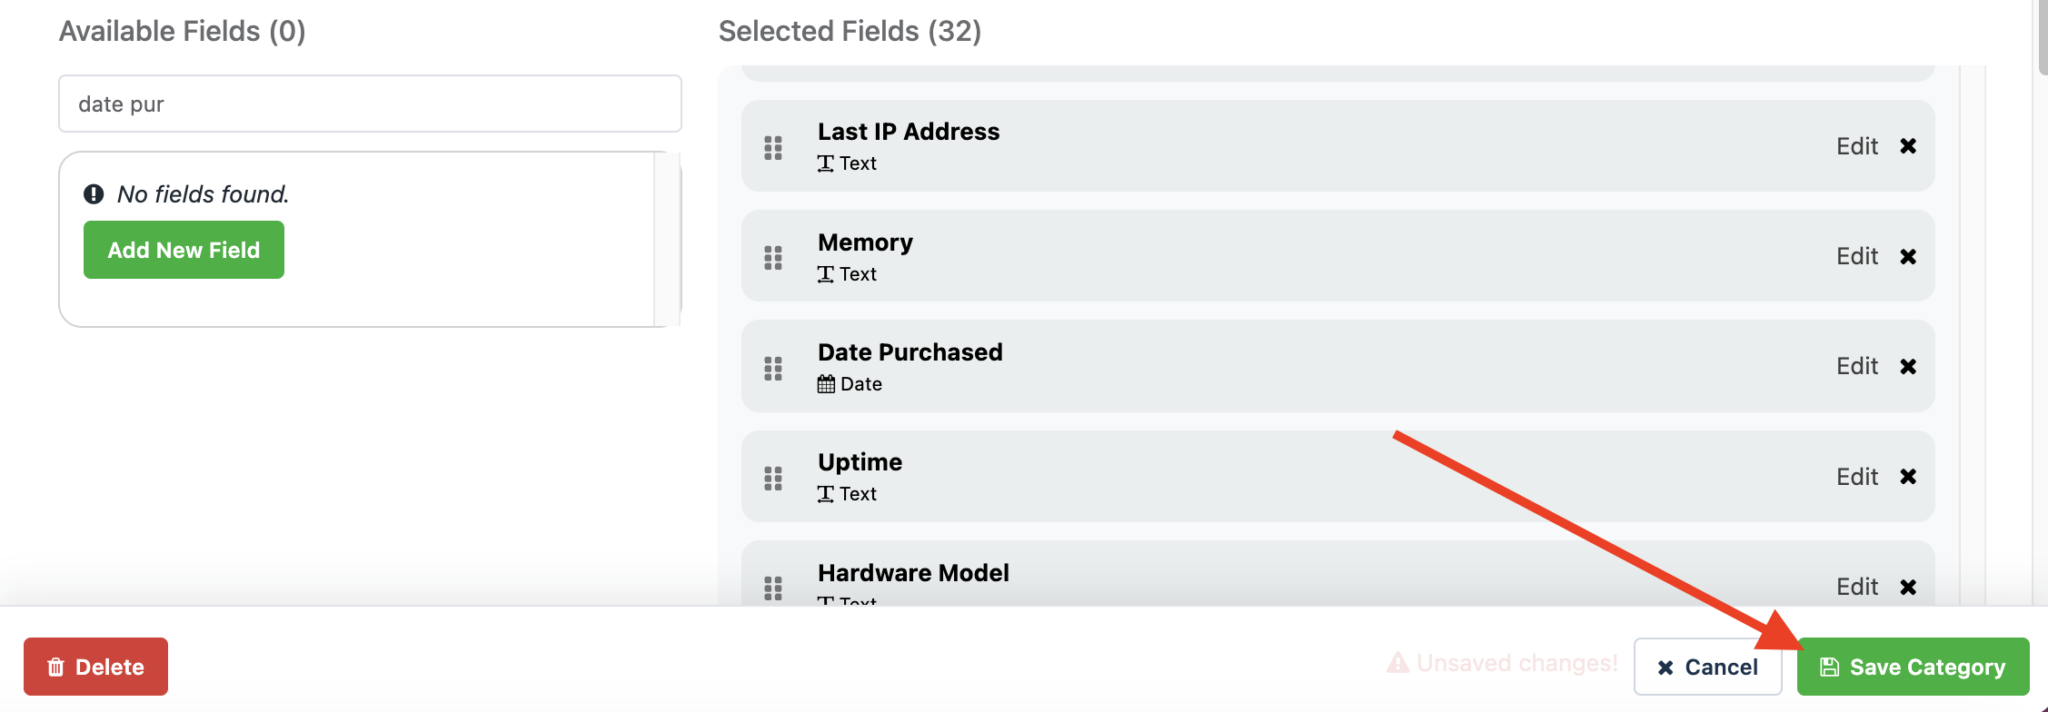
Make sure the fields contain at least the same as your column headers from your spreadsheet. Add a new field or drag over any existing fields so they are saved under “Selected Fields“
If you need to create new fields, click “Add New Field” & choose a field type that matches the data in your spreadsheet column headers.
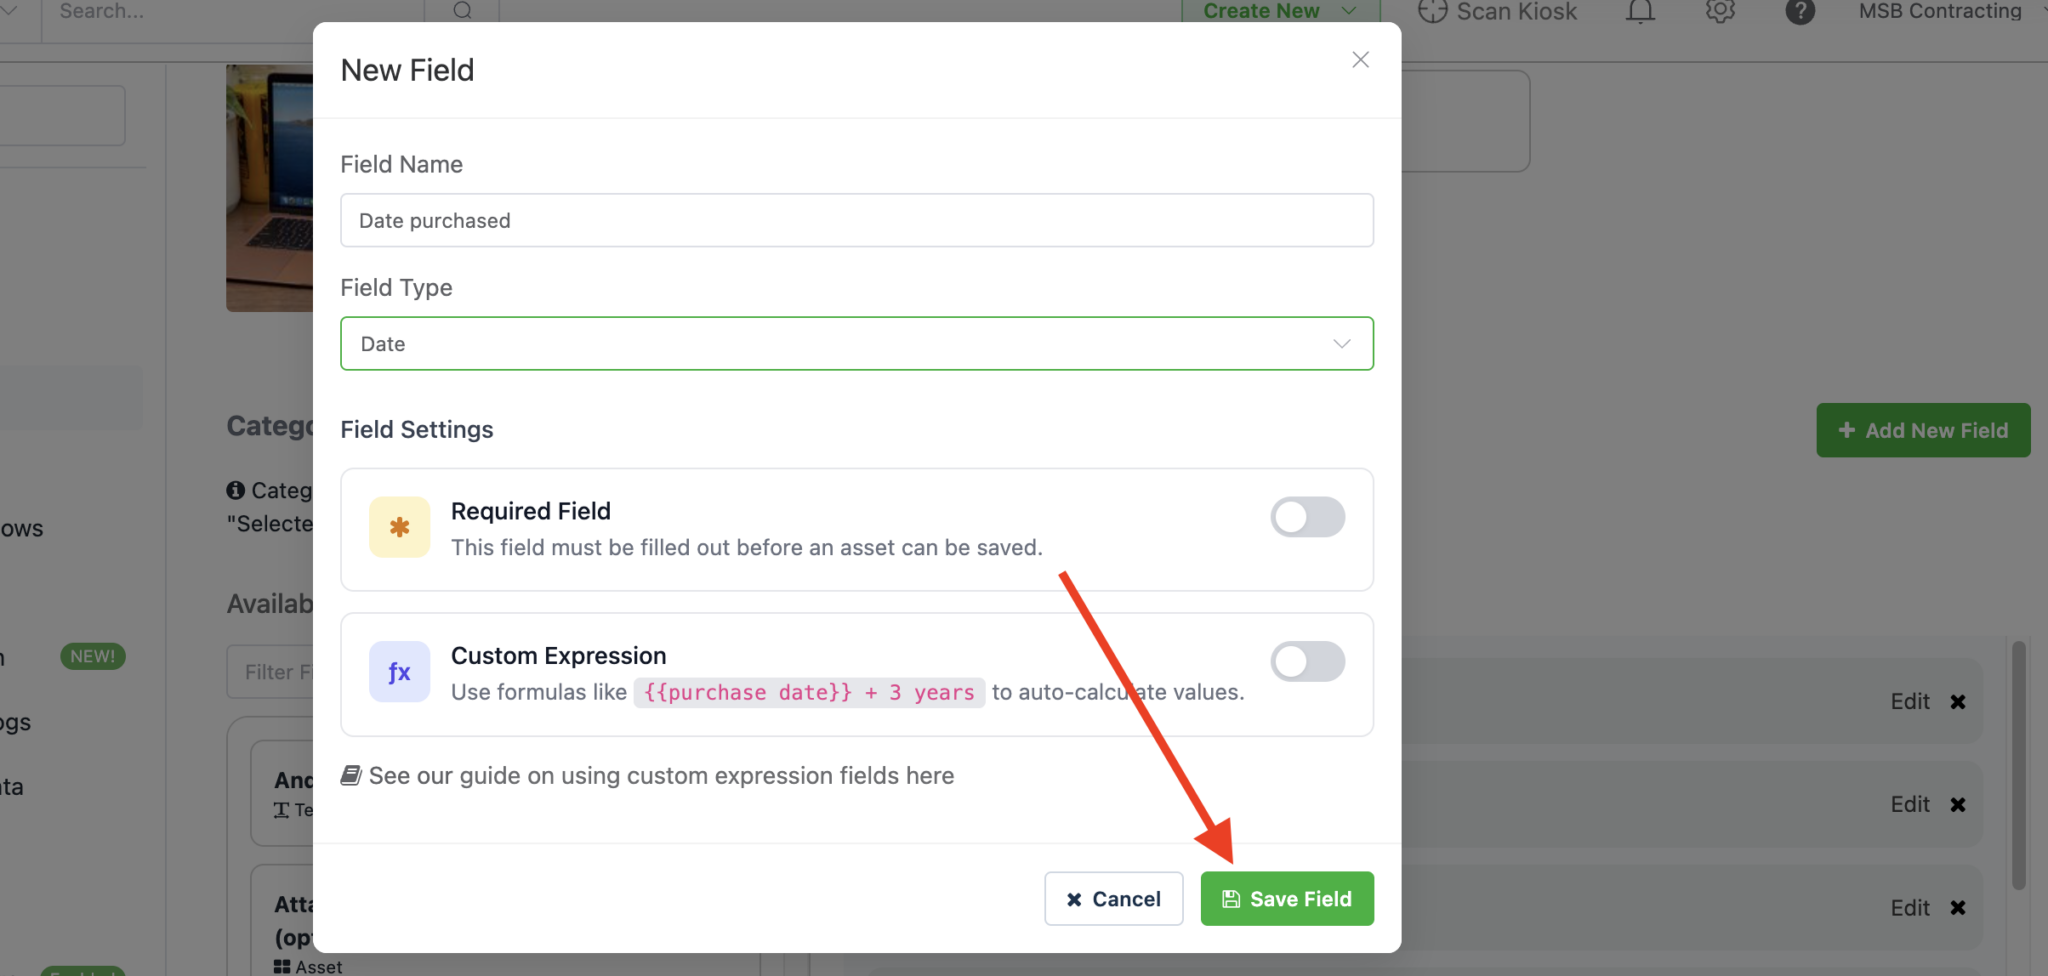
For example:
- Use a Date field for purchase dates, warranty dates, and other calendar dates.
- Use a Monetary field for prices, costs, and other currency values.
- Use a Dropdown or Menu field for columns that contain a limited set of repeated choices.
Click Add after creating each field, and then click Save Category.
Step 4: Select a category and default location
Return to: Settings > Import / Export Data > Import Assets
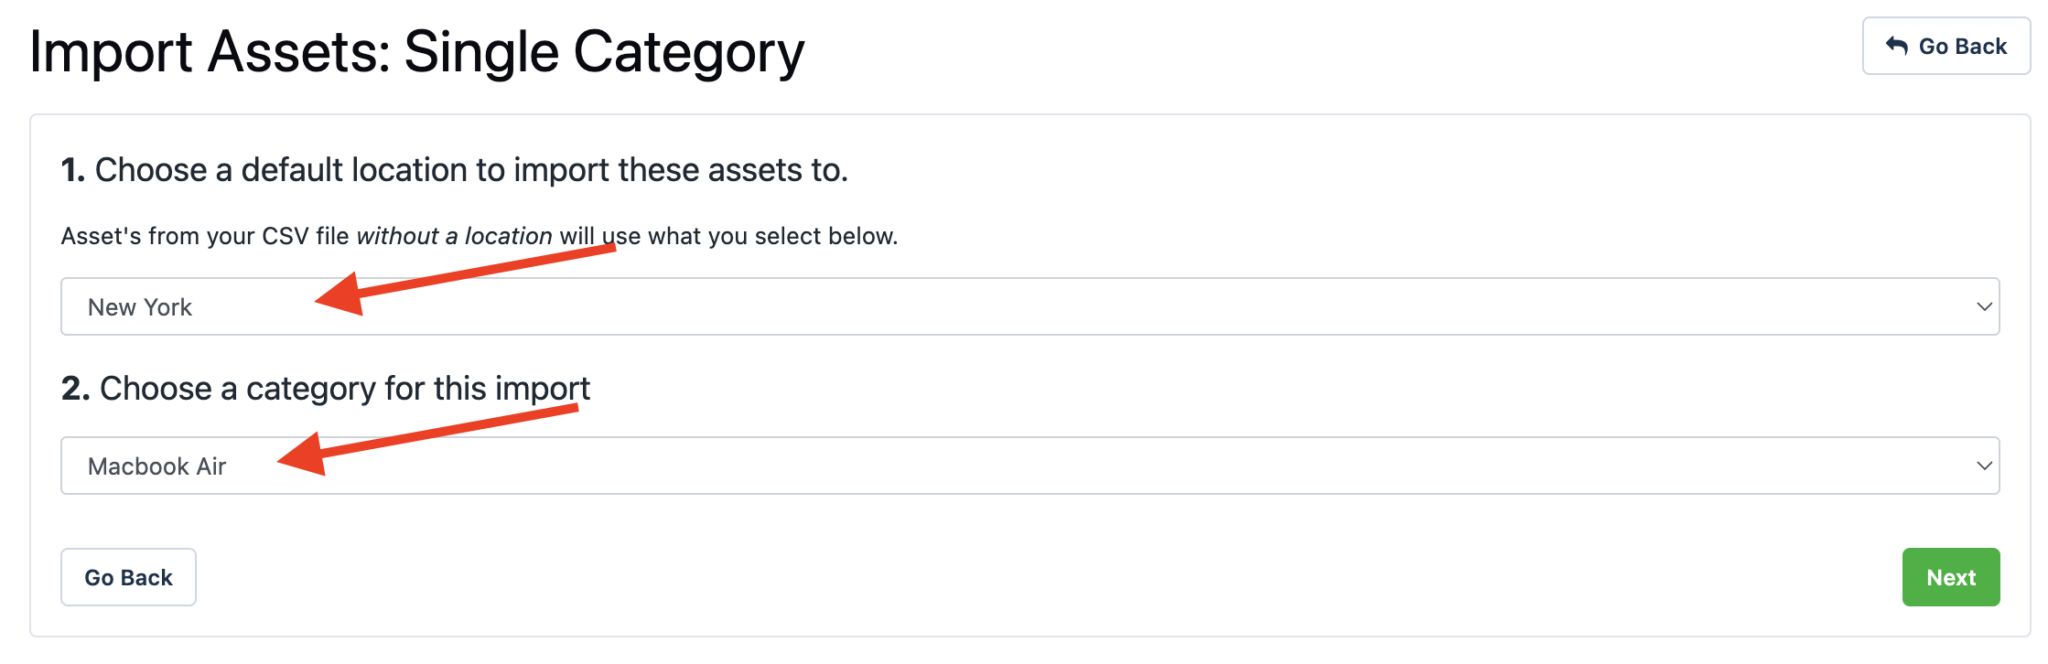
Choose the category for the import.
Select a default location.
Step 5: Upload your file
Upload your Excel or CSV file by dragging it into the importer or clicking Browse Files.
Review the field mappings and confirm that each spreadsheet column is mapped to the correct Reftab field.
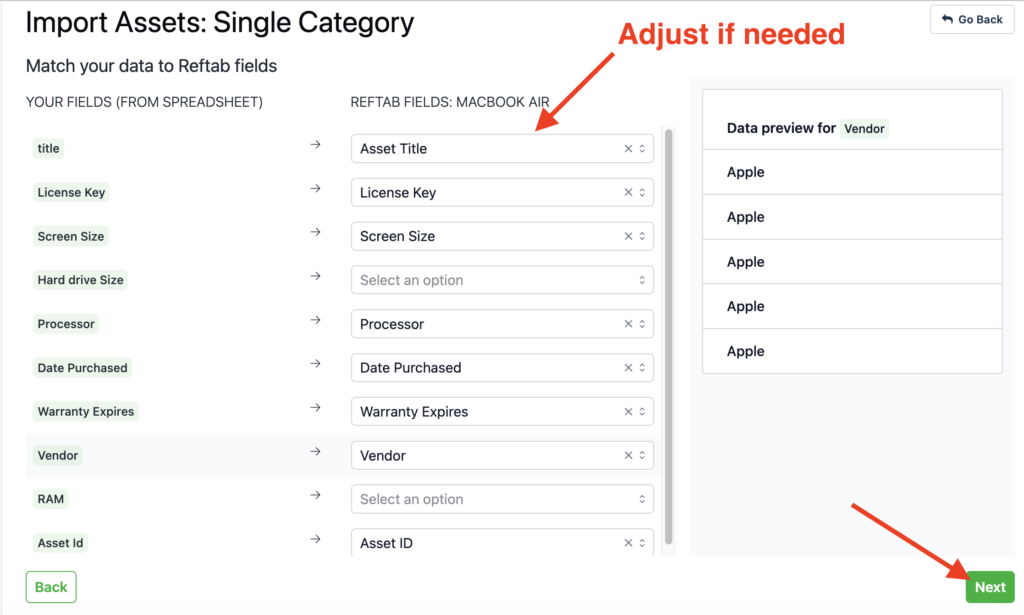
You can skip any columns that you do not want to import by clicking the “x” on any of the inputs. Click “Next” when your mapping is complete.
Option 2: Import assets from multiple categories
Choose this option when your spreadsheet contains several types of assets. This is best for when you’re new to Reftab and want the importer to create categories, fields and locations automatically. (With this option, You do not need to split the spreadsheet into separate files for each category.)
Click “Settings” > “Import / Export Data” > “Import Assets“
Click “Many Categories”
Step 3: Upload your File & Select the category column
Upload your Excel or CSV file.
Reftab will ask you to select the column that identifies the asset type for each row.
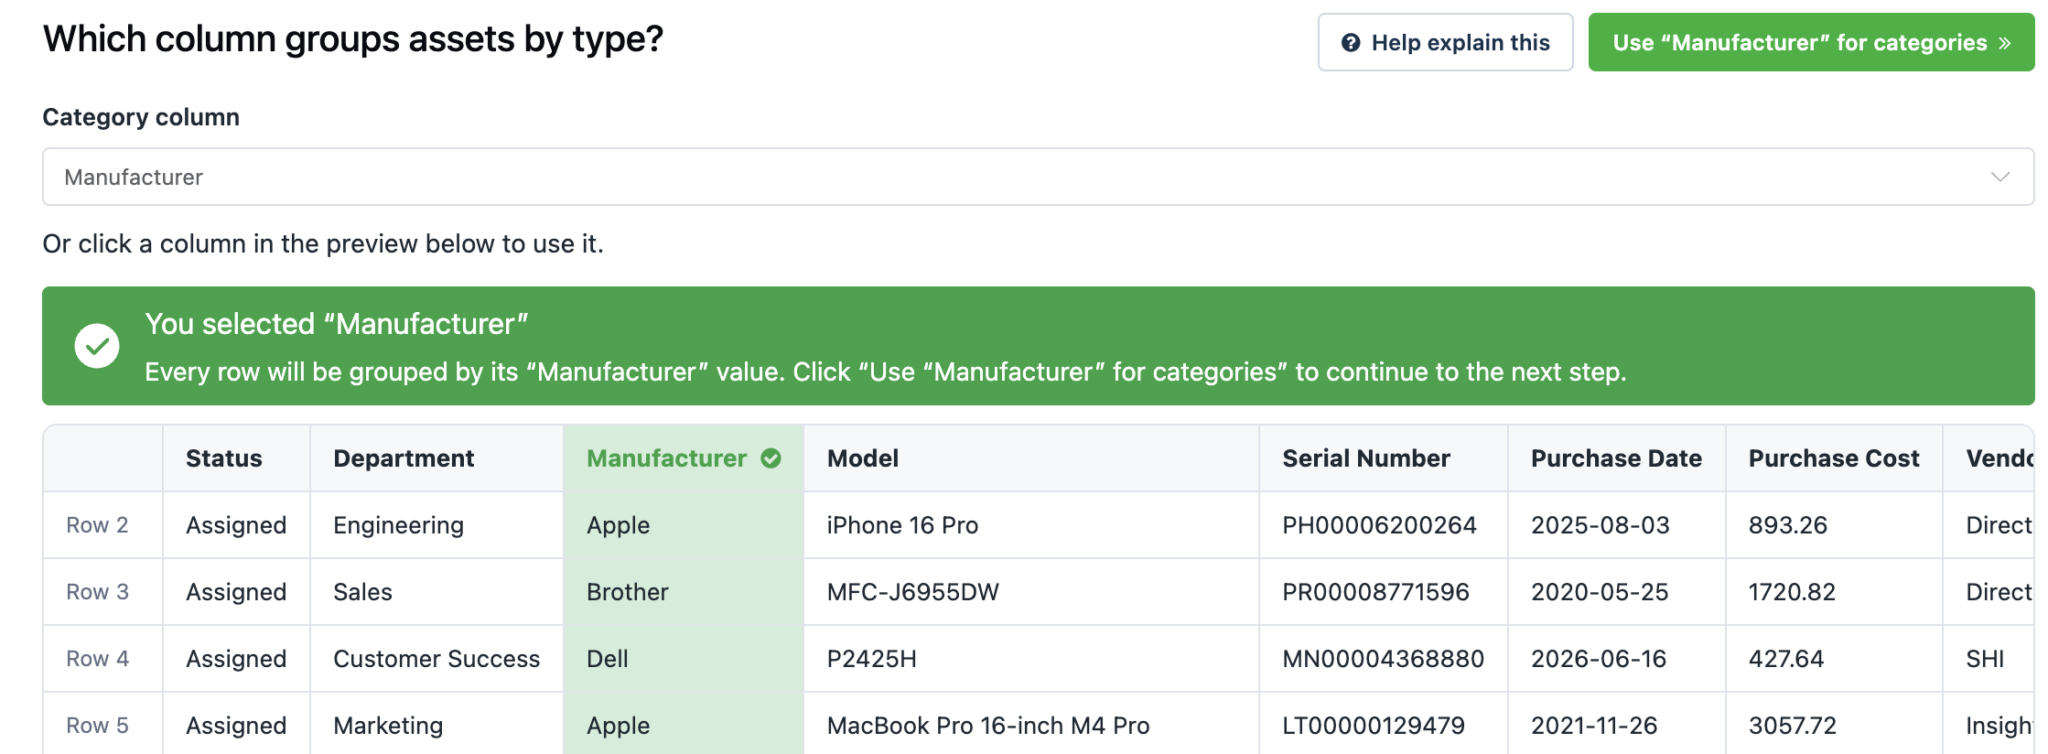
For example, the column may contain values such as:
- Laptop
- Monitor
- Mobile Phone
- Access Point
Reftab will group the rows based on the values in this column and show how many assets were found in each group.
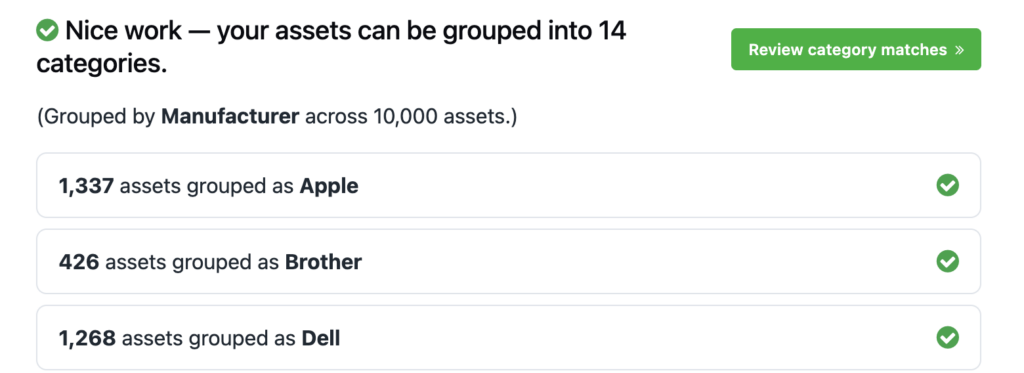
Step 4: Match or create categories
For each asset type found in the spreadsheet, you can:
- Match it to an existing Reftab category.
- Create a new category.
- Combine multiple spreadsheet values into one category.
- Skip a group that you do not want to import.
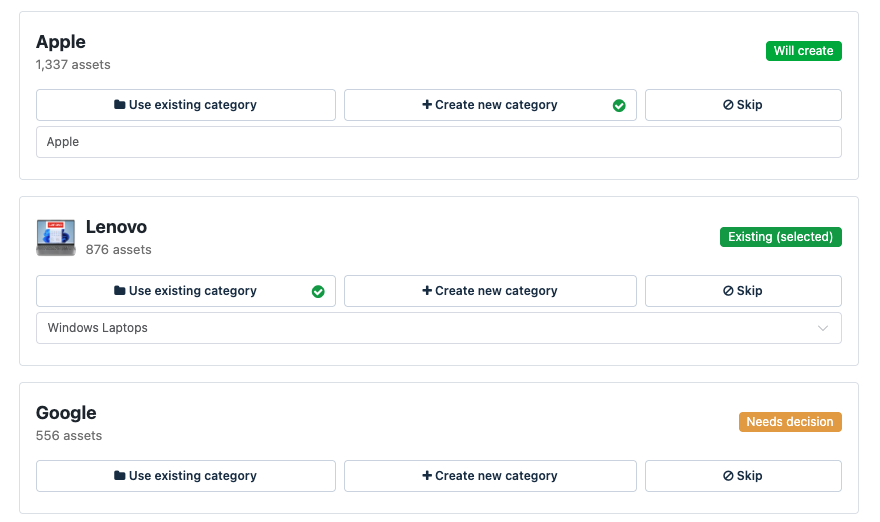
Any new categories will be created only after you review and confirm the import.
Step 5: Choose the asset title and ID
Select your spreadsheet column that should be used as the asset title. (A good choice would be a “Model” column if you have one).
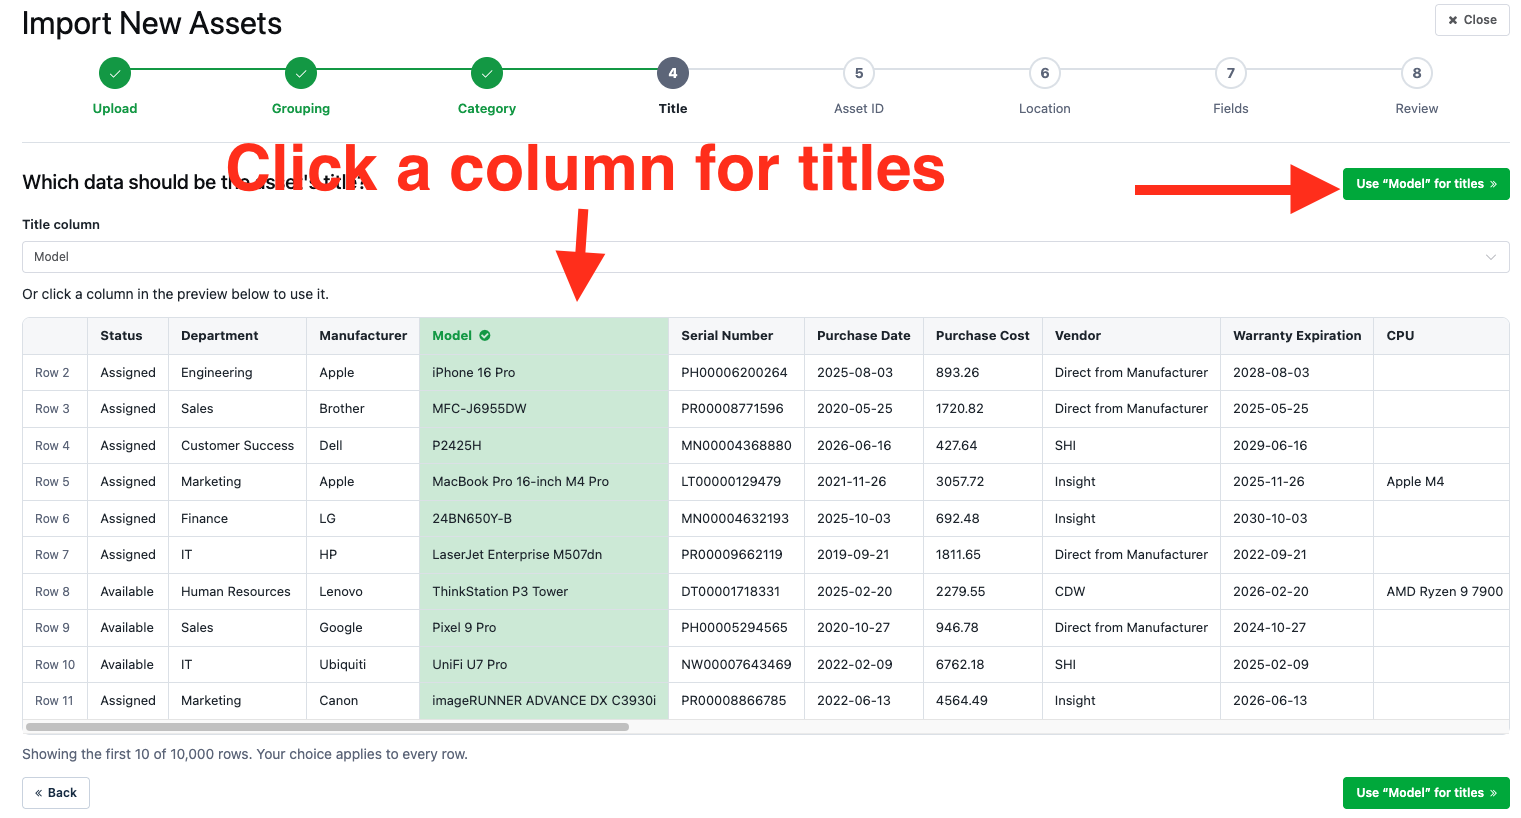
Click the green “Use x for titles” button to proceed.
You can also choose an existing Asset ID column or have Reftab automatically generate unique Asset IDs during the import.
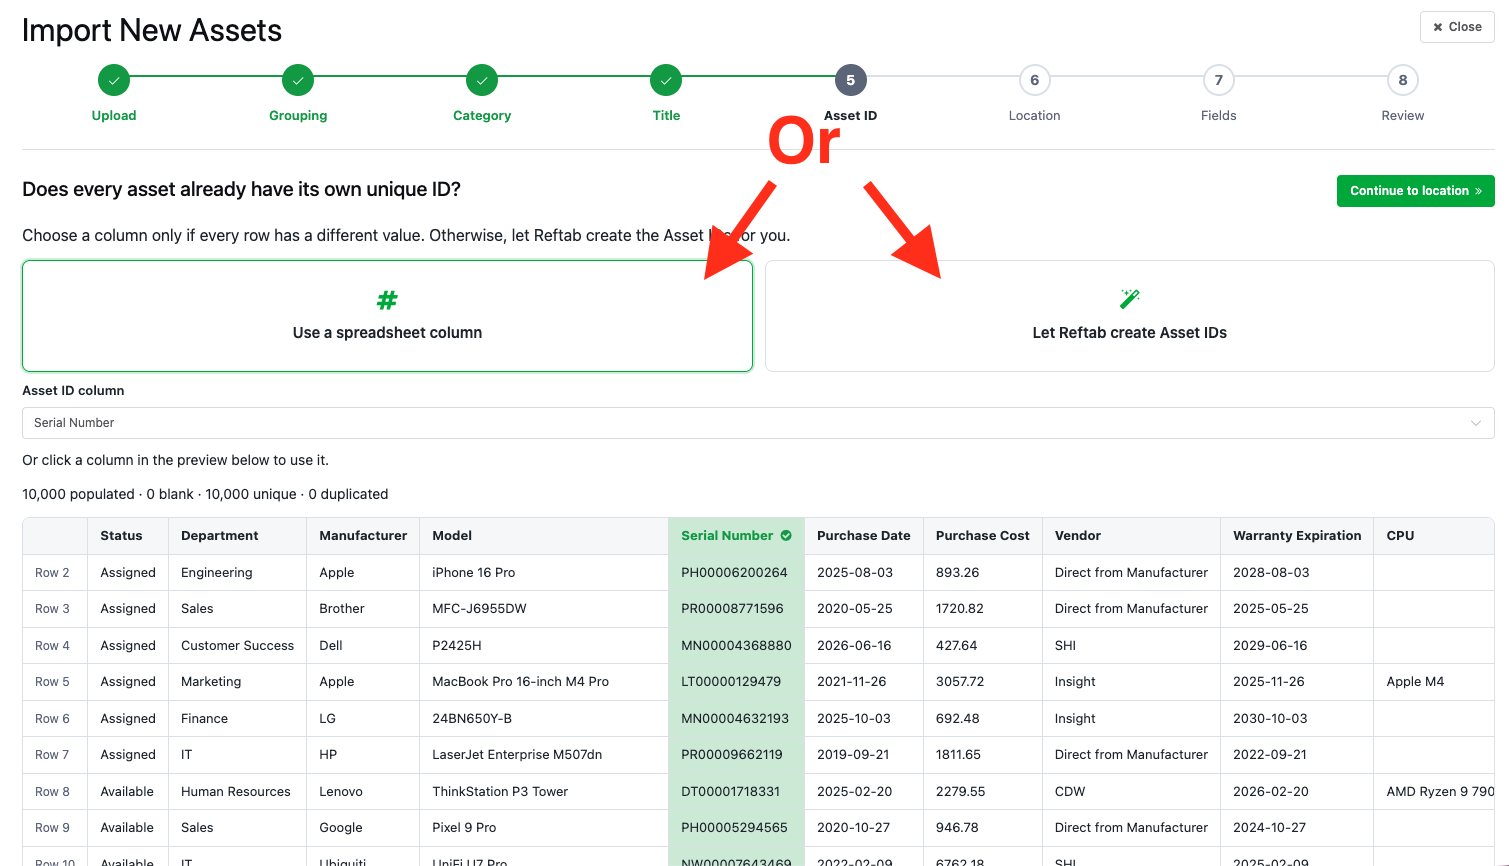
Click the green “Continue to location” button to proceed.
Step 6: Configure locations
You can assign all imported assets to one default location or select a spreadsheet column that contains a location for each asset.
If your spreadsheet contains locations that do not yet exist in Reftab, the multi-category importer will identify them and allow you to create them during the import.
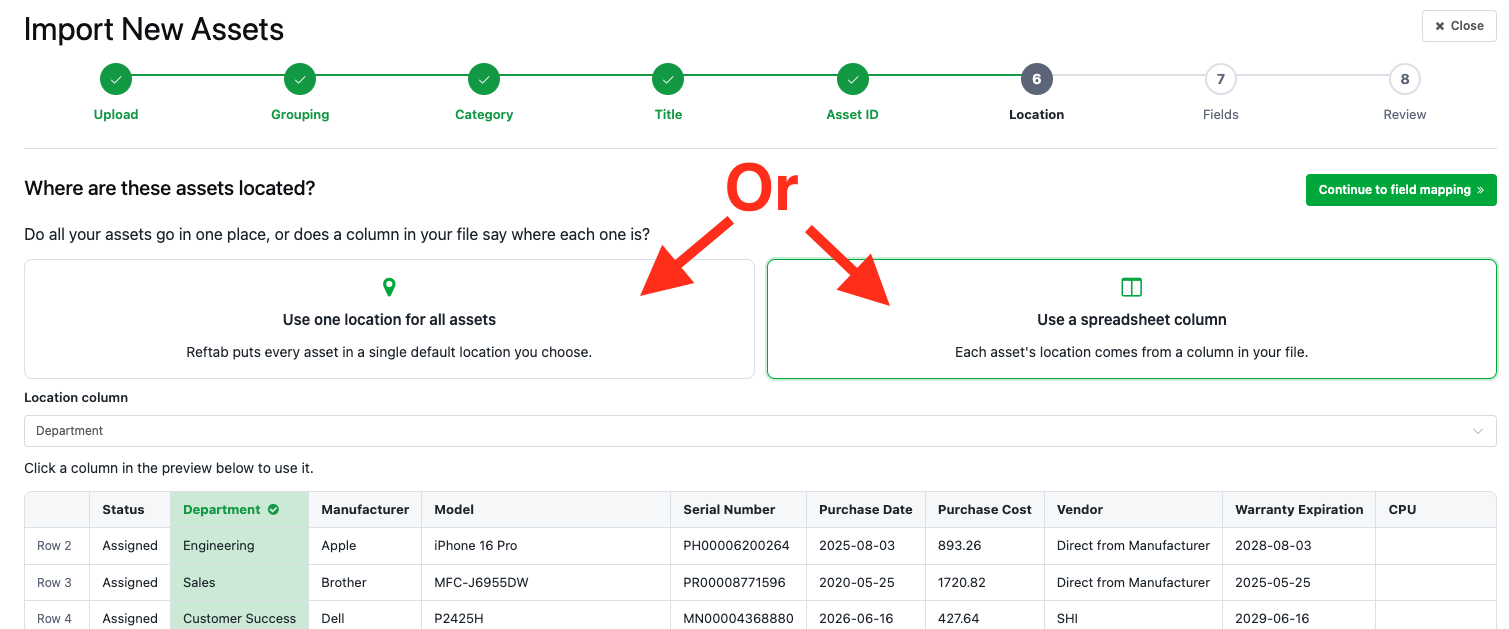
You can review the new locations before they are added to your account. Click “Continue to field mapping” to proceed.
Step 7: Configure fields for each category
Reftab will review the remaining spreadsheet columns and help you configure the fields for each category.
For every column, you can:
- Map it to an existing field.
- Create a new field.
- Skip the column.
For example, in the screenshot below my spreadsheet had a column header for “Status”, “Department”, “CPU” and so forth… do not exist in my Reftab account. They will be created as new fields and saved to my category. If desired, I can change and adjust the field name, field type, etc.
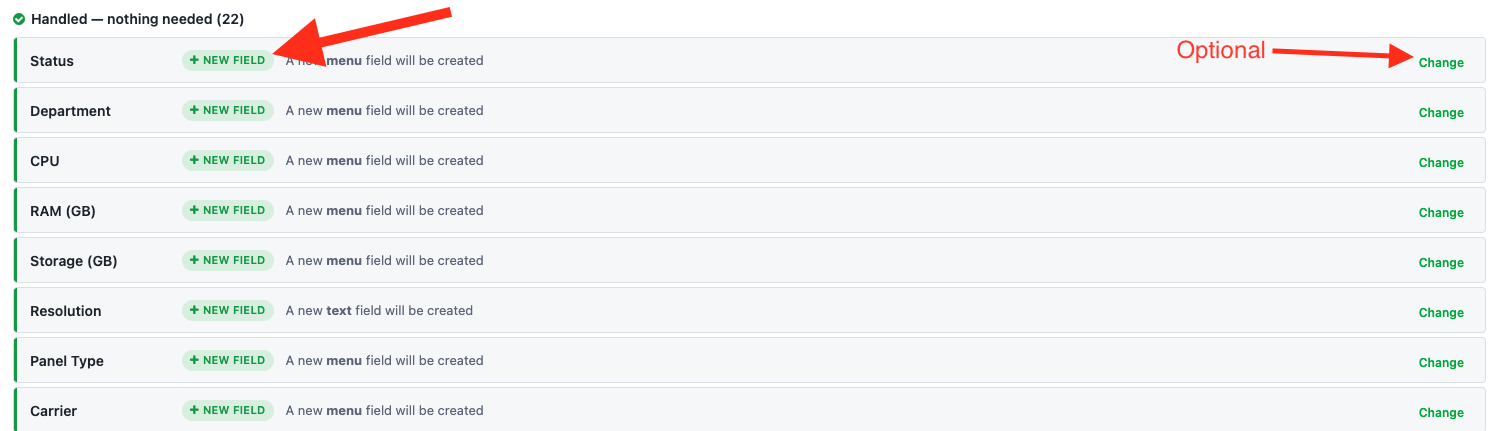
Reftab may also suggest a field type based on the values in the spreadsheet.
For example:
- A column containing dates may be suggested as a Date field.
- A column containing prices may be suggested as a Monetary field.
- A column containing a small number of repeated values may be suggested as a Dropdown field.
If Reftab finds an existing field with a similar name, you can reuse that field instead of creating a duplicate. These will be shown at top under “Needs your attention”. You can click the yellow buttons to use the suggested similar field. A common example of this is where your Reftab account has a field called “Date Purchased” and your spreadsheet column header is called “Purchase Date”. Reftab will suggest you use the existing field instead of creating a new one.
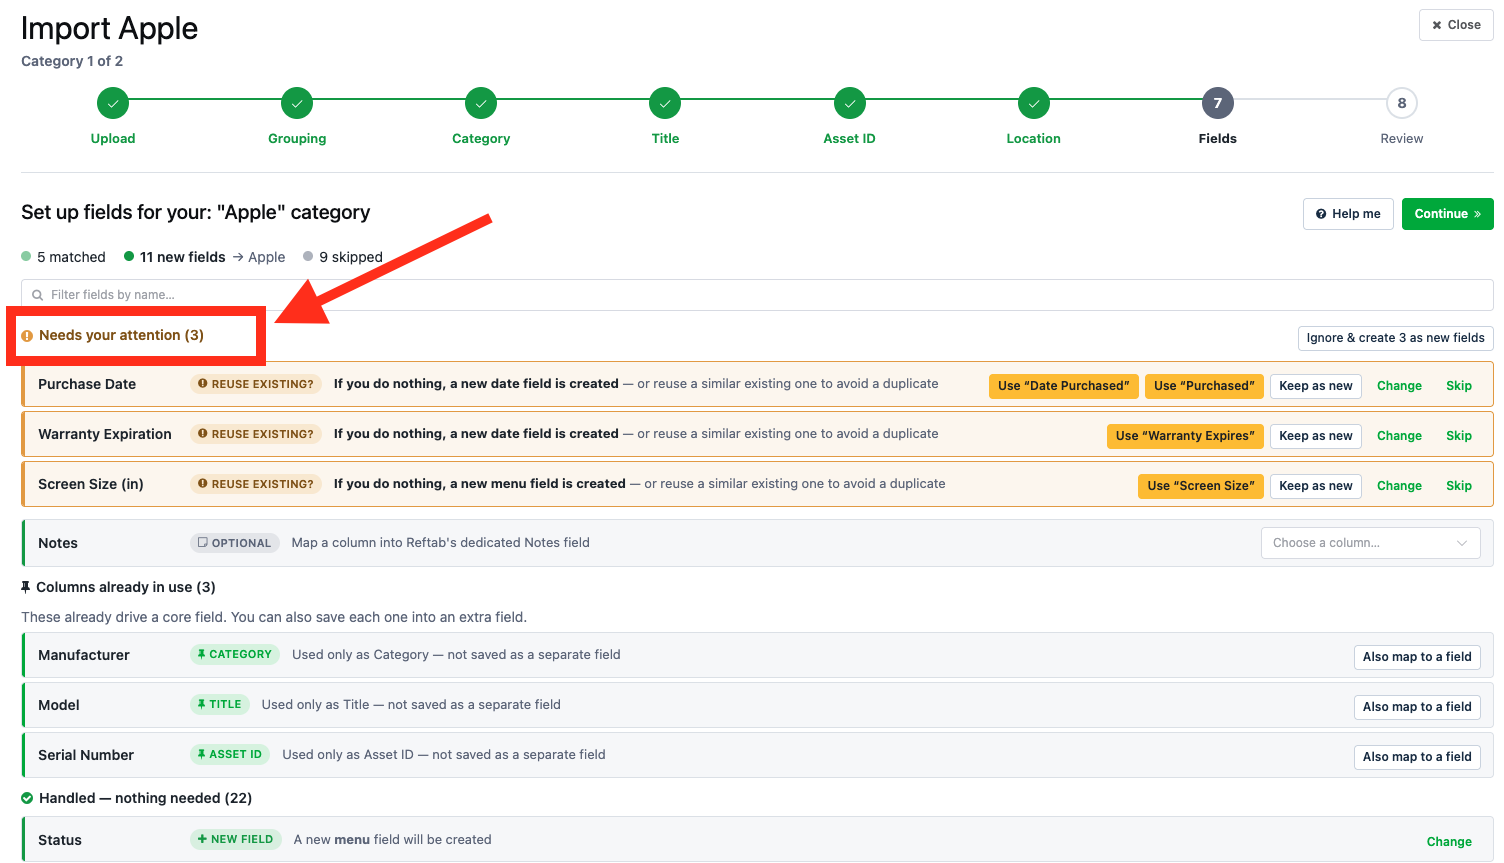
Note that fields can be configured separately for each category as you move through this wizard. A column can be included for one category and skipped for another.
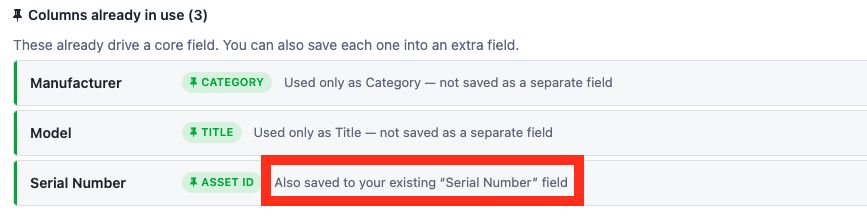
The section for “Columns already in use” allow you to map data that you’re already mapping to a standard Reftab field. For example in the previous steps, “Serial number” was set to use as Asset ID’s. Click, “Also map to a field” so that you can map Serial Numbers to a field on your assets. For example, you may have an existing field called “Serial Number” that you would also want to save this data into.

If you want to also map these fields to a category field like in our Serial Number example, click “Also map to a field”. A drawer will open. Choose to map these values to an existing field, create a new field or skip it from being used in another field.
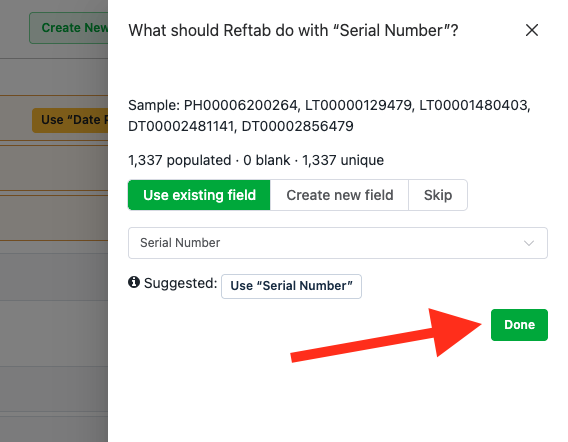
Once you click “Done” – you will see the row updated on the page showing that it will also be saved to your newly selected field.
Review and correct your data
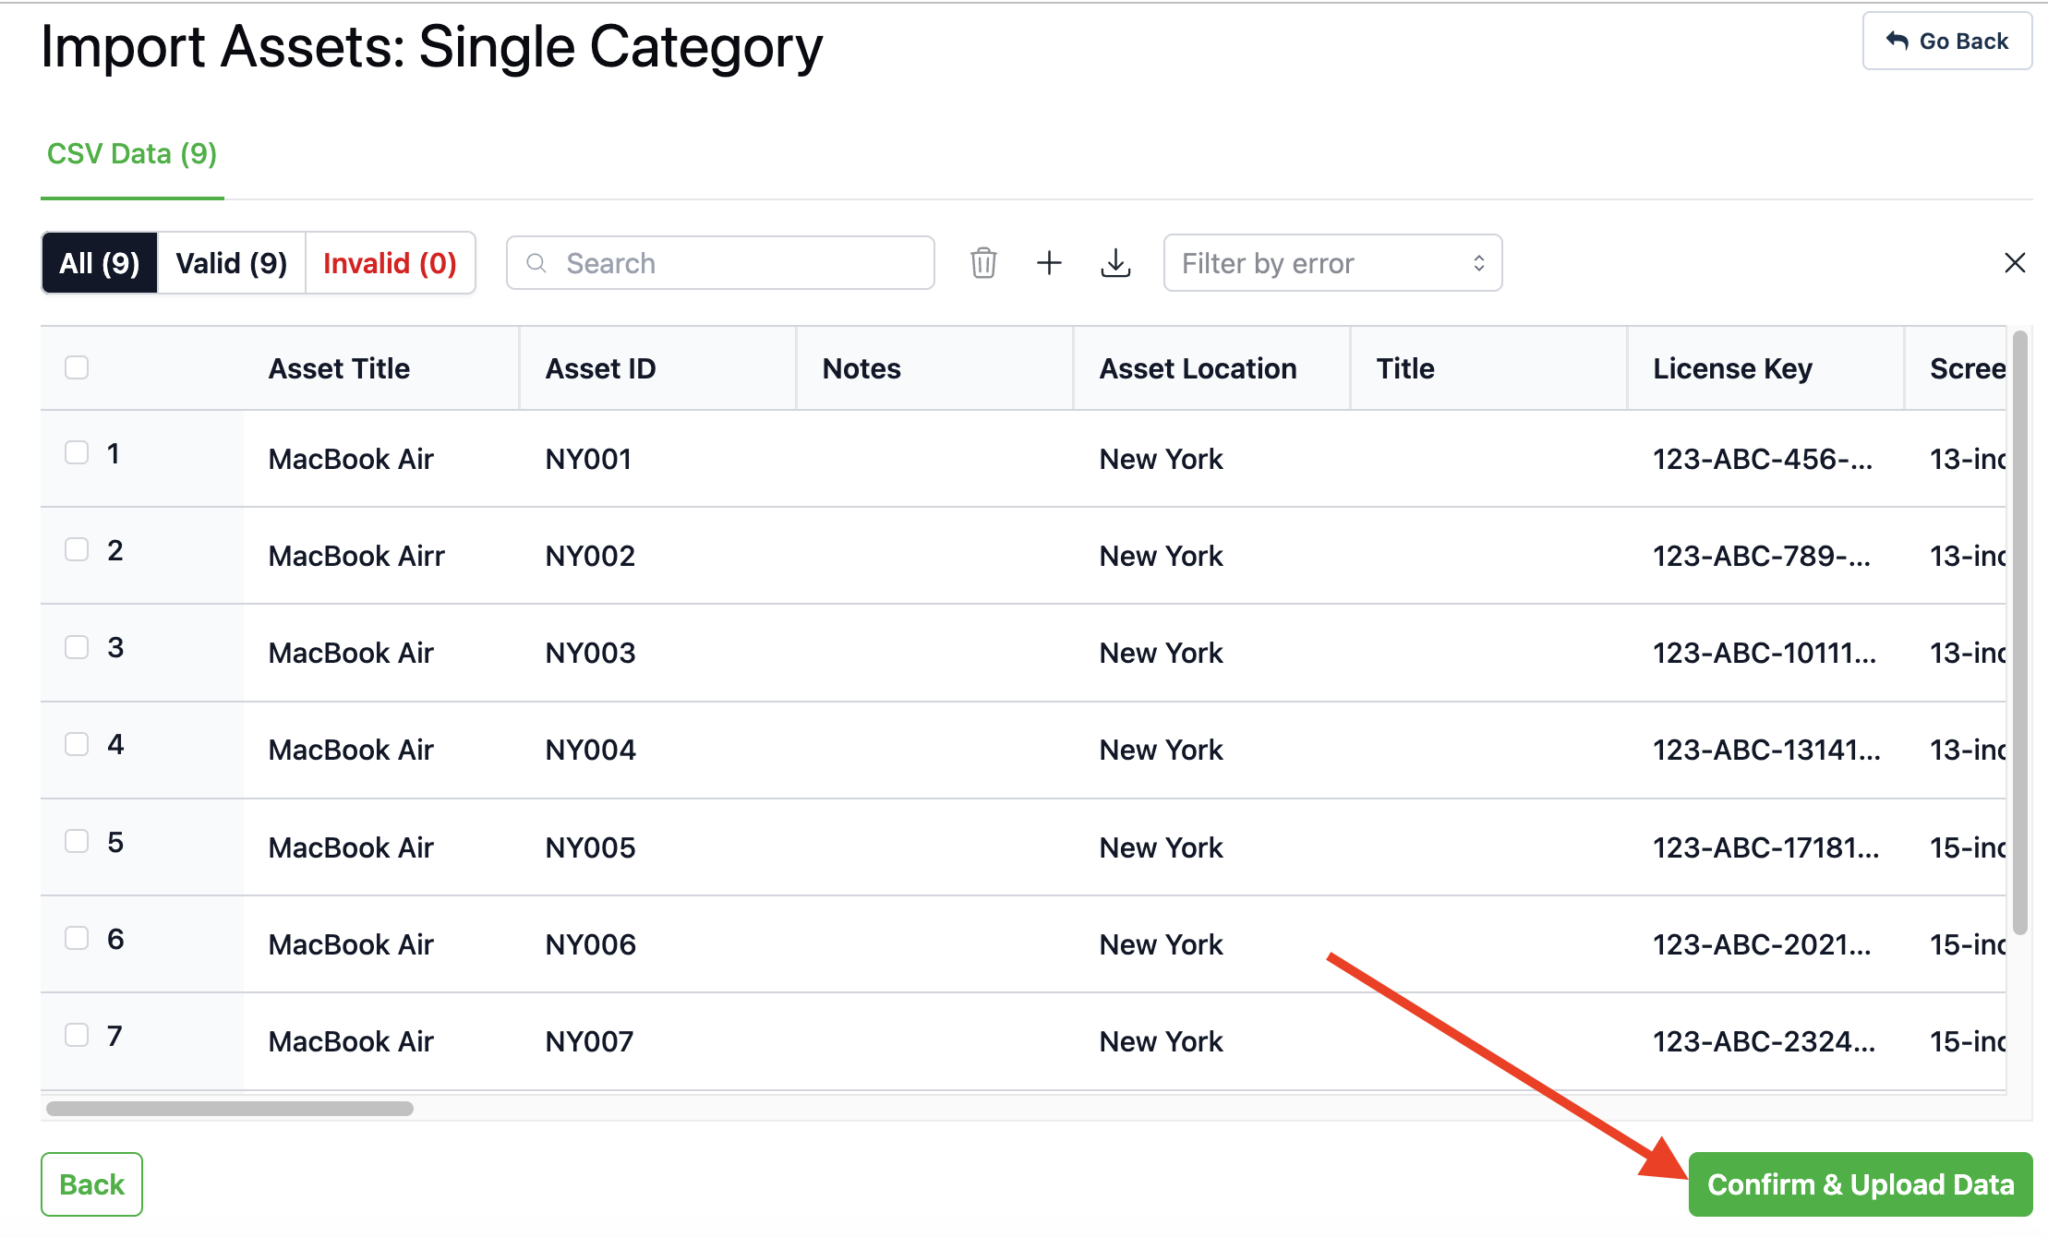
Before completing either type of import, Reftab will display the assets in an editable table.
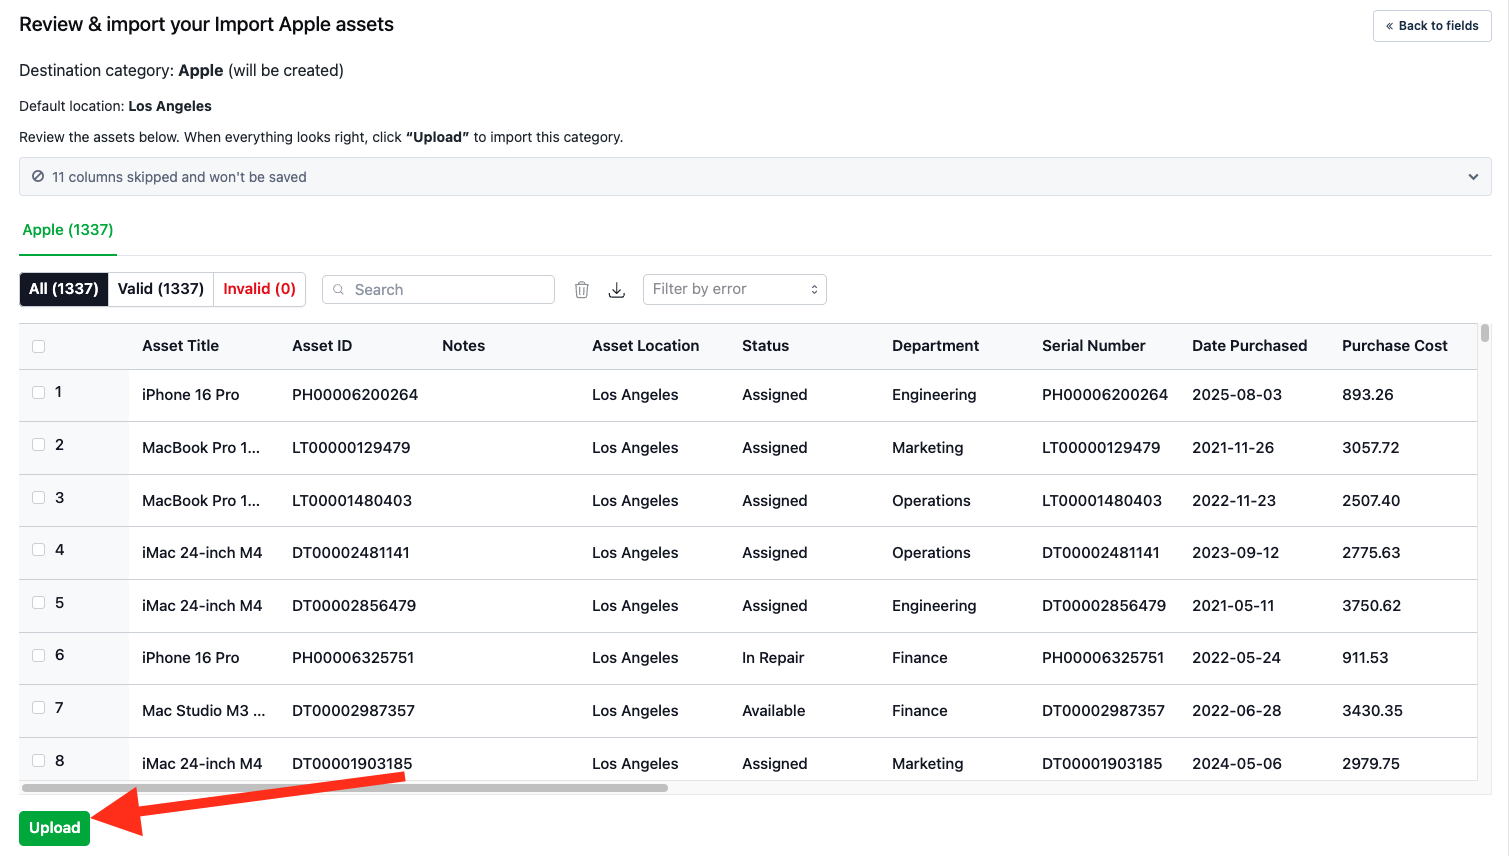
Review the data and correct any issues before uploading it.
You can:
- Edit individual cells.
- Add or remove rows.
- Correct invalid field values.
- Change invalid locations.
- Enter Asset IDs manually.
- Download the current spreadsheet for further review.
If your spreadsheet does not contain an Asset ID column, Reftab can automatically generate Asset IDs during the import.
Complete the import
Once you have reviewed the data and resolved any issues, click: Upload
Reftab will import the assets into the selected or matched categories.
After the import is complete, you can review a summary of the assets, categories, fields, and locations that were created. Any skipped or failed rows can be downloaded so they can be corrected and imported again.
After you import
Next, see our getting started with Reftab guide for what you should do to get your account setup after data has been imported. Otherwise, after your assets are imported, you may also need to:
- Import their current assignments to employees.
- Print and apply asset tags.
- Update existing records in bulk.
- Connect an MDM or other integration.
- Run an initial audit to reconcile Reftab with your physical inventory.
For help, email “Help@reftab.com”
Need help? We're here for you
For any questions or assistance, feel free to reach out to us.
Your assets, simplified. Begin your journey with us!
50 assets free forever with unlimited inventory & software tracking. Includes email alerts, mobile apps, reports, custom asset tags and more.